Table of Contents
Advertisement
OPERATOR'S MANUAL
Liquid Propane Gas
(LPG) Grill
Model BIG-8122C
Grill Information Center:
Call us first if you have any problem with this
product. We can help you with questions about
assembly and grill operation or if there are
damaged or missing parts when you unpack this
unit from the shipping box. Please call before
returning to the store.
1- 800-667-7313
8am-5pm EST, Monday through Friday
IMPORTANT:
Ÿ
NOTE TO ASSEMBLER / INSTALLER:
Leave this manual with the consumer.
Ÿ
NOTE TO CONSUMER:
Keep this manual for future reference.
RECORD YOUR SERIAL # __________________
Ÿ
(see silver ETL label on main body of grill)
FOR YOUR SAFETY
Do not store or use gasoline or other
flammable vapors or liquids in the
vicinity of this or any appliance.
WARNING
!
Before using this gas appliance read
all instructions and perform all gas
leak-check procedures even if the
product was pre-assembled by the
retailer or manufacturer.
Improper installation, adjustment,
alteration, service or maintenance can
cause property damage, injury or death.
Read the installation, operating and
maintenance instructions thoroughly
before installing or servicing this
equipment.
Manual #PK000232019AE- Date:2019 /11
CM
C
US
Intertek
5000733
!
Advertisement
Table of Contents

Related Manuals for Grill Chef BIG-8122C


Summary of Contents for Grill Chef BIG-8122C
-
Page 1: Primary Safety Warnings
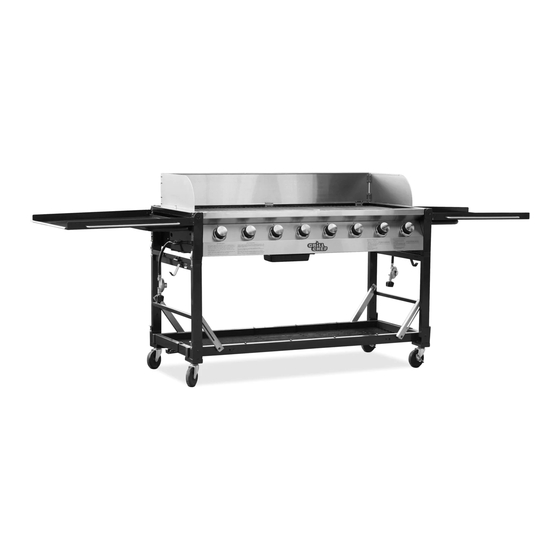
OPERATOR'S MANUAL Intertek Liquid Propane Gas (LPG) Grill 5000733 Model BIG-8122C Grill Information Center: FOR YOUR SAFETY Do not store or use gasoline or other Call us first if you have any problem with this flammable vapors or liquids in the product. -
Page 2: Table Of Contents
Table of Contents DANGER Primary Safety Warnings ......1-3 Warranty Terms and Conditions ....2 IF YOU SMELL GAS: Pre-Assembly Instructions ......3 Shut off gas to the appliance. Part Diagrams and Lists ......4-6 Extinguish any open flame. Assembly Instructions.......7-10 Open lid. -
Page 3: Pre-Assembly Instructions
Pre-Assembly Instructions For Your Safety CAUTION WARNING For safe operation ensure the Gas Valve Assembly Failure to comply with these instructions may Orifice is inside the Burner Tube before using your result in a hazardous situation which, if not grill. See figure. If the Orifice is not inside the Burner avoided, may result in injury. -
Page 4: Part Diagrams And Lists
Hardware Pack Parts List for Model BIG-8122C The following table The following table illustrates a breakdown of the hardware pack. It highlights what parts are used in the various stages of assembly. PART DESCRIPTION QTY PURPOSE OF PART Hardware Pack For use in assembly 1/4"x3/8"... - Page 5 Parts Diagram for Model BIG-8122C...
- Page 6 Parts List for Model BIG-8122C PART DESCRIPTION PART # L id, L e ft P0 0 1 2 70 4 5 D L id, R ig ht P0 0 1 2 80 4 5 D L id H a n d le...
-
Page 7: Assembly Instructions
Assembly Instructions Install Tank Holders and Casters Install Casters to each Cart Leg.(Tighten securely using 16 of 1/4"x1/2" Phillips Head Screws). 1/4"x1/2" Phillips Head Screw QTY. 1 6 Assemble Cart W ith an assistant, lift Cart out of shipping carton and place it on the cardboard work surface. Pull out the cart frame to the highest position,and hand tighten the butterfly nut after pushing down the track bracket. - Page 8 Install Tank Holders and Casters Install Tank Holders to each side of Cart Frame. (Tighten se-curely using 4 of 1/4"x3/8" Phillips Head Screws) Install Casters to each Cart Leg.(Install casters with the wrench provided). 1/4"x3/8" Phillips Head Screw QTY. 4 Casters Installation Code The installation shall be made with a connector (installed on this grill) with the Standard for Connectors for Movable Gas Appliances, ANSI Z21.69-CSA6.16.
- Page 9 Install Grill Bowl W ith an assistant, lift and position Grill Bowl onto the Cart. Lock 4 Latches on Grill Bowl and Cart. Note: Preassembled Grease Tray and Grease Receptacle Lift and slide the Grease Receptacle out from the Grease Tray Bracket, from the rear of the Cart. Unscrew the W ing Bolts on each side of the Grease Tray and remove the Grease Tray from Bottom Bowl panel.
- Page 10 Install Cooking Components ® Place the Savor Plates on lower ledge above Burners. Place Cooking Grids on bowl ledge. Cooking Grids ® Savor Plate Final Grill Assembly Step When you have finished assembling your grill be sure that all screws are tightened for safe operation of your grill.
-
Page 11: Use & Care Instructions
USE AND CARE INSTRUCTIONS Keep fire extinguisher readily accessible. In the CORRECT LP GAS TANK USE event of an oil/grease fire, do not attempt to LP Gas grill models are designed for use with two standard 20 lb. Liquid Propane Gas (LP Gas) tanks, extinguish with water. - Page 12 USE AND CARE INSTRUCTIONS LP Gas Model only: NOTE about LP Gas Tank Exchange Programs Ÿ Many retailers that sell grills offer you the option of Secure two 20lb LP Gas Tanks to Gas Grill replacing your empty LP Gas tank through an exchange Turn your LP Gas Tank Valves clockwise to service.
- Page 13 USE AND CARE INSTRUCTIONS Check all connections for LP Gas Leaks CAUTION: Always open both left and right Lid as shown before lighting your grill. Never test for leaks with a flame. Prior to first use, at the beginning of each season, or every time your LP Gas tank is changed, you must check for gas leaks.
-
Page 14: Lighting Instructions
USE AND CARE INSTRUCTIONS Grill Lighting Instructions NOTE: This gas grill is designed to be used with two If the burner does not light, turn the control knob to 20lb LP Gas tanks (not included) for 8 burner operation. OFF, wait 5 minutes for gas to clear, then retry. A tank placed on the right will operate the four right-side burners. -
Page 15: Troubleshooting
USE AND CARE INSTRUCTIONS To purge air from your gas line and/or reset Troubleshooting the regulator excess gas flow device: If the grill fails to light : Turn Control Knobs to the OFF position. Turn gas off at source and turn Control Knobs to OFF. -
Page 16: Cleaning And Maintenance
Cleaning and Maintenance WARNING! Always wear protection gloves and Remove aluminum foil from Orifices and check each Orifice for obstruction. safety glasses when cleaning your grill Clean Jet-fire ignitor with a soft bristle brush. WARNING! Turn off the gas supply at the source and disconnect the unit before Replace Flame Tamers and the Cooking Grids. - Page 17 CLEANING THE BURNER TUBES AND BURNER PORTS Regardless of which Burner cleaning procedure you Cleaning The Burner Tubes and Burner Ports u s e , we r e c o m m e n d you a l s o c o m p l e t e t h e f o l l o wi n g s t e p s t o h e l p p r o l o n g B u r n e r l i f e .
-
Page 18: Frequently Asked Questions
Frequently Asked Questions WARNING! Always wear protection gloves and Question: Can I convert my grill from LPG to NG? safety glasses when cleaning your grill. Answer: No, your gas grill is manufactured to exact specifications and is certified for Liquid Propane (LPG) o r Na tu r al G as (NG) us e on l y. - Page 19 Frequently Asked Questions CAUTION: Operating your grill on the HIGH setting for longer than five minutes may damage certain parts of your grill. Do Grease Tray, Receptacle and Heat Shield: not leave your grill unattended. To reduce the chance of fire, the Grease Draining Preheating Tray, Grease Receptacle and Heat Shield should be inspected before each grill use.
- Page 20 GRILL CHEF GAS GRILL WARRANTY S.R. Potten Ltd. warrants to the original owner of each Grill Chef Gas Grill that it is free from defects in workmanship and materials under conditions of normal residential use. This limited warranty applies to Grill Chef Gas Grills purchased and located in Canada.
Need help?
Do you have a question about the BIG-8122C and is the answer not in the manual?
Questions and answers