Table of Contents
Advertisement
Available languages
Available languages
Quick Links
Advertisement
Chapters
Table of Contents

Related Manuals for Megasat Shipman


Summary of Contents for Megasat Shipman
- Page 1 Shipman / Shipman GPS Auto Skew Bedienungsanleitung...
-
Page 2: Table Of Contents
Inhaltsverzeichnis 1. Einführung 1.1 Allgemeine Informationen ..................03 1.2 Auspacken ..........................03 1.3 Lieferumfang ........................03 1.4 Systemkomponenten ....................04 2. Installation 2.1 Installation ..........................05 2.2 Klebeanleitung ........................06 2.3 Anschluss der Komponenten ................... 07 2.4 Das Steuergerät ......................... 08 2.5 Wahl des Standortes ....................... -
Page 3: Einführung
Einführung 1.1 Allgemeine Informationen Bitte lesen Sie die Bedienungsanleitung sorgfältig vor Inbetriebnahme des Gerätes. Bei falscher oder unsachgemäßer Handhabung erlischt der Gewährleistungsanspruch. Hinweis: Falls Sie schon ähnliche Produkte installiert haben, muss die Vorge- hensweise mit diesem Produkt nicht zwingend übereinstimmen. Achtung: Die Antenne ist nicht für den Einsatz auf Salzgewässer geeignet, da es zu Korrosion an den Bauteilen der Antenne führen kann. -
Page 4: Systemkomponenten
Antenne und Receiver geschaltet und ver- sorgt die Antenne mit Strom. Hinweis: Der Shipman GPS/AutoSkew besitzt zusätzlich eine Auto Skew Funktion, die den Polarisationswinkel des LNBs automatisch einstellt und einen GPS Emp- fänger für eine exakte und schnelle Positionsbestimmung. DEUTSCH... -
Page 5: Installation
2. Installation 2.1 Installation Grundsätzlich empfehlen wir, den Einbau durch Ihren Fachhändler oder eine Fachwerk- statt vornehmen zu lassen! Achtung: Beachten Sie bitte auch, dass sich durch die Antenne die Fahrzeughöhe ent- sprechend ändert! Bitte halten Sie sich unbedingt an die einzelnen Punkte der Montageanweisung! Allgemeines: Sorgen Sie für einen geeigneten Arbeitsplatz, eine Garage/Halle ist besser als ein Platz im... -
Page 6: Klebeanleitung
2. Installation 5. Rauen Sie die gezeichneten Flächen und Füße mit Schleifpapier (120er Körnung) leicht an und säubern Sie die Fläche erneut mit dem Reiniger (ACHTUNG: Flächen anschließend nicht mehr berühren) und lassen Sie den Reinigen ca. 10 Minuten ablüften. 6. -
Page 7: Anschluss Der Komponenten
2. Installation 2.3 Anschluss der Komponenten Montieren Sie das Steuergerät und den Satelliten Receiver im Fahrzeuginneren nicht im Bereich eines Airbags. Achten Sie auf eine sorgfältige Verlegung der Kabel, um Kurz- schlüsse zu vermeiden. Achten Sie hierbei auch auf schon vorhandene Kabel. Schließen Sie die Antenne wie auf der Abbildung dargestellt an: ( - ) SCHWARZ... -
Page 8: Das Steuergerät
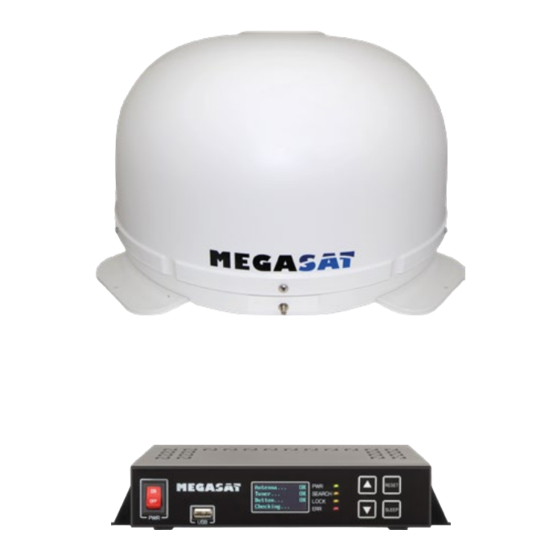
2. Installation 2.4 Das Steuergerät Satellitenauswahl Hauptschalter Display (hoch / runter) Reset USB Anschluss zur LED Anzeigen Tracking Funktion Aktualisierung der Firmware (PWR = Power) (Deaktiviert die (SEARCH = Suche) automatische (LOCK = Signal gefunden) Nachführung (ERR = Fehlfunktion) der Antenne) Anschluss zur Antenne Anschluss... -
Page 9: Wahl Des Standortes
2. Installation 2.5 Wahl des Standortes Direct Broadcast Service (DBS) strahlt Audio, Video und Daten über den Satelliten aus, der sich in 35.000 km Höhe über der Erde befindet. Mit einer Empfangsstation wie die Antenne und einem Satelliten Receiver werden die Signale vom Satelliten empfangen und verar- beitet. -
Page 10: Inbetriebnahme Und Bedienung
2. Installation 2.6 Inbetriebnahme und Bedienung 1. Schalten Sie das Steuergerät am Hauptschalter ein. Die grüne LED-Anzeige (PWR) am Steuergerät leuchtet auf - der Bootvorgang startet. 2. Nach dem Bootvorgang werden die vorinstallierten Satelliten im Display angezeigt. Wählen Sie innerhalb von 2 Sekunden den gewünschten Satelliten mit den Satel- litenauswahltasten (hoch/runter). -
Page 11: Skew Einstellungswerte Für Europäische Hauptstädte
2. Installation 2.7 Skew Einstellungswerte für europäische Hauptstädte Folgende Einstellungen müssen Sie nur beim Shipman (ohne Auto Skew) vornehmen. Signale in vertikaler (rot) und horizontaler (blau) Linie haben einen Versatz von genau 90º zueinander. Durch die unterschiedliche Position der Satelliten, abhängig von Ihrem Standort, ist es möglich, dass die Signale... -
Page 12: Fehlerbehebung
Es gibt Probleme mit dem Mainboard (Hauptplatin des Steuergerätes. Bitte suchen Sie einen Fachhändler zur Überprüfung auf. Satellit wird nicht gefunden (nur beim Shipman ohne Auto Skew) Sollte die Antenne keinen Satelliten finden, überprüfen Sie die Skeweinstellung des Satelliten für ihren Standort. Eine Übersicht der Skew Einstellwerte entnehmen Sie bitte der Tabelle. -
Page 13: Aktualisierung Der Firmware
Von Zeit zu Zeit kommt es vor, dass die Firmware des Steuergerätes aktualisiert werden muss (z. B. bei einer Frequenzänderung des Satellitenbetreibers oder allgemeine Verbes- serung des Steuergerätes). Die aktuelle Firmware finden Sie auf unserer Homepage www.megasat.tv Updatevorgang 1. Kopieren Sie die Firmware-Datei auf einen ge- eigneten USB Stick. -
Page 14: Ausleuchtzone
5. Ausleuchtzone Hinweis: In den Randgebieten der Ausleuchtzone kann es zu Empfangsstörungen kommen. DEUTSCH... - Page 15 6. Montageambessungen 76 cm DEUTSCH...
-
Page 16: Technische Daten
7. Technische Daten Antennen Typ Off-Set-Spiegel Anzahl der Teilnehmer LNB Typ Universal LNB Frequenzband Ku Band Frequenzbereich 10.7 GHz bis 12.75 GHz LNB Verstärkung 33 dBi Empfangsleistung 49 dBW Polarisation Vertikal / Horizontal Motorsteuerung 2-Achsen DC Motor Neigungswinkel 15° bis 62° Suchwinkel 360°... - Page 17 Konformitätsinformation Hiermit erklärt die Firma Megasat Werke GmbH, dass sich folgendes Gerät in Überein- stimmung mit den grundlegenden Anforderungen und den übrigen einschlägigen Be- stimmungen der Richtlinie 2014/30/EU befindet: Megasat Shipman (Artikel-Nr. 1500051) Megasat Shipman GPS / Auto Skew (Artikel-Nr. 1500055) Die Konformitätserklärung zu diesen Produkten liegt der Firma vor:...
- Page 18 Version: 3.4 (November 2017) // Technische Änderungen, Druckfehler und Irrtümer vorbehalten. Megasat Werke GmbH | Industriestraße 4a | D-97618 Niederlauer | www.megasat.tv | info@megasat.tv...
- Page 19 Shipman / Shipman GPS Auto Skew User manual...
- Page 20 Content 1. Introduction 1.1 General Information ....................... 03 1.2 Unpacking..........................03 1.3 Delivery ........................... 03 1.4 System Components...................... 04 2. Installation 2.1 Installation ..........................05 2.2 Gluing instructions ......................06 2.3 Connecting the components ................... 07 2.4 The Control unit......................... 08 2.5 Selecting the location ....................
-
Page 21: Introduction
1. Introduction 1.1 General Information Please read the manual thoroughly before operating the equipment. In case of incorrect or improper handling of the warranty becomes void. Note: If you have already installed similar products, the procedure does not necessarily coincide with this product. Warning: The antenna is not suitable for use in salt water, as it may cause cor- rosion on the components of the antenna. - Page 22 Note: The Shipman GPS/AutoSkew additionally has a Auto skew function that au- tomatically adjusts the angle of polarization of the LNB and a GPS receiver for fast and accurate positioning.
-
Page 23: General Information
2. Installation 2.1 Installation Basically, we recommend that you leave the installation to make by your dealer or work- shop! Warning: Please also note that the antenna height of the vehicle will change accordingly! Please strictly adhere to the various points in the installation instructions! General information: Sorgen Sie für einen geeigneten Arbeitsplatz, eine Garage/Halle ist besser als ein Platz im Freien. -
Page 24: Gluing Instructions
2. Installation 5. Roughen the drawn areas and feet with sandpaper (120 grit) to easily and thoroughly clean the surface again with Cleaner (WARNING: then no longer touch areas) and let the clean dry for about 10 minutes. 6. Unless you have a way to run the cable through an existing roof outlet, look for a suitable place (best in the wind shadow behind the antenna) on the roof for the in- stallation of a roof outlet to avoid the ingress of moisture (eg rain or splash water) in the wellbore. -
Page 25: Connecting The Components
2. Installation 2.3 Connecting the components Install the control unit and the set-top box is not inside the vehicle in the region of an airbag. Maintain a careful installation of the cable in order to avoid short circuits. Pay attention also to existing cables. Connect the antenna as shown in the illustration below: ( - ) SCHWARZ... -
Page 26: The Control Unit
2. Installation 2.4 The control unit Satellite selection Main power Display (up / down) Reset USB connection for LED displays Tracking function Firmware Update (PWR = Power) (Disables automatic (SEARCH = Searc) tracking of the (LOCK = Signal detected) antenna) (ERR = Error) Connection for antenna... -
Page 27: Selecting The Location
2. Installation 2.5 Selecting the location Direct Broadcast Service (DBS) satellites broadcast audio, video and data information from satellites located 22.000 miles in space. A receiving station, such as the antenna, should include a dish and satellite receiver to receive the signals and process them for use by the consumer audio and video equipment. -
Page 28: Startup And Operation
2. Installation 2.6 Startup and operation 1. Turn on the control unit at the main switch. The green LED (PWR) on the control unit lights up - the boot process starts. 2. After booting the pre-installed satellites are displayed. Choose within 2 seconds the desired satellite with the satellite selection buttons (up / down). -
Page 29: Skew Setting Values For European Capitals
2. Installation 2.7 Skew setting values for European capitals The following settings are only for the Shipman (without AutoSkew). Signals in the vertical (red) and horizontal (blue) line have an offset of exactly 90° to each other. Due to the... -
Page 30: Troubleshooting
There are problems with the mainboard of the control unit. Please contact a dealer for inspection. Satellite can‘t be found (only for Shipman without Auto Skew) If the antenna has not found satellites, check the Skew settings for the satellite at your location. -
Page 31: Firmware Update
From time to time it happens that the firmware of the controller needs to be updated (eg. change a frequency of the satellite operator or general improvement of the control unit). You can find the latest firmware from our homepage www.megasat.tv Update procedure 1. -
Page 32: Footprint
5. Footprint Note: In the outlying areas of the footprint there may be interference. ENGLISH... -
Page 33: Mounting Dimensions
6. Mounting dimensions 76 cm ENGLISH... -
Page 34: Specifications
7. Specifications Antenna type Off-Set-dish User LNB type Universal LNB Frequency band Ku Band Frequency range 10.7 GHz to 12.75 GHz LNB gain 33 dBi Received power 49 dBW Polarization Vertical / Horizontal Motor control 2-Axis DC Motor Elevation 15° to 62° Azimuth 360°... - Page 35 Conformity information Hereby declare the company Megasat Werke GmbH that the following devices is in compliance with the essential requirements and other relevant provisions of Directive Council 2014/30/EU: Megasat Shipman (Article-No. 1500051) Megasat Shipman GPS / Auto Skew (Article-No. 1500055) The Declaration of Conformity for these products is located at the company: Megasat Werke GmbH, Industriestraße 4a, D-97618 Niederlauer...
- Page 36 Version: 3.4 (November 2017) // Technical changes, misprints and errors reserved. Megasat Werke GmbH | Industriestraße 4a | D-97618 Niederlauer | www.megasat.tv | info@megasat.tv...
- Page 37 Shipman / Shipman GPS Auto Skew Mode d’emploi...
- Page 38 Sommaire 1. Introduction 1.1 Informations générales ....................03 1.2 Déballage ..........................03 1.3 Volume de livraison ......................03 1.4 Composants de système ..................... 04 2. Installation 2.1 Installation ..........................05 2.2 Instruction de collage ....................06 2.3 Schéma de raccordement ..................07 2.4 L’appareil de commande .....................
-
Page 39: Introduction
1. Introduction 1.1 Informations générales S‘il vous plaît lire attentivement le manuel avant d‘utiliser l‘appareil. Une manipulation incorrecte ou inappropriée de la garantie expire. Attention - Une mauvaise manipulation peut endommager cet appareil gra- vement. Cette personne peut également être tenu responsable pour autres dégâts qui sont le résultat de cette mauvaise manipulation. -
Page 40: Composants De Système
électricité. Après l’orientation de l’antenne vous pouvez éteindre l’appareil. Remarque: Le Shipman GPS/AutoSkew possède en outre une fonction Auto Skew, qui règle l’angle de polarisation du LNB automatiquement, et un raccordement supplémentaire pour un deuxième récepteur. FRANÇAIS... -
Page 41: Installation
2. Installation 2.1 Installation En principe, nous recommandons un montage par votre revendeur ou par un atelier spécialisé! Attention: Veuillez prendre en considération que l’antenne change la hau- teur du véhicule. Veuillez observer absolument les points de l’instruction de montage! En général: Veuillez assurer un lieu de travail approprié, une garage/salle est meilleure comme un lieu en plein air. -
Page 42: Instruction De Collage
2. Installation 5. Meulez faiblement la surface marquée avec un papier émeri (grain de 120) et netto- yez de nouveau la surface avec le nettoyant (ATTENTION: ensuite, ne touchez plus la surface). Laissez aérer le nettoyant pour env. 10 minutes. 6. -
Page 43: Schéma De Raccordement
2. Installation 2.3 Schéma de raccordement Ne montez pas l’appareil de commande et le récepteur satellite dans la zone d’un airbag dans l’intérieur de votre véhicule. Faites attention à la pose correcte des câbles afin d’évi- ter des court-circuits. Veuillez faire également attention s’il y a déjà des câbles raccordés. Raccordez l’antenne comme montré... -
Page 44: L'appareil De Commande
2. Installation 2.4 L’appareil de commande Interrupteur Sélcetion d’un satellite principal Ecran (haut / bas) Confirmer Port USB pour la mise Afficher la DEL Position de base à jour du firmware (PWR = Power) (aucune fonction) (SEARCH = Recherche) (STOW = Aucune fonction) (ERR = Erreur de fonctionnement) Raccordement pour l‘antenne... -
Page 45: Diffusion Par Satellite
2. Installation 2.5 Diffusion par satellite Direct Broadcast Service (DBS) diffuse des fichiers audio, vidéos et données par satellite qui se trouve 35.000 km au-dessus de la terre. Les signaux du satellite sont reçus et traités par un poste récepteur comme l’antenne et un récepteur satellite. Le système demande une vue nette du satellite pour profiter au maximum de la réception des signaux. -
Page 46: Mise En Service Et Commande
2. Installation 2.6 Mise en service et commande 1. Allumez l’appareil de commande avec l’interrupteur principal. Puis, l’indicateur à DEL vert (PWR) de l’appareil de commande est allumé – le démarrage commence. 2. Après le démarrage les satellites préinstallés sont affichés sur l’écran. Sélectionnez dans les 2 secondes le satellite désiré... -
Page 47: Valeurs De Réglage Skew Pour Les Capitals Européennes
2.7 Valeurs de réglage Skew pour les capitals européennes Les réglages suivants doivent seulement être ef- fectués concernant le Shipman (sans auto Skew). Les signaux sur la ligne verticale (rouge) et horizontale (bleu) ont un déport d’exact 90° entre eux. En raison des positions différentes des satellites, dépendant de... -
Page 48: Dépannage
Il y a des problèmes avec la carte mère (carte mère de l’appareil de commande). Veuillez contacter votre revendeur pour une vérification. Satellite n’est pas trouvé (seulement Shipman sans Auto Skew) Si l’antenne ne trouve pas un satellite, vérifiez le réglage Skew du satellite pour votre emplacement. -
Page 49: Actualisation Du Firmware
De temps en temps le firmware de l’appareil de commande doit être actualisé (p. ex. concernant un changement de fréquence de l’opérateur satellitaire ou une amélioration générale de l’appareil de commande). Vous trouvez le firmware actuel sur notre site Internet www.megasat.tv Actualisation 1. Copiez le fichier de firmware sur une clé USB. -
Page 50: Zone De Couverture
5. Zone de couverture Zone de couverture Remarque: Dans les zones périphériques de la zone de couverture, des perturbations de la réception peuvent se produire. FRANÇAIS... -
Page 51: Dimensions De Montage
6. Dimensions de montage 76 cm FRANÇAIS... -
Page 52: Spécifications Techniques
7. Spécifications techniques Type d’antenne Antenne Offset Nombre de participants Typ de LNB Universal LNB Bande de fréquence bande Ku Gamme de fréquence 10.7 GHz - 12.75 GHz Amplification du LNB 33 dBi Puissance de réception 49 dBW Polarisation Vertical / Horizontal Moteur Moteur à... - Page 53 Extrait de la déclaration de conformité Par la présente, l’entreprise Megasat Werke GmbH déclare que l’appareil suivant est en conformité avec les exigences essentielles et les dispositions pertinentes de la directive 2014/30/EU: Megasat Shipman (Numéro d’article: 1500051) Megasat Shipman GPS / Auto Skew (Numéro d’article: 1500055) La déclaration de conformité...
- Page 54 Version: 3.4 (Novembre 2017) // Sous réserve de modifications techniques, de fautes d’impression et d’ e rreurs. Megasat Werke GmbH | Industriestraße 4a | D-97618 Niederlauer | www.megasat.tv | info@megasat.tv...
Need help?
Do you have a question about the Shipman and is the answer not in the manual?
Questions and answers