Advertisement
Quick Links
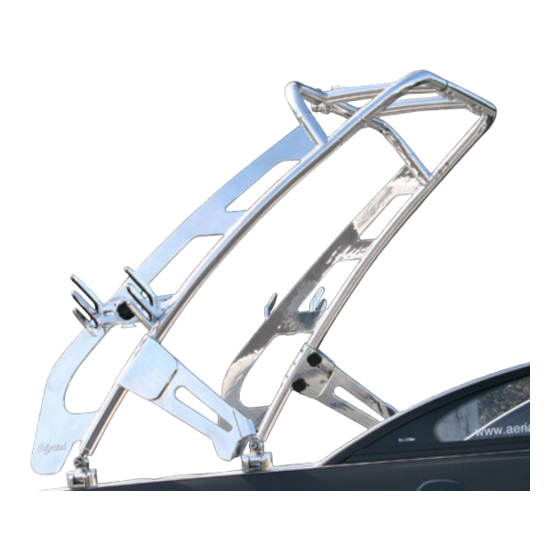
Installation Guide for FreeRide Wakeboard Tower:
All Aerial Wakeboard Towers have been carefully designed to allow anyone with average do-it-yourself
skills and access to a set of common tools to complete the installation with no problem in just a few
hours. There a just a few important but simple technical tips you'll want to use. Well over 90% of our
customers have installed the towers and accessories themselves and have reported back that it all went
very well.
Properly installed, the FreeRide tower is one of the strongest aftermarket wakeboard towers on the
market. It can absolutely go toe-to-toe with a factor made OEM tower.
Remember, if you get stuck, you can call our support team at (949) 407-5009 Monday through Friday
9am to 5pm Pacific time. We'll be happy to walk you though. Remember to scroll all the way to the
bottom of the page for a list of extra tips and reminders before getting started. You can do this!
Your FreeRide Wakeboarding Tower is designed for years of enjoyment. Please read through these
instructions before beginning installation.
Important Tower information
Advertisement

Related Manuals for Aerial FreeRide


Summary of Contents for Aerial FreeRide
- Page 1 Properly installed, the FreeRide tower is one of the strongest aftermarket wakeboard towers on the market. It can absolutely go toe-to-toe with a factor made OEM tower.
-
Page 2: Important Warning
The FreeRide tower fits boat with beam width of 75-100 inches. This measurement is taken from • the mounting points, so the side to side must be greater than 75 inches in the front and back. Do not fold the tower without having the top section bolted •... - Page 3 • CONSULT user manual for proper installation, maintenance and usage • AERIAL WAKEBOARDING is not liable for personal injury or property damage from the use of this • product. Determine placement of tower. This tower fits 75-100 inch wide hulls.
- Page 4 TUBE TRIMMING Where a narrow fit is required the side section tubes may require trimming. Use a hacksaw to trim each tube and then deburr the edges with a file.
- Page 5 Tower can be mounted as a top or side mount-see hull mounting section...
- Page 6 Detail of how base installation on hull...
- Page 7 Tower dimensions.
- Page 8 Exploded view.
- Page 9 Start by carefully opening the plastic bags and inspecting all items. It is best to do so on a moving blanket or a soft surface. If you discover any defects (defined as marks more than 1 inch long), please contact Aerial Wakeboarding immediately BEFORE installation. Note that wakeboarding towers are handcrafted metal products.
- Page 10 Installation Checklist: Blue 3M tape • Drill (capable of accepting bits up to 1/2 inch) • File • Drill bit set ranging from 1/4 - 5/8 inches • Ratchet set • A Permanent Marker • A buddy to help out •...
- Page 11 Tape off all the areas that may potentially come into contact with the side rails...
- Page 12 Arrange upper arms so you can identify items #20, 26, 19 and 27.
- Page 13 4. This will help slide into the H-section #25 H-Section (#25) 1. Be sure to check the H-section for any burr or defects prior to inserting the upper arms Aerial is not liable for burr’s 2. The clear Milar should be wrapped around the tube before you insert it into the H-section, once your tower has been installed you will remove it.
- Page 14 Placement/Folding 1. Tower folding is always a 2 person job 2. Placement is key. Remember this tower folds forward. 3. Start by loosing the quick knobs on the main clamp. 4. Remove the shoulder bolt from the Heim joint and tower foot. Repeat for the other side. Swing the from supports into the boat, and the tighten down the quick knobs.
- Page 15 2. If you have an over head garage or tree you might be able to use it to take up the weight. 3. This will help determine where the tower will fit on you boat. Remember to check the under side prior to drill for wires, also make sure you have access to that area.
- Page 16 Remove just enough blue tape for your tower feet to snugged up to your boat. Aerial sells a backing plate kit with instructions, it will add 20 minutes to the install and is cheap insurance.
- Page 17 Bolting the Feet to the Deck 1. Use part number 11 with lock tite 2. Make sure you have chamfered the edge before inserting the foot to the deck. ( if you do not, you will get gel coat cracking) 3.
- Page 18 Forward Support 1. 1Start by assembling parts- 7,8,9,10,15,16,17 2. Snap #3 on to the main frame 3. At our shop we have an over head lift, we used this to hold the tower in the “up position” 4. Put #1 and #7 together with part #14 5.
- Page 19 See illustration for side assembly. Front Tower Foot 1. This step will be the same as the rear Once you have marked your 4 holes, check the underside for wires. 2. If necessary, you should move the wires out ofthe way while you drill. We recommend drilling a small pilot hole which will keep the 5/8”...
- Page 20 Drilling the Top Section 1. Once the tower is “up” mark the hole and drill them with a 3/8 drill bit 2. The FreeRide tower has parts # 24 which is the integrated nut. 3. Part #23 is the integrated speaker clamp.
- Page 21 Second is to use a vacuum and suck a light piece of string or rope through. Then tape the wires to either the fish or the rope. The Aerial wiring harness comes with a deck fitting for the wiring to pass through. Tower Light As of January 1st 2010 all towers must have a 360 navigation light at the tallest point, in this case we have integrated an USCG 2 mile certified light.
- Page 22 wrenches with the correctly sized bits. Only have old worn out drill bits? Add new ones to the list. Did you do a full recharge on your power drill? Have enough painter's tape? Maybe have some 3M 5200 Marine Adhesive ready just in case. Have a tube of Loctite? On the day of your install, it really helps to layout all the parts and hardware on a an old blanket that has some thickness for padding.
- Page 23 Most customer can use their old bimini no problem. Many, opt to upgrade to an Aerial Tower Bimini. If you absolutely want to keep your folding bimini, we can't give you a guarantee but you may have options that could give you enough extra width or height to allow your bimini to clear the tower frame.
Need help?
Do you have a question about the FreeRide and is the answer not in the manual?
Questions and answers