
Related Manuals for Dynatone DPR-1650


Summary of Contents for Dynatone DPR-1650
- Page 1 OWNER'S MANUAL High Performance Digital Piano DPR-1650 N e w f e e l , n e w l o o k a n d n e w s o u n d...
- Page 3 Precaution INSTRUCTIONS PERTAINING TO A RISK OF FIRE, ELECTRIC SHOCK, OR INJURY TO PERSONS. WARNING : TO REDUCE THE RISK OF FIRE OR ELECTRIC SHOCK, DO NOT EXPOSE THIS APPLIANCE TO RAIN OR MOISTURE. CAUTION RISK OF ELECTRIC SHOCK CAUTION TO REDUCE THE RISK OF ELECTRIC SHOCK DO NOT REMOVE COVER (OR BACK) NO USER SERVICEABLE PARTS INSIDE...
-
Page 4: Precautions
Precautions PLEASE READ CAREFULLY BEFORE PROCEEDING Please keep these precautions in a safe place for future reference. WARNING Always follow the basic precautions listed below to avoid the possibility of serious injury or even death from electrical shock, short-circuiting, damages, fire or other hazards. These precautions include, but are not limited to, the following: ㆍ... - Page 5 Precautions ㆍBefore moving the piano, remove all connected immediately turn off the power and remove electric plug from outlet and inspect by cables qualified service personnel. ㆍWhen cleaning the piano, use a soft, dry cloth. ㆍDo not place the piano against a wall (allow at Do not use paint thinners, solvent, cleaning least 3 cm/one inch from the wall), since this can fluids or chemical-impregnated wiping cloths.
-
Page 6: Table Of Contents
Contents Contents 목 Precautions Contents Unpacking Setting Up Your Piano Controls and Terminals Adjusting the Volume Demo Music Selecting Voices GM Voice Reverb Effect Touch Split Layer Using the Metronome SETUP (Master Tune, Transpose) SETUP (Octave, Local Control, Metronome Beat) Auto Accompaniment Recording General MIDI Voice &... -
Page 7: Unpacking
Unpacking Unpacking Carefully remove the Digital Piano and its accessories from the packing box. The Digital Piano set consists of the following items. [[PIANO BOX] Piano Body Rear Plate (d) [STAND BOX] Pedal Box (c) Right, Left Legs (a, b) Six bolts Two screws Four Self-Tapping screws... -
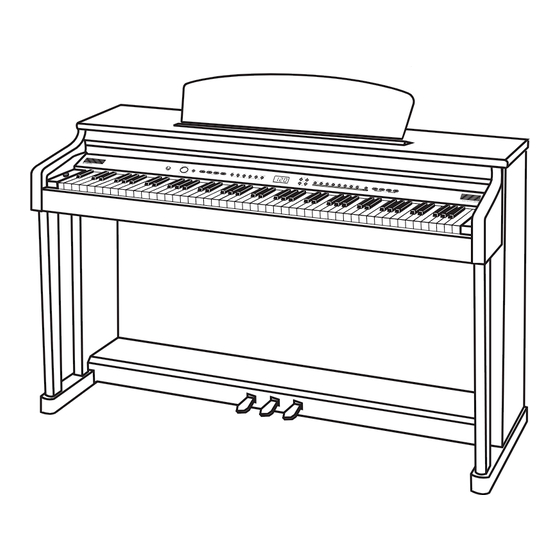
Page 8: Setting Up Your Piano
Setting Up Your Piano Setting Up Your Piano The piano is composed with the piano body and stand and assemble the piano as following steps. 1. Attaching the both legs and pedal box assembly Securely attach both Legs(a,b) to the Pedal box(c) assembly using four Bolts(h) Before assembling pedal box, untie the pedal cable in the pedal box. - Page 9 Setting Up Your Piano 3. Attaching the main unit and stand Set the stand upright and gently lower the main unit on the stand. Attach the main unit to the stand using the six bolts (e) and four bolts(j) as shown in the illustration.
-
Page 10: Controls And Terminals
Controls and Terminals Controls and Terminals POWER Connect the AC Power Adapter. Insert DC plug at the end of DC cord of the AC adapter into the piano and AC plug at end of the AC adapter into a standard AC power outlet. ☞... - Page 11 Controls and Terminals CONNECTING TO AUDIO DEVICE LINE IN Connect the output jack (LINE OUT etc.) of an external synthesizer or the tone generator module and the instrument's LINE IN jack using appropriate stereo audio cable. The stereo outputs from another instrument can be connected to this jack, allowing the sound of an external instrument to be reproduced via the instrument's speakers.
- Page 12 Controls and Terminals CONTROL PANEL ① ⓖ ⑩ ⑪ ⑫ ⑬ ③ ④ ⑤ ⑥ ⑦ ⑧ ⓐ ⓑ ⓒ ⓓ ⓔ VOICE SECTION RHYTHM SECTION ① MASTER VOLUME ⑨ RHYTHM buttons Page 12 Page 21 ② VOICE buttons ⑩ ACCOMP Page 14 Page 23 ③...
- Page 13 Controls and Terminals ⓕ ② ⓗ ⓘ ⓙ ⓚ ⑨ ⑭ FUNCTION SECTION PLAYER SECTION ⓐ MASTER TUNE ⓖ DEMO Page 19 Page 13 ⓑ TRANSPOSE ⓗ PLAY Page 19 Page 13, 26 ⓒ OCTAVE ⓘ TRACK1 Page 20 Page 26 ⓓ...
-
Page 14: Adjusting The Volume
Adjusting the Volume Adjusting the Volume The piano has one volume knob on the panel for adjusting the volume. MASTER VOLUME This determines the entire volume of the piano. ☞ This also determines the volume level of the HEADPHONE(s). ADJUSTING PART VOLUME The part volume of accompaniment, split, layer, demo, metronome, reverb and effect independently can be adjusted Press and hold down the desired part button and adjust the selected volume by pressing the DATA... -
Page 15: Demo Music
Demo Music Demo Music There are 8 demo music in the piano. ⓐ Go to the demo mode. Press the DEMO button. The demo button lights and all voice buttons flashes. The display shows 'SEL' ⓑ Start playback of the desired music. Press one of voice buttons. -
Page 16: Selecting Voices
Selecting Voices Selecting Voices The piano features a wealth of rich, authentic voices, including piano, strings and brass instruments. It also features a keyboard percussion function that lets you play realistic drum, percussion sounds, and various effect sounds directly from keyboard. Voice Types ☞... -
Page 17: Gm Voice
GM Voice / Reverb GM Voice There are 128 different voices in the piano. When the GM VOICE button is selected, one of 128 GM voices can be assigned. CHANGING GM VOICE BY DATA BUTTONS. ⓐ Press the GM VOICE button. The Pop-up display shows you the current selected voice number. -
Page 18: Effect
Effect /Touch Effect This control adds richness to the sound. There are 13 different Chorus types. EFFECT ON/OFF To turn on effect, press the EFFECT button. The lamp lights and effect is set ON. (default off) To turn off effect, press the EFFECT button again. The lamp turns off and effect is no longer active. SELECTING EFFECT TYPE Press the EFFECT button. -
Page 19: Split
Split / Layer Split The Split mode of the piano allows you to select and play two different voices with your left and right hands - For example, play bass with the left and piano with the right . ⓐSelect the main voice. Select a voice in the normal way. -
Page 20: Using The Metronome
Using the Metronome Using the Metronome The piano features a convenient metronome that is ideal for practicing. START/STOP OF THE METRONOME To start the metronome, simply press the METRONOME button. Press the METRONOME button again to stop the metronome sound. ADJUSTING THE TEMPO OF THE METRONOME You can set the tempo over range 20 ~ 280 beats per minute by using the TEMPO buttons. -
Page 21: Setup (Master Tune, Transpose)
Setup Setup MASTER TUNE The Tune function lets you make fine adjustments to the pitch, allowing you to accurately match the tuning with that of other instruments. Press both REVERB and EFFECT buttons. (NOT HOLD DOWN) ☞ The Tune pop-up display appears and shows current value. ☞... -
Page 22: Setup (Octave, Local Control, Metronome Beat)
Setup OCTAVE The OCTAVE function makes it's possible to shift the octave of the keyboard, allowing you to match the octave of the keyboard to the range of other instruments. Press both TOUCH and SPLIT buttons. (NOT HOLD DOWN) ☞ The Octave shift pop-up display appears and shows current value. ☞... -
Page 23: Auto Accompaniment
Auto Accompaniment Auto Accompaniment This keyboard automatically plays bass and chord parts in accordance with the chords you finger. The bass and chord parts are played using sounds and voices that are automatically selected to select the rhythm you are using. All of this means that you get full, realistic accompaniments for the melody notes you play with your right hand, creating the mood of a one-person ensemble. - Page 24 Auto Accompaniment TEMPO CONTROL ADJUSTMENT Whenever you select a different style, the preset tempo for that style is also selected, and the tempo is shown in the Multi Function display after STYLE SELECT Pop-up display. (Unless you try changing the style during playback, in which case the same tempo is maintained.) Press the TEMPO buttons.
- Page 25 Auto Accompaniment Synchronized Start This configures the piano so rhythm and chord accompaniment will start automatically when you press any keys within the accompaniment key range. To use this, press the FILL/SYNC button and press a key or keys on lower part of the keyboard. The rhythm starts.
- Page 26 Auto Accompaniment ⓓStart the Auto Accompaniment. To start Auto Accompaniment, press START/STOP button. Alternately, press FILL/SYNC, then play the keyboard. (see the PLAYING A RHYTHM section on page 22~23) ACCOMPANIMENT RANGE When accomp turns on, the keyboard is automatically divided into left and right sections. You must use the left section to play the chords and the right section to play the melody.
- Page 27 Auto Accompaniment Fingered Method The chord types below can be played with Fingered method. For a fingering chart showing all chords in the example key of C. ・ Major [M] ・ Sixth [6] ・ Major seventh [M7] ・ Major seventh sharp eleventh [M7#11] ・...
-
Page 28: Recording
Recording Recording The piano features comprehensive song recording functions that allow you to record your own performance. ⓐPrepare recording to track 1 Select the desired voice and press both the RECORD and the TRACK 1buttons. The record button turns on and the track 1button flashes. Auto Accompaniment styles can be recorded into the TRACK1. -
Page 29: General Midi Voice & Drum Table
General MIDI Voice & Drum Table General MIDI Voice & Drum Table GM # VOICE GM # VOICE Piano1 Soprano Saxophone 0 0 1 0 6 5 Piano2 Alto Saxophone 0 0 2 0 6 6 Piano3 Tenor Saxophone 0 0 3 0 6 7 Honky Tonk Baritone Saxophone... - Page 30 General MIDI Voice & Drum Table Prog 1 Prog 9 Prog 17 Prog 25 Prog 26 Display Standard Drum (7 - 1) Room Drum Power Drum Elec. Drum (7 - 2) TR-808 (7 - 3) 18 - D#2 Brush Slap 19 - E2 Brush Tap Swrl 20 - F2...
- Page 31 General MIDI Voice & Drum Table PC # Prog 33 Prog 41 Prog 49 Prog 57 REMARKS (Display) Jazz Drum Brush Drum Orchestra (7 - 4) SFX (7 - 5) 18 - D#2 Closed Hi Hat 19 - E2 Pedal Hi-Hat 20 - F2 Open Hi Hat 21 - F#2...
-
Page 32: Midi Implementation Chart
MIDI Implementation Chart MIDI Implementation Chart Function Recognized Transmitted Remark Basic Channel Default 1 -3, 10 Mode Default OMNI OFF, POLY OMNI OFF, POLY Note ON/OFF 9nH kk vv #kk:note ON (0-127) #vv:velocity (1-127) Pitch Bender EnH bi bh Maximum swing +/- 1 tone 00 BnH 00H cc Bank Select 01 BnH 01H cc... -
Page 33: Troubleshooting
Troubleshooting ※ Be sure to check to following table whenever you encounter problems with the DIGITAL PIANO operation. PROBLEM CAUSE SOLUTION No sound 1. Power supply problem. 1. Check the power cord whether it's properly in AC outlet. 2. Volume setting is too low. 2. -
Page 34: Specifications
Specifications Specifications Section Contents PRODUCT HIGH PERFORMANCE DIGITAL PIANO KEYBOARD 88 KEYS (STANDARD) - 7 1/4 OCTAVES TOUCH RESPONSE OFF, HARD, SOFT, NORMAL MAX. POLYPHONY 64NOTES SOUND GENERAL MIDI 128 VOICES 4 DRUM KIT, 1 SOUND EFFECT SET ACCOMPANIMENT STYLE 40 RHYTHM STYLES ACCOMPANIMENT MODE MULTI FINGERED... - Page 36 D Y N A T O N E C O R P . w w w . d y n a t o n e . b i z Part No. D1650 rev. 1.0...
Need help?
Do you have a question about the DPR-1650 and is the answer not in the manual?
Questions and answers