
Subscribe to Our Youtube Channel
Related Manuals for Dynatone SDP-600


Summary of Contents for Dynatone SDP-600
- Page 1 OWNER'S MANUAL High Performance USB Digital Piano N e w f e e l , n e w l o o k a n d n e w s o u n d...
-
Page 2: Important Safety Instructions
Precautions IMPORTANT SAFETY INSTRUCTIONS WARNING: When using electric products, basic precautions should always be followed, including the following: 1. Read all the instructions before using the product. 2. To reduce the risk of injury, close supervision in necessary when a product is used near children. 3. -
Page 3: Grounding Instructions
Precautions INFORMATION TO THE USER This equipment has been tested and is found to comply with the limits for a class B digital device, pursuant to part 15 of the FCC Rules. These limits are designed to provide reasonable protection against harmful interference in a residential installation. -
Page 4: Before Reading
This section is intended to ensure the user's safety and Before Reading: prevent financial damage. Please read this section carefully and use the product Safety Instructions properly according to it. WARNING: Not following this warning may result in death or serious injury Not following this caution may result in injury and/or financial loss. - Page 5 CAUTION To avoid the risk of physical injury, damage of this product or other financial loss, please follow the fundamental safety instructions listed below. This caution includes the following: ㆍ Do not place the power cable nearby heat generators like heaters or radiators. Bending the ㆍWhen cleaning the instrument, always use soft and cable too much could damage the cable.
- Page 6 Preface Thank you for your purchase. This product mixes up a maximum polyphony of 256 notes and a massive sound data weighing as much as 8Gbit to offer its 5 distinguished concert grand piano sounds and other high quality voices that recreate the authentic sound of 128 different instruments.
-
Page 8: Table Of Contents
Table of Contents Before Reading Table of Contents External Appearance Controls Voice Key Map Function Key Map Terminals Using the Pedals Adjusting the Volume Selecting Voice Layer Split Twin Piano Default All Reverb Tune Transpose Touch Recording MIDI CHART GM Voice & Percussions List Trouble shooting Product Specifications... -
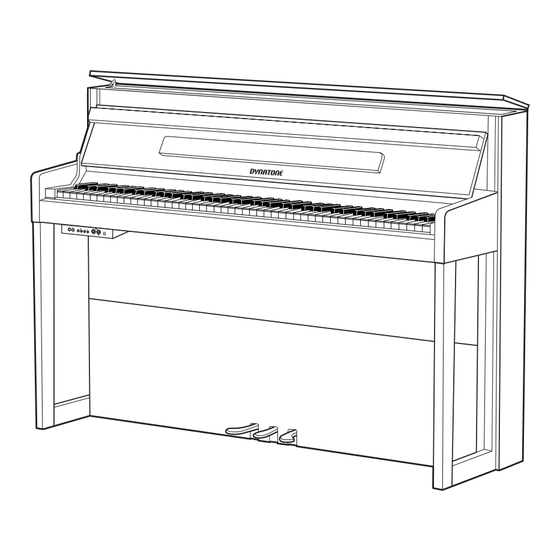
Page 9: External Appearance
External Appearance Control Panel Fall Board PowerSwitch Terminal Speaker Box Pedal Accessory Owner’s AC Power Cable Manual Plug the AC Power Cable into the corresponding socket on the back of the main unit. -
Page 10: Turning On The Power
Turning on the Power ① Connect the AC POWER CABLE. Insert AC plug at the end of AC cord into the piano and AC plug at the other end of AC cord into a standard AC outlet. ② Press POWER switch. The power is turned on. The voice of Grand Piano is selected automatically as the default value. -
Page 11: Controls
Controls ⓐ MASTER VOLUME Page 13 ⓑ LAYER button Page 14 ⓐ ⓒ SPLIT button Page 15 ⓓ TWIN PIANO button Page 16 ⓒ ⓑ ⓔ REVERB button Page 17 ⓕ RECORD button ⓓ ⓔ Page 21 ⓖ SETUP button Page 18,19,20 ⓕ... -
Page 12: Function Key Map
Function Key Map... -
Page 13: Terminals
Terminals ⓐ ⓑ ⓒ ⓓ CONNECTING AUDIO DEVICES ⓐ AUX in jacks(RCA jacks of L and R) The stereo outputs from another instrument can be connected to these jacks, allowing the sound of an external instrument to be reproduced via the instrument's speakers. Connect the output jacks (LINE OUT etc.) of an external synthesizer or the tone generator module and the instrument's AUX In 'L' and 'R' jacks using appropriate audio cables. - Page 14 CONNECTING OTHER DEVICES ⓒ Connecting the external MIDI devices (MIDI Terminals) Use the built-in MIDI terminals and standard MIDI cables to connect external MIDI devices. MIDI IN Receives MIDI messages from an external MIDI device. MIDI OUT Transmits MIDI messages generated by the instrument. ☞...
-
Page 15: Using The Pedals
Using the Pedals The piano has three pedals. ③ ② ① ① Damper Pedal (Right) This pedal performs the same function as the damper pedal of an acoustic piano; playing notes while keeping this pedal pressed will sustain the notes even if the keys have been released. It also provides the Half Pedal feature, which detects and responds to the delicate control that pianists exercise on acoustic pianos by pressing the pedal only halfway. -
Page 16: Adjusting The Volume
Adjusting the Volume The piano has one volume on the panel for adjusting the volume. MASTER VOLUME This determines the entire volume of the piano. ☞ This also determines the output level of the signal at the HEADPHONES. Selecting Voice The piano features a wealth of rich, authentic voices, including piano, strings and brass instruments. -
Page 17: Layer
Layer The layer mode of the piano allows you to select and play two different voices simultaneously in a layer. This makes it easy to create exceptionally rich and thick tonal textures. The volume balance can be set for the two voices. PLAYING WITH THE LAYER VOICE ①... -
Page 18: Split
Split The split mode of the piano allows you to select and play two different voices with your left and right hands. For example, play bass with the left and piano with the right. PLAYING WITH THE SPLIT VOICE ① Select a main voice. Select a voice in the normal way. -
Page 19: Twin Piano
Twin Piano Splitting the piano Keyboard into two sections for twin piano performance. The keyboard can be divided into two separate sections, allowing two people to perform in the same octave. PLAYING WITH THE TWIN PIANO ① Press the TWIN PIANO button. The keyboard splits two sections, which have same octave. -
Page 20: Reverb
Reverb Reverb is an effect that recreates the decaying reflections of a sound in a performance space, and reproduces the special ambience of a concert hall. ① Press the REVERB button. ☞ The reverb turns on and lamp lights. ☞ The reverb is engaged automatically when the power is turned on with the lamp lighting. -
Page 21: Tune
Tune The Tune function lets you make fine adjustments to the pitch, allowing you to accurately match the tuning with that of other instruments. ① Press and hold the SETUP button. ☞ The lamp is on. ② Adjust the pitch by pressing tune up(D#7) and down(C#7) keys. ☞... -
Page 22: Transpose
Transpose The Transpose function makes it possible to shift the pitch of the keyboard in semitone units, allowing you to match the pitch of the keyboard to the range of other instruments or singers, or letting you easily play in a different key without having to change your fingering. -
Page 23: Touch
Touch Touch determines how your playing strength (velocity) affects the volume of the voices. Four types are available for tailoring the keyboard response to the selected voice, type of song, or your own playing preference. ① Press and hold the SETUP button. ☞... -
Page 24: Recording
Recording This piano is equipped with a real time recorder, able to store a song or performance. It will record all notes as they are played. ① Select Record mode. Press the RECORD button. The button lights. ② Start recording Start playing the keyboard or press the SETUP button. -
Page 25: Midi Chart
MIDI CHART MIDI Implementation Chart Function Recognized Transmitted Remark Basic Channel Default 1 -3 Mode Default OMNI OFF, POLY OMNI OFF, POLY Note ON/OFF 9nH kk vv #kk:note ON (0-127) #vv:velocity (1-127) Pitch Bender EnH bi bh Maximum swing +/- 1 tone 00 BnH 00H cc Bank Select 01 BnH 01H cc... -
Page 26: Gm Voice & Percussions List
GM Voice & Percussions List GM Voice VOICE GM # VOICE GM # 0 0 1 0 6 5 Piano1 0 0 2 0 6 6 Piano2 0 0 3 0 6 7 Piano3 0 0 4 0 6 8 Honky Tonk 0 0 5 0 6 9... - Page 27 Percussions Prog 1 Prog 9 Prog 17 Prog 25 Prog 26 Standard Drum Room Drum Rock Drum Elec. Drum Analog Drum 27 - D#1 High Q 28 - E1 Slap 29 - F1 Scratch Push 30 - F#1 Scratch Pull 31 - G1 Sticks 32 - G#1...
- Page 28 Prog 33 Prog 41 Prog 49 Prog 57 Prog 59 REMARKS Jazz Drum Brush Drum Classic SFX 1 SFX 2 27 - D#1 Closed Hi Hat Conga 28 - E1 Pedal Hi-Hat Whistle 29 - F1 Open Hi Hat Small Drum 30 - F#1 Ride Cymbal Cymbal...
-
Page 29: Trouble Shooting
Trouble shooting If a problem occurs while using this product, check the points listed below first prior to contacting customer service. Problem Cause Solution 1) The power cord is not properly 1) Properly plug the power cord. plugged. 2) Press the power switch. The piano does not turn on. -
Page 30: Product Specifications
Product Specifications ProductName High Performance USB Digital Piano Keyboard Real Hammer Action-3W (Wooden Key,Triple-Sensor) MaximumPolyphony Voices 152 Voices (include 128 GM voice) Functions LAYER SPLIT TWIN PIANO TUNE TRANSPOSE TOUCH (Off, Hard, Normal, Soft) REVERB with Adjustable Level Control EFFECT with Adjustable Level Control Recording Real-time recording 1 Tracks... - Page 31 D Y N A T O N E C O R P . w w w . d y n a t o n e . b i z Part No. 11958332...
Need help?
Do you have a question about the SDP-600 and is the answer not in the manual?
Questions and answers