Table of Contents
Advertisement
Quick Links
Advertisement
Table of Contents

Related Manuals for Duplo DC-646


Summary of Contents for Duplo DC-646
- Page 3 (→ P.00 xxxx) : Indicates the page number and item containing related information. The English version of DC-646 Instruction Manual is original instructions. Trademarks ● Microsoft and Windows are either registered trademarks or trademarks of Microsoft Corporation in the United States and/or other countries.
- Page 4 Duplo International Ltd, Automated Precision House, Hamm Moor Lane Addlestone Surrey KT15 2SD, United Kingdom DECLARATION DE CONFORMITE Duplo Seiko Corporation, dont le siège est situé au 353, Koudai, Kinokawa-shi, Wakayama 649-6551, Japon, déclare que le ou les produits Directive 2014/35/UE relative au matériel électrique destiné à être employé dans certaines limites de tension Directive 2006/42/CE relative aux machines Directive 2014/30/UE concernant la compatibilité...
- Page 5 Disposal of Old Electrical & Electronic Equipment This symbol (the symbol of the crossed out wheeled bin) indicates that in European countries this product should not be disposed of as household waste. Please recycle where facilities exist by checking with your local authority or supplier for recycling advice.
-
Page 6: Notes On Safety (Please Read And Observe
Notes on Safety (Please Read and Observe) Safety Precautions Various symbols and pictures are used in this manual and on the labels affi xed to the machine. These symbols and pictures provide warnings and instructions to prevent danger to you or other personnel, and to prevent damage to offi... - Page 7 Notes on Safety (Please Read and Observe) ● Caution for Grounding WARNING ● Use only the power cord that is provided among the accessories. Insert the power cord plug fi rmly into the socket, so that proper electrical contact is eff ected. →...
- Page 8 Notes on Safety (Please Read and Observe) ● Prohibition of Disassembly or Modifi cation WARNING ● Do not modify the machine. → Doing so may result in fi re or electric shock. ● Do not remove the rear lid, cabinet, or covers from the machine. →...
- Page 9 Notes on Safety (Please Read and Observe) ● Caution for Cleaning CAUTION ● Before cleaning the machine, turn off the power switch and unplug the power cord. → If the machine is activated accidentally, it may cause injury. ● Do not use fl ammable sprays or solvents inside or near the machine. →...
-
Page 10: Locations Of Warning Labels
Notes on Safety (Please Read and Observe) Locations of Warning Labels Keep the WARNING and CAUTION labels clean at all times. If labels become damaged or come off , contact our service person. Part No. Name Q'ty 1 M7-T303* WARNING LABEL 2 L8-T107* WARNING LABEL 3 P9-T310*... - Page 11 Notes on Safety (Please Read and Observe) Part No. Name Q'ty 4 K9-T139* WARNING LABEL...
- Page 12 Notes on Safety (Please Read and Observe) Part No. Name Q'ty 5 U7-T109* LABEL ● The symbol in the LABEL indicates the elevator down switch. 230 V model only Part No. Name Q'ty 6 U7-T108* LABEL ● The symbol in the LABEL indicates the power switch.
-
Page 13: Labels Of High-Voltage Warning
Notes on Safety (Please Read and Observe) Labels of High-Voltage Warning There are several high-voltage area inside the machine. 230 V model only Part No. Name Q'ty 1 U7-T102* WARNING LABEL ● The safety symbol in the WARNING LABEL indicates risk of electric shock inside the machine. -
Page 14: Location Of Rating Labels
Notes on Safety (Please Read and Observe) Location of Rating Labels Rating labels are located on the lower part of the ejection side. Model Rating label DC-646 115V DC-646 230V 2, 3... -
Page 15: Interlock System For Safety
The DC-646 is equipped with various safety functions for the case of causing any dangerous operations or situations, and it stops running the operation in those cases. -
Page 16: Emergency Stop Function
Notes on Safety (Please Read and Observe) Emergency Stop Function The machine is equipped with the emergency stop functions for the safety of an operator. When you need to stop the machine for emergency, press the emergency stop switch. Turning the switch to the right releases the emergency stop. To stop the machine normally, press the STOP key of this machine. -
Page 17: Machine Dimensions And Required Space For Operation
Notes on Safety (Please Read and Observe) Machine Dimensions and Required Space for Operation * With the PC arm amount attached Dimensions in ( ): DC-646 115V(USA), DC-646 230V(UK) 800mm 800mm 800mm (240mm) 765mm 2650mm (1745mm) 1505mm 745mm 1000mm 2570mm... -
Page 18: Table Of Contents
Setting the Exit Tray ..........Attaching the Card Stacker ..............Module Hanger ....... How to Connect the DC-646 to Your Computer ............ Before Preparing a Document ........... Defi nition of Programming Terms Chapter 2 Programming a JOB on the Control Panel ........ - Page 19 Adjustment ............Airfl ow Adjustment ............Skew Compensation ......... Curled Document / Light Weight Document Programming a JOB for DC-646 Via Computer (PC Controller) Chapter 4 ............What is PC Controller? ............Before Installation ......... PC Controller Installation Procedure ...........
- Page 20 Contents Chapter 5 Troubleshooting ......... When Messages Appear on the OK Monitor ............When Messages Appear ......... When Service Call Messages Appear ........When a Document Jam Has Occurred ............... J2 FEED TRAY ............J3 FEED ERROR ..............J4 CCD AREA ..............
-
Page 21: Before Using This Machine
Loading Documents ............Attaching the Upper Guide ..............Setting the Exit Tray ............Attaching the Card Stacker ................. Module Hanger ........How to Connect the DC-646 to Your Computer ............Before Preparing a Document ........... Defi nition of Programming Terms... -
Page 22: Part Names And Their Functions
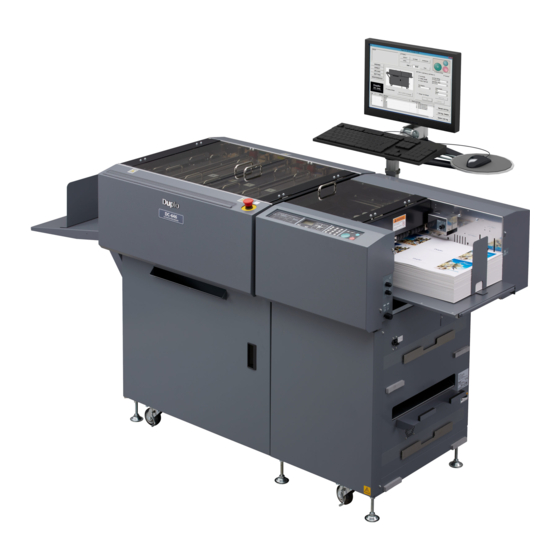
Part Names and Their Functions Appearance 10 11 Function Name Back guide (for feed tray) Set this according to the document size. Side guide (for feed tray) Set this according to the document size. PC arm mount Install a commercial monitor arm for putting the laptop computer. (Model: 115V (USA), 230V (UK)) Feed tray Original document is placed here. -
Page 23: Ejection Side
Part Names and Their Functions Function Name Module hanger Unused modules can be hung on this. AC inlet Connect the power cord here. Elevator down switch Press this to lower the feed tray to the bottommost position. Name Function PC tray Place a desktop computer on this tray. -
Page 24: Ejection Side (With Card Stacker Attached)
Part Names and Their Functions Ejection Side (with card stacker attached) Name Function Guide Set this according to the card width. Support guide Set this when document alignment is poor. (for card stacker) Guide assy Set this according to the card length. (for card stacker) Card stacker Receives card-sized fi... -
Page 25: Inside
● Install each module properly as shown in the above fi gure. It is especially important that the slitter modules are installed in correct positions (slot 2, 3, and 4) with correct orientation. ● Slitter modules for the DC-645 cannot be used in the DC-646. -
Page 26: Control Panel
Part Names and Their Functions Control Panel Name Function OK Monitor The LED of the error area fl ashes when detecting an error. LCD panel Displays the status of the machine. Displays messages when an error or a document jam has occurred. F key Press this to switch from the current screen to the function selecting screen. - Page 27 Part Names and Their Functions Name Function NUMERIC key Press this to program a JOB and to enter preset count. CLEAR key Press this to clear the entered value when programming a JOB. Press this to clear the count of sheets processed in the count-up mode.
-
Page 28: Lcd Panel
Apply Shrinkage is set in Settings3. ↓ Displayed when Adjust All is set. Displayed when the DC-646 is connected to the PC Controller. Displayed when Batch separation is set. (Displayed only when IFS off is activated). ● Select menu screen... -
Page 29: Turning Power On/Off
Turning Power ON/OFF Turning Power ON Connect the connector of the power cord to the Inlet Inlet. Connector of the power cord Connect the power plug of the power cord to the outlet. Power plug of the power cord WARNING ●... -
Page 30: Turning Power Off
Turning Power ON/OFF Turning Power OFF Press down the power switch lever to turn OFF the power. The power turns OFF and the display on the LCD panel disappears. -
Page 31: Preparation Before Use
Preparation Before Use Loading Documents Prepare appropriate documents for the JOB selected. Loosen the stack of the documents by fl ipping through the sheets and align them. Load the documents on the feed tray and gently push them toward the inside of the machine. REFERENCE Fully extend the feed tray for the vertically long document. -
Page 32: Attaching The Upper Guide
Preparation Before Use Attaching the Upper Guide Attach the upper guide to keep the document feed stable when using light weight documents. Open the top cover 1. Top cover 1 Attach the upper guide to the position where the left edge of the document passes. Upper guide Setting the Exit Tray Exit tray... -
Page 33: Attaching The Card Stacker
Preparation Before Use Attaching the Card Stacker Attach the card stacker when making card-sized products. REFERENCE ● Use the card stacker when the length of a fi nished product is 150 mm or shorter. ● In the case that the fi nished products are not aligned on the exit tray even the fi nished product size is 150 mm or longer, use the card stacker with the stopper. - Page 34 Preparation Before Use The fi nished products temporarily stop for about one minute when they reach the document-exit point. Slide the guide to the point at which the fi nished product is ejected during the time. Adjust each guide to appropriate position so that Adjust the guide to the card edge.
- Page 35 Preparation Before Use The fi nished products are ejected on the card stacker when the STOP key or the TEST key is pressed or one minute has elapsed. REFERENCE • Pressing the START key ejects the fi nished products temporarily stopped at the ejection section and continuously processes all documents on the feed tray.
-
Page 36: Module Hanger
Preparation Before Use Module Hanger You can hang the edges of the top plate of the unused module on the module hanger. Two module hangers (upper and lower) are equipped with the main unit and enable you to hang two modules. Hang the module on the module hanger so that Module both edges of the top plate of the module and the... -
Page 37: How To Connect The Dc-646 To Your Computer
How to Connect the DC-646 to Your Computer Prepare an USB 2.0 Cable (A/B 4-pin). Plug the USB terminals into the USB port of the DC-646 and the USB port on your computer. USB cable must be within 3 m long. -
Page 38: Before Preparing A Document
This section describes items required to program a JOB. SLIT: The DC-646 has six slitters. Two slitters (1, 2) are for the margins and the remaining four slitters are for the center area of the document. -
Page 39: Defi Nition Of Programming Terms
Before Preparing a Document Defi nition of Programming Terms Document feed direction REG mark Barcode Slit 2 Slit 1 Slit 4 Slit 3 Slit 5 Slit 6 Document feed direction First cut REG mark Barcode Crease Last cut... - Page 40 Before Preparing a Document Slit/Cut/Crease Limitations There are limitations for slit/cut/crease process on the DC-646. Document feed direction Slit : Up to slits can be made on one document. Up to eight slits can be made with the optional modules.
- Page 41 Before Preparing a Document Moving range of the slitter Document feed direction Slit 2 Slit 4 Slit 6 Slit 5 Slit 3 Slit 1 1. Moving range of the slitter 1 3.2 to 55 mm (The width stands at 0 when it is not set.) 2.
- Page 42 Before Preparing a Document REG Mark (Registration mark) The DC-646 automatically compensates for image drift, one of the common problems on digital printers. It detects the image drift caused on each page by reading REG mark with the built-in laser sensor and adjusts the cut/slit/crease position accordingly.
- Page 43 JOB. An operator can press the START key and leave. Even if multiple types of JOBs are loaded on the feed tray at one time, the DC-646 recognizes barcode on documents also with the built-in CCD scanner and automatically switches setup and fi...
- Page 44 Before Preparing a Document REFERENCE Barcode may not be read even it is within the specifi cations depending on the print quality of a printer and document type. If this is the case, enlarging the barcode may enable it to be read. Use the barcode generator function equipped on your software application or use barcode generator software.
- Page 45 Before Preparing a Document When both REG mark and barcode are printed on one document ● When REG mark spec is set to Standard 60 mm or shorter 5 mm 35 mm 20 mm 3 mm 3 mm 20 mm Barcode REG mark Document feed...
- Page 46 Before Preparing a Document Non-Printing Area 35 mm 5 mm 20 mm 3 mm or more 1 mm or more Non-Printing Area 20 mm 3 mm 1 mm more more Barcode REG mark Document feed direction • Any part of the image to be printed should not enter into the gray-colored area. •...
- Page 47 Before Preparing a Document ● Shape and position of end mark End mark consists of a REG mark from the document lead edge and a horizontal line A as shown in the fi gure below. If end mark is not printed properly, the machine does not operate normally. 20 mm 3 mm 3 mm...
-
Page 49: Programming A Job On The Control Panel
Chapter Programming a JOB on the Control Panel This chapter describes how to program a JOB on the control panel of the DC-646..........Programming a JOB on the Control Panel ..........Programming a JOB in Advanced Mode ............ Programming a JOB in Simple Mode .............. -
Page 50: Programming A Job On The Control Panel
Programming a JOB on the Control Panel The DC-646 can save up to 250 patterns of JOBs. This chapter describes how to program and change a JOB on the control panel of the DC-646. Make sure to read the procedure carefully to program a JOB properly. - Page 51 Programming a JOB on the Control Panel • Full bleed mode Document feed direction Document feed direction 0 - 48.9 mm Chopped up 49 mm - Chopped up 0 - 48.9 mm 49 mm - Chopped up Not chopped up 0 - 48.9 mm Chopped up 49 mm -...
- Page 52 Cut position Enter the distances between the lead edge of the document and each cut position. The DC-646 can cut up to 30 positions on one document. Crease position (Perpendicular to the document feed direction) Enter the distance between the lead edge of the document and each crease position.
- Page 53 Programming a JOB on the Control Panel Tool position of cross tool module (When CPM (cross tool module) is used) Enter the distance between the right edge of the document and perforation start/end positions. Tool position of rotary tool module (When RTM (rotary tool module) is used) Enter the distance between the lead edge of the document and perforation start/end positions.
-
Page 54: Programming A Job In Advanced Mode
Programming a JOB in Advanced Mode The DC-646 provides two programming modes, the advanced mode and the simple mode. You can select either mode by your preference. When programming a JOB in the advanced mode, select Advanced mode under Slitter entry in Settings2 before programming one. - Page 55 ’ Clear Moves the cursor to the left. Space, Moves the cursor to the right. ● Example: Entering DUPLO in JOB001 1. Press the <3> key and the CURSOR (Right) key. Job Name Enter JOB name • Pressing the CLEAR key deletes one character.
- Page 56 5. Press the <6> key three times and the CURSOR (Right) key. Job Name Press the SET key or the CURSOR (Down) key. Enter JOB name DUPLO Select Module Select Module Use the CURSOR (Right/Left) key to select Standard, Slitter,...
- Page 57 Programming a JOB in Advanced Mode Reg Mark Side mark Reg Mark When processing a JOB by reading a REG mark, enter the distance between the right edge of the document and the side Side mark mark using the NUMERIC keys and press the SET key or the **.*mm CURSOR (Down) key.
- Page 58 Programming a JOB in Advanced Mode Slit Slit Enter the distance from the right edge of the document to the position for Slit1 using the NUMERIC keys, and press the SET Slit1 key or the CURSOR (Down) key. ***.*mm Values that you can enter are displayed in (0/***.*-***.*). (0/***.*-***.*) REFERENCE ●...
- Page 59 Programming a JOB in Advanced Mode • Gutter slits, slits, and the RTM (rotary tool module (option)) Slit/RTM is at are allocated to the locations that prevent the sensor from 55.1-60mm and sensing a document. 95.1-100mm. The message appears when the following conditions of 1 and 2 Change Slit/RTM are met simultaneously.
- Page 60 Programming a JOB in Advanced Mode Enter the value for Cut2 to Cut30 in a similar way to step 17. This Cut30 value must be previous cut position +3 mm or more. The value for the last cut must be under the document length ***.*mm When you require fewer than 30 cuts, enter 0 after the last cut (0/***.*-***.*)
- Page 61 Set this to ON when the trail margin does not drop easily. REFERENCE Last cut • Dummy cut : The DC-646 performs cutting operation three times without a document to be cut at the position where the document is fed for the distance of the Document feed direction trail margin plus extra length.
- Page 62 ● If you select Save as diff erent JOB no. and press the SET JOB001entry key, a list of JOB numbers appears on the screen. 1: DUPLO Use the CURSOR (Up/Down) key to select JOB number, and press the SET key. Every time you press the CURSOR (Right/...
-
Page 63: Programming A Job In Simple Mode
Programming a JOB in Simple Mode The DC-646 provides two programming modes, the advanced mode and the simple mode. When programming a JOB in the simple mode, select Simple mode under Slitter entry in the Settings2 before programming one. (→P.63 Function Setting 2) Simple mode: Optimum module setup in slot 2 to slot 4 is displayed by entering processing positions. - Page 64 Programming a JOB in Simple Mode Follow steps 1 to 11 and steps 15 to 18 of Programming a JOB in Advanced Mode. (→P.34 Programming a JOB in Advanced Mode) ● When only slitter modules are installed in slot 3 and slot 4. (Neither the CPM (cross tool module) nor the RTM (rotary tool module) are used.) Slit Slit...
- Page 65 ● If you select Save as diff erent JOB no. and press the SET JOB001entry key, a list of JOB numbers appears on the screen. 1: DUPLO Use the CURSOR (Up/Down) key to select JOB number and press the SET key. Every time you press the CURSOR (Right/...
-
Page 66: Correcting The Job Settings
The JOB numbers are displayed in ascending order. JOB001entry Use the CURSOR (Up/Down) key to select the JOB number and press the SET key. 1:DUPLO 2: JOB*** 3: [No Data] Press the SET key or CURSOR (Down) key to select an item. - Page 67 To overwrite the locked JOB, unlock the JOB fi rst. (→P.56 Unlocking a JOB) The message Saving JOB appears on the screen and the 001: DUPLO changed JOB settings are saved. The standby screen reappears. - - - - - - - - - - The JOB number and the JOB name that have just been saved are displayed.
-
Page 69: Basic Operations
Chapter Basic Operations This chapter describes the operating sequence from turning on the DC-646 until completing process............Processing a JOB by Retrieving ..........Processing a JOB in Pause Feeding Mode ..............Deleting a Saved JOB ..............Locking a Saved JOB ................ -
Page 70: Processing A Job By Retrieving
1:DUPLO 2:A4 ROUND 3:20 SLIT ● Retrieving a JOB number from Retrieve JOB log JOB log Processed JOBs are saved in the DC-646 as JOB log. 1:DUPLO of the latest processed JOBs are saved and older JOBs 30:DUPLO30 exceeding 10 are deleted in chronological order. - Page 71 Processing a JOB by Retrieving ● The JOB number of the locked JOB is highlighted. JOB log (→P.55 Locking a Saved JOB) 1:DUPLO 30:DUPLO30 65:DUPLO65 Prepare appropriate documents for the JOB selected, then loosen the stack of the documents by fl ipping through the sheets.
- Page 72 Make sure that the LED on the START key is green, and then press the START key. If it is red, the DC-646 is having an error. Follow the instruction displayed on the LCD panel. When the processing is completed, the standby screen 001: DUPLO reappears.
-
Page 73: Processing A Job In Pause Feeding Mode
Use the pause feeding mode for small amount of documents such as when checking a fi nished product. Make sure that the standby screen is displayed on the LCD 001: DUPLO panel. REG BC - - - - - Sheets... -
Page 74: Deleting A Saved Job
Enter JOB Settings1 Use the CURSOR (Up/Down) key to select a JOB and press and JOB001entry hold the CLEAR key. 1: DUPLO 2: [No Data] 3: [No Data] REFERENCE If you delete the locked JOB, the message as shown on the Locked JOB right appears. -
Page 75: Locking A Saved Job
Locking a Saved JOB This section describes the procedure to lock saved JOBs. Locked JOBs cannot be overwritten. Make sure that the standby screen is displayed on the LCD panel. Press the F key. Use the CURSOR (Up/Down) key to select Enter JOB and press Select menu the SET key. -
Page 76: Unlocking A Job
Unlocking a JOB Locked JOBs cannot be overwritten. Unlock the JOB and then overwrite it. Make sure that the standby screen is displayed on the LCD panel. Press the F key. Use the CURSOR (Up/Down) key to select Enter JOB and press Select menu the SET key. -
Page 77: Function Setting
Function Setting < Function Setting 1 > Air knife Compressed air is blown out from the front of documents to loosen them, preventing a double feed. Default is ON. Side blow fan (Option: ASIA, TAIWAN) Air is blown out from the side of documents to loosen them, preventing a double feed. Default is OFF. -
Page 78: Function Setting
Function Setting < Function Setting 2 > DBL detection (double feed detection) This detects a double feed (two or more sheets are fed at once). Default is ON. Read Barcode (Barcode reading) This reads a barcode printed on a document and automatically programs it for a JOB. Default is ALL. -
Page 79: Function Setting
Apply shrinkage In case printed documents are shrunk by heat generated on a digital printer, if the original document size and document size after shrunk are entered, the DC-646 automatically calculates the shrinkage ratio and adjusts cutting and creasing positions accordingly. -
Page 80: Function Setting 1
Function Setting Function Setting 1 Make sure that the standby screen is displayed on the LCD panel. Press the F key. Use the CURSOR (Up/Down) key to select Settings1 and press Select menu the SET key. Retrieve JOB Enter JOB Settings1 Air Knife Settings1... - Page 81 Function Setting REFERENCE ● Every**sht: You can set 2 to 9999. For example, if you set two sheets, REG mark is read once in two sheets (1st, 3rd, 5th, ...). Rejected sheets are included in the number. ● **.*mm or more: You can set 0.2 to 12.0. If you set **mm and the diff erence between the REG mark and the current slit position is under ** mm, the slit position does not move.
- Page 82 Function Setting Crease depth Settings1 */** Set Crease depth function when creasing on the document. Crease depth Use the CURSOR (Right/Left) key to select MAX, MID, or MIN and press the CURSOR (Down) key. REFERENCE • Set this to MAX for heavy weight documents and MIN for light weight documents.
-
Page 83: Function Setting 2
Function Setting Function Setting 2 Press the F key to display the Select menu screen. Select menu Use the CURSOR (Up/Down) key to select Settings2 and press Enter JOB the SET key. Settings1 Settings2 DBL detection (Double feed detection) */** Settings2 This detects a double feed (two or more sheets are fed at once). - Page 84 Function Setting Waste detection Settings2 */** This sets the detection timing of waste box full. When waste Waste detection box full is detected, an error message appears on the LCD panel. Use the CURSOR (Right/Left) key to select MAX, MID, or OFF and press the CURSOR (Down) key.
- Page 85 Function Setting RTM on pos adj Settings2 */** You can adjust a processing start position when the RTM (rotary RTM on pos adj tool module (option)) is installed. +0.0mm Use the CURSOR (Right/Left) key to select shift direction and use the NUMERIC key to enter a value. Then press the CURSOR (Down) key.
-
Page 86: Function Setting
In case printed documents are shrunk by heat generated on a Apply shrinkage digital printer, if the original document size and the document size Before → After after shrunk are entered, the DC-646 automatically calculates ***.*mm→***.*mm the shrinkage ratio and adjusts cutting and creasing positions accordingly. -
Page 87: Stacker
Function Setting Stacker Press the F key to display the Select menu screen. Select menu Use the CURSOR (Up/Down) key to select STACKER and press Settings2 the SET key. Settings3 STACKER Batch Separation STACKER */** This selects a setting from the last process of the document preset to the next one. - Page 88 Function Setting Press the SET key. The standby screen reappears. IMPORTANT ● If you exit Function Setting without pressing the SET key, the function set are not saved. ● If you press the SET key before completing Function Setting, the setting you have just entered is saved and the standby screen reappears.
-
Page 89: Adjust All (In Vertical/Horizontal Direction)
Adjust All (in Vertical/Horizontal Direction) Adjust All (in a vertical direction) This corrects a document position in a vertical direction against the JOB set. Adjust All (in a horizontal direction) This corrects a document position in a horizontal direction against the JOB set. REFERENCE You can program Adjust All for a JOB. - Page 90 Adjust All (in Vertical/Horizontal Direction) Press the SET key. IMPORTANT ● If you exit Function Setting without pressing the SET key, the function settings are not saved. ● If you press the SET key before completing Function Setting, the setting you have just entered is saved and the standby screen reappears.
-
Page 91: Processing A Job With A Barcode
Processing a JOB with a Barcode By adding a barcode which indicates a JOB number on each document, the DC-646 automatically sets up the machine and starts processing the JOB. Prepare appropriate documents for the JOB selected. Loosen the stack of documents by fl ipping... - Page 92 Processing a JOB with a Barcode Attach the back guide (for the exit tray) and the Back guide two side guides (for the exit tray). Set the back guide (for the exit tray) perpendicular to the fl oor. Side guide Set Read Barcode to ON in Settings2.
-
Page 93: Adjusting Feeder
Adjusting Feeder Elevator Level (Feed tray) Adjustment The elevator level should be adjusted in the following cases: 1. The machine does not feed. → Turn the level adjustment knob in a counterclockwise direction (to a smaller number). The level of the elevator is raised. 2. -
Page 94: Skew Compensation
Adjusting Feeder Skew Compensation If the fi nished products are cut obliquely, adjust skew using the skew adjustment knob. Clockwise: Turning the knob slightly shifts the lead edge of the document toward the operator's side. Counterclockwise: Turning the knob slightly shifts the lead edge of the document toward the non-operators side. -
Page 95: Curled Document / Light Weight Document
Curled Document / Light Weight Document If a document rolls up or is not successfully fed because it is light weight or curled, use the upper guide. IMPORTANT When you use light weight documents, make the following settings to stabilize the document feed when entering a JOB. - Page 96 Curled Document/ Light Weight Document Turn the level adjustment knob in a clockwise direction to lower the elevator level. For light weight documents Turn the separator adjustment knob in a counterclockwise direction to raise the separator position. For light weight documents Turn the airfl...
-
Page 97: Programming A Job For Dc-646 Via Computer (Pc Controller)
Chapter Programming a JOB for DC-646 Via Computer (PC Controller) This chapter describes how to install the PC Controller in your computer and set up a JOB via the computer..............What is PC Controller? ..............Before Installation ............ PC Controller Installation Procedure .............. -
Page 98: What Is Pc Controller
What is PC Controller? PC Controller is a software used to program a JOB for the DC-646 on your computer. Installation of this software enables the user to program and edit JOBs for the DC-646, with preview image of the document, as well as save JOB data and execute a JOB from the computer. -
Page 99: Pc Controller Installation Procedure
● If you upgrade the PC Controller, the data (*.M646, *.Am646, *.Jm646) that has been saved or modified is deleted from the installation folder (ex.: C:\Duplo Seiko Corp\DC-646 PC Controller V1.XX) of the previous version. Back up the data before upgrading the PC Controller if necessary. - Page 100 PC Controller Installation Procedures Double-click the Setup folder. Double-click the Setup icon. Click Next. Specify a folder for installing the PC Controller. Everyone: Multiple users on the same computer Just me: Only one user on the computer Select either one, and click Next. REFERENCE To install the PC Controller in a certain place, click Browse, then specify a folder to install the PC Controller...
- Page 101 PC Controller Installation Procedures Click Next. REFERENCE User Account Control dialog may appear while installation is in progress. Click Yes to proceed with the installation. Click Close. IMPORTANT Proceed to the driver installation.
-
Page 102: Driver Installation Procedure
● The following instructions use the screenshots appeared on Windows 10. If you are using Windows 8.1 or Windows 7, the screenshots vary. ● There are two types (32-bit, 64-bit) of the DC-646 driver for Windows 10, Windows 8.1, and Windows 7. - Page 103 Driver Installation Procedures Double-click the folder of the language to be used. REFERENCE Select the language folder of OS used. Select the Others folder when there is no corresponding language folder. If you are using a 32-bit computer, double-click the DPinst folder.
- Page 104 This software has been thoroughly tested and can be used without any problems. Click Finish to close the installation fi le. Connect the DC-646 and your computer with a USB cable and then turn ON the DC-646. IMPORTANT USB cable (type AB): The cable length must be 3 m or shorter.
- Page 105 Driver Installation Procedures • Checking whether the driver is successfully installed ● Windows 10 From the start menu, click Settings. Click System. Click About. Click System info under Related settings. Click Device Manager.
- Page 106 Driver Installation Procedures Installation is successful if the Device Manager dialog indicates that USB DC-646 *.* is saved in Universal Serial Bus controllers. ● Windows 8.1 Click Settings charm. Click Control panel. Click Hardware and Sound. Click Device Manager.
- Page 107 Driver Installation Procedures Installation is successful if the Device Manager dialog indicates that the USB DC-646 *.* is saved in the Universal Serial Bus controllers. ● Windows 7 1. Click Start on the task bar. 2. Click Control Panel on the menu bar.
-
Page 108: Pc Controller Uninstallation Procedure
● The following instructions use the screenshots appeared on Windows 10 and Windows 8.1. If you are using Windows 7, the screenshots vary, depending on the operating system. Make sure that the DC-646 is turned OFF. Turn the computer ON to start the Windows. ● Windows 10 From the start menu, click Settings. - Page 109 PC Controller Uninstallation Procedures From the list of Apps & features, select DC-646 PC Controller V*.** and click Uninstall. Click Uninstall. ● Windows 8.1 1. Click Settings charm. 2. Click Control panel. Click Uninstall a program under Programs.
- Page 110 PC Controller Uninstallation Procedures From the Uninstall or change a program list, select DC-646 PC Controller V*.** and click Uninstall. Click Yes. ● Windows 7 Click Start on the task bar and click Control Panel on the menu. From here, follow steps 2 to 4 in ● Windows 8.1 (→ P.89).
-
Page 111: Driver Uninstallation Procedure
● The following instructions use the screenshots appeared on Windows 10 and Windows 8.1. If you are using Windows 7, the screenshots vary. Make sure that the DC-646 is turned OFF. Turn the computer ON to start the Windows. ● Windows 10 From the start menu, click Settings. - Page 112 Driver Uninstallation Procedures From the list of Apps & features, select Windows Driver Package - Duplo Seiko Corp. (usbdc646) USB and click Uninstall. Click Uninstall. ● Windows 8.1 1. Click Settings charm. 2. Click Control panel.
- Page 113 Driver Uninstallation Procedures Click Uninstall a program under Programs. From the Uninstall or change a program list, select Windows Driver Package - Duplo Seiko Corp. and click Uninstall/Change. Click Yes. ● Windows 7 Click Start on the task bar and click Control Panel on the menu.
-
Page 114: Driver Update
Driver Update Uninstall the previously installed driver according to the driver uninstallation procedure. (→P.91 Driver Uninstallation Procedure) Install a new driver according to the driver installation procedure. (→P.82 Driver Installation Procedure) -
Page 115: Pc Controller Setting
WIZARD mode when the dimensions are already fi nalized. UPLOAD Reads a JOB from the DC-646 and saves it on a computer. SETTING Sets the default values for the PC Controller. For service person use only for setting the machine and so on. - Page 116 Then click the STOP key or the TEST key to eject it to the exit tray. At that time, if you click the START key, the DC-646 ejects it to the exit tray and then continues the JOB.
-
Page 117: Locking A Job
• To save the JOB temporarily, select the Temporary job check box. • When the DC-646 is turned OFF or another JOB is retrieved, the temporarily saved JOB is deleted. * is displayed in front of the name of a locked JOB. -
Page 118: Unlocking A Job
REFERENCE • To save the JOB temporarily, select the Temporary job check box. • When the DC-646 is turned OFF or another JOB is retrieved, the temporarily saved JOB is deleted. REFERENCE If you overwrite the locked JOB, the message as shown on the right appears. -
Page 119: Wizard
PC Controller Setting WIZARD The DC-646 can save up to 250 patterns of JOBs. This section describes the procedure for programming a JOB in the Wizard mode with preview display. Following items should be entered to program a JOB. Slot 2, 3, 4 Select an optional module for the JOB when necessary. - Page 120 PC Controller Setting Reg. Mark Reading the REG mark and correcting the print position gap improve accuracy of document processing. REG. Mark Spec This sets a reading function for a bold REG mark printed on a specially treated document. (→ P.23 IMPORTANT) Slitter Guide When the slitter module is not used, it acts as a document guide to stabilize the document conveyance.
- Page 121 PC Controller Setting Select a JOB programming mode. When the Advanced Mode check box is selected, the advanced mode is selected. When it is cleared, the simple mode is selected. Click WIZARD. Inch>> mm If you select the Inch>> mm check box, the values entered in inches are converted to ones in millimeters...
- Page 122 PC Controller Setting Select a module from the Slot 3 [L/R] box and click NEXT. Slitter Module RTM (Rotary Tool Module)(option) Standard Module Select a module from the Slot 4 [L/R] box and click NEXT. Slitter Module RTM (Rotary Tool Module)(option) Standard Module If you have selected CPM (Cross Tool Module) or RTM (Rotary Tool Module) in the Slot 2 [L/R] box in step 5,...
- Page 123 PC Controller Setting Enter a JOB name in the JOB Name box and click NEXT. You can enter up to 30 characters. REFERENCE Usable characters; • Alphabetical letters (A to Z, a to z) • Numeric characters • Symbols Paper Size ●...
- Page 124 If you entered 5 in the Crosswise box of Cards per document as shown in the fi gure on the right, the DC-646 cannot process gutter slit and Cannot enter Gutter Slits dialog appears. Click OK. Gutter Cuts...
- Page 125 PC Controller Setting Crease Set the crease positions. After entering one numerical value, click NEXT. Then enter the next value. Set all the crease positions, then click NEXT. Enter 0 if there is no crease. REFERENCE • You can set up to 20 crease positions on a document. •...
- Page 126 PC Controller Setting 2. Fan Register This suctions the document to the conveyance belt for skew correction. Select Max, Mid, Min, or Off . REFERENCE Select Min or Off when processing light weight documents to prevent a document jam. 3. REG. Mark If you are using the REG mark reading function, select Enable.
- Page 127 PC Controller Setting 5. Slitter Guide When using the module in the slot as a sliter guide, select Enable. When not using it as a slitter guide, select Disable. REFERENCE Enable is recommended for light weight documents. RTM (rotary tool module (option)) and Slitter Module can be used as slitter guides.
- Page 128 REFERENCE Default is Disable. ● Dummy cut : Last cut The DC-646 performs cutting operation three times without a document to be cut at the position where the document is fed for the distance of the Document feed direction trail margin plus extra length. This is eff ective...
- Page 129 PC Controller Setting Check the contents of the function settings, then click Clicking CANCEL returns to the WIZARD screen without changing the settings. Click NEXT. Check the JOB details. To change the details, click the item and re-enter it. REFERENCE You can fi...
- Page 130 REFERENCE • To save the JOB temporarily, select the Temporary job check box. • When the DC-646 is turned OFF or another JOB is retrieved, the temporarily saved JOB is deleted. REFERENCE If you download the data to the locked JOB, the message on the right appears.
- Page 131 PC Controller Setting REFERENCE When clicking SETTING on the main menu screen, and selecting the PDF Template creator check box and the XML file creator check box on the DEFAULT tab, the screen as shown on the right appears at the time of saving the JOB. (→P.121 ●...
-
Page 132: Direct
PC Controller Setting DIRECT This section describes the procedure of Direct entry programming a JOB in the DIRECT mode. Select a JOB programming mode. When the Advanced Mode check box is selected, the advanced mode is selected. When it is cleared, the simple mode is selected. Click DIRECT. - Page 133 PC Controller Setting If you select the check box in the upper right part of the screen (DIRECT), you can lock the JOB. (→P.97 Locking a JOB) Select a module from the Slot 2[L/R] box. Standard Module Slitter Module CPM (Cross Tool Module) (option) RTM (Rotary Tool Module) (option) Select a module from the Slot 3 [L/R] box.
- Page 134 PC Controller Setting If you have selected RTM (rotary tool module (option)) in the Slot 3 [L/R] or Slot 4 [L/R] box in steps 6 and 7, select a tool for each slot in a similar way to step 8. Enter a JOB number in the JOB No.
- Page 135 PC Controller Setting Length (Custom size) To use a custom size document, enter a value of the document length in the Length box. If you have selected standard size in step 11, the selected document length value appears here. Side Mark Enter the distance from the right edge of the document to the side mark in the Side Mark box.
- Page 136 PC Controller Setting Click each Cut box, then enter the distance from the lead edge of the document to the cut position. Up to 30 cuts can be set. Enter 0 when fi nishing the cut setting. Crease Click each Crease box, then enter the distance from the lead edge of the document to the crease position.
-
Page 137: Upload
PC Controller Setting UPLOAD This section describes the procedure to read JOBs (upload) from the DC-646 to your computer. Select the Connect check box to connect the line. Click UPLOAD. ● Uploading all JOBs from the DC-646 1. Click ALL JOBS and click UPLOAD. - Page 138 • icon is displayed for the locked JOB. ● Clicking END fi nishes uploading it. ● Uploading a specifi ed JOB from the DC-646 1. Click JOB No.. Select the JOB number from the JOB number box. Click UPLOAD. 2. Click YES.
-
Page 139: Setting
PC Controller Setting SETTING This section describes the procedure to set frequently used function on a computer. Click SETTING. Click the DEFAULT tab. Set each default setting. REFERENCE The optional items do not appear on this screen if you do not set the optional devices. ●... - Page 140 PC Controller Setting ● Standard Size: Select the default size from the Standard Size box. It is recommended that you set the most frequently used size. ● Custom Size (Default): Set the default values when using documents of other size than the standard size. Enter each value in the W: (Width) box and L: (Length) box.
- Page 141 PC Controller Setting ● REG. Mark Spec Select Standard or Bold. When using specially treated documents, print a bold REG mark on them in advance. REFERENCE Normally select Standard. If the REG mark cannot be read, select Bold. Guidelines for REG. mark spec •...
- Page 142 PC Controller Setting ● XML file creator If you select the XML file creator check box, the JOB programmed can be saved as an XML file. REFERENCE • JOB that was programmed or edited in the advanced mode, the settings for RTM (rotary tool module (option)) and CPM (cross tool module (option)) are not refl...
-
Page 143: Setting 1
PC Controller Setting Click the SYSTEM tab. Select the system for connecting to the DC-646. If you are using the DC-646 alone, select 1. DC ONLY. Click the radio key of the system confi guration that you want to select. - Page 144 PC Controller Setting Slitter Guide When no modules are used for performing a JOB, these modules act as document guides to stabilize the document conveyance. Select the Slitter Guide check box when using the modules as slitter guides. REFERENCE Recommended for light weight documents. RTM (rotary tool module (option)) and Slitter Module can be used as slitter guides.
- Page 145 PC Controller Setting Side Blow Fan (Option: ASIA, TAIWAN) Air is blown out to loosen documents. Select a level from the Side Blow Fan box. Off , Min, Mid, Max REFERENCE Select Max when processing document with excessive static electricity or heavy weight documents. Select Min or Off...
- Page 146 PC Controller Setting REG. Mark Spec When using specially treated documents, print a bold REG mark on them in advance. Then select the BOLD check box for REG. Mark Spec. (→ P.23 IMPORTANT) Normally clear the check box. Crease Depth This sets the depth of the crease.
-
Page 147: Setting 2
PC Controller Setting SETTING 2 Click the SETTING 2 tab. REFERENCE Read Barcode and Reject appear when these settings are set to enable on the OPTION MODULE tab of the MAINTENANCE screen. The MAINTENANCE setting screen is locked with the password. - Page 148 PC Controller Setting Waste Full Detect Level This function detects the waste strips amount in the waste box. When waste box full is detected, a message appears on the screen. Select from the Waste Full Detect Level box. Read Barcode This sets whether to perform automatic setup by reading the barcode.
-
Page 149: Setting 3
Apply Shrinkage In case printed documents are shrunk by heat generated on digital printer, by entering the original document size and document size after shrunk, the DC-646 automatically calculates the shrinkage ratio and adjusts the cutting and creasing position accordingly. - Page 150 PC Controller Setting REFERENCE This function compensates for the shrinkage in the feed direction only. Adjust All This function corrects the document position in a vertical/horizontal direction against the JOB set (mm). 1. Select the Adjust all check box to enable this function.
-
Page 151: Stacker
PC Controller Setting STACKER Click the STACKER tab. Batch Separation OFF: Starts processing documents without a time interval. Proceed to step 5. Automatic: Pausing is canceled according to the set time and then the operation resumes automatically. Even when the set time has not elapsed, pressing the START key resumes the operation. - Page 152 PC Controller Setting Stack priority Set speed of a fi nished product to be ejected from the exit of the machine to the exit tray. Alignment: Gives priority to alignment of fi nished products. Decreases processing speed. Speed: Gives priority to processing speed. Reduces accuracy of alignment of fi...
-
Page 153: Download
DC-646. Select the Connect check box to connect the line. Click DOWNLOAD. Click File. Select the fi le to be saved in the DC-646 and click Open. REFERENCE ● Extension of the fi le saving one JOB: Jm646 ● Extension of the fi le saving all JOBs: Am646... - Page 154 JOB with this JOB appears. IMPORTANT If the file extension is .Am646, the maximum JOBs that can be saved in the DC-646 are all saved. When saveing a file with .Am646 in the DC-646, all JOBs saved in the DC-646 at that time are overwritten.
-
Page 155: Select
PC Controller Setting SELECT This section describes the procedure of SELECT, retrieving a JOB for the DC-646 from the computer and processing it. Click SELECT. After uploading the JOB data from the DC-646, JOB numbers and JOB names are displayed. -
Page 156: Job Detail
To save the corrected JOB on the computer, click SAVE and then specify a fi le name and location to save. To save the corrected JOB in the DC-646, click DOWNLOAD. REFERENCE The message as shown on the right appears if the settings (values, functions) are changed and not saved or downloaded. - Page 157 JOB. (→ P.99 to P.110, steps 21 to 25 of WIZARD) ● Clicking DOWNLOAD savees the corrected JOB data in the DC-646. (→ P.110, step 25 of WIZARD) ● To save the corrected JOB on the computer, click SAVE and then specify a file name and location to save.
-
Page 158: Open
PC Controller Setting OPEN Click OPEN. A list of JOB fi les programmed on the PC Controller are displayed. Select a fi le and click Open. Click the text box of the item to be corrected and re-enter a correction value. ●... - Page 159 Clicking NO returns to the previous screen without saving it. REFERENCE To save the JOB temporarily, check the Temporary job box. When the DC-646 is turned OFF or another JOB is retrieved, the temporarily saved JOB is deleted. 2. To overwrite the locked JOB, click YES.
-
Page 160: Saved Job Log
Click Saved Job log. The list of saved JOB log is displayed. Up to 999 JOBs are logged in the list. Click the fi le that you want to save in the DC-646. Click DOWNLOAD. REFERENCE • If you download the data to the locked JOB, the message on the right appears. - Page 161 To save the JOB data temporarily, select the Temporary job check box. REFERENCE If the DC-646 is turned OFF or another JOB is retrieved, the temporarily saved JOB is deleted. To overwrite the data, click YES. Clicking NO returns to the previous screen.
-
Page 162: Job Log. Details
Click the START key or TEST key to start the JOB. JOB Log. Details The processed JOBs are saved as JOB log in the DC-646. Up to latest 50 processed JOBs are saved. If the number of saved JOBs exceeds 50, they are deleted in chronological order. - Page 163 Clicking NO cancels saving the data, and return to the previous screen. REFERENCE To save the JOB temporarily, select the Temporary job check box. If the JOB data is temporarily saved, it is deleted when the DC-646 is turned OFF or another JOB is selected.
- Page 164 PC Controller Setting To overwrite the data, click YES. REFERENCE If you download the data to the locked JOB, the message as shown on the right appears. To overwrite the locked JOB, unlock the locked JOB fi rst. (→P.98 Unlocking a JOB) Click OK.
-
Page 165: Select Job Log
PC Controller Setting Select JOB Log The JOB logs are displayed in the lower part of the main menu screen. Click the JOB log that you want to retrieve, then click Job log. Details. The JOB is temporarily downloaded. 1. Click YES. 2. -
Page 166: Messages
2. Is the USB cable 3 meters or shorter? The DC-646 is in operation. 1. Either wait for the JOB to quit or press the STOP key on the DC-646 to abort the JOB. 2. The DC-646 is not ready to operate. - Page 167 The gutter slits are output on the exit tray on this JOB. The gutter slits are output on the exit tray on this JOB. Pressing OK continues the processing. The screen appears when a stored JOB in the DC-646 is retrieved and then the START key is clicked.
-
Page 168: Messages On The Status/System Display
Resolve the error according to the instructions. ●When the title bar is OFF LINE. The PC Controller cannot communicate with the DC-646. Check the following. • Is the DC-646 turned ON? • Is the DC-646 connected to the computer with the USB cable properly? -
Page 169: Pdf Template
PDF Template How to Create a PDF Template ● PDF Template When saving a JOB programmed by using the PC Controller, you can programme a PDF template. (→P.155 How to Use Template) 0011Duplo20160125[front] Sheet:320.0x450.0 Finished:150.0x200.0 Slit1:10.0 Cut1:20.0 CPM,RTM,SLM The layout created on the JOB can be saved in PDF. 1. - Page 170 PDF Template 2. Click the DEFAULT tab. Set each default setting. 3. If you select the PDF Template creator check box, the JOB programmed can be saved as a PDF template. Program a JOB and click SAVE.
- Page 171 Creates barcode on a PDF template. Standard size: Creates standard size barcode. Large size: Creates barcode that is 1.5 times the size of DC-646 Barcode standard. You can also select 2 digits or 3 digits from Barcode digit. (Contact our service person.) Barcode position area Users can paste their own barcode on a PDF template.
- Page 172 PDF Template 0011Duplo20160125[front] Sheet:320.0x450.0 Finished:150.0x200.0 Slit1:10.0 Cut1:20.0 CPM,RTM,SLM Job info REG. mark Crop marks DC-646 Barcode Barcode position area Crease (Score) Perforation Finished product line...
- Page 173 fi rst cut on the JOB The value displayed here of lead entering screen in the DIRECT mode. margin diff ers depending on barcode size. Alternatively, clear the DC-646 Barcode check box on the screen of the right that appears when clicking SAVE.
- Page 174 PDF Template ● If a REG mark is out of the specifi cations. 0011Duplo20160125[front] Sheet:320.0x450.0 Finished:150.0x200.0 Slit1:10.0 Cut1:20.0 CPM,RTM,SLM Layout area of the fi nished product is out of the REG. mark specifi cations. As shown in the fi gure above, if the layout area of the fi...
-
Page 175: How To Use Template
If you click NO, the DIRECT screen reappears. How to Use Template A template is a collection of JOB samples that the DC-646 can process. You can carry out the JOB that you select. If you install the PC Controller, a shortcut of DC-646Job Template is automatically created on the desk top. - Page 176 1. They are in the CD-ROM (that comes with the DC-646) used when the PC Controller and the driver are installed. 2. They are is in the folder in which the PC Controller is...
-
Page 177: Troubleshooting
Chapter Troubleshooting This chapter describes what to do when an error has occurred and how to deal with document jams and error messages........... When Messages Appear on the OK Monitor ..............When Messages Appear ..........When Service Call Messages Appear .......... -
Page 178: When Messages Appear On The Ok Monitor
When Messages Appear on the OK Monitor When a document jam or an error that the machine cannot correct has occurred, the OK monitor fl ashes where the error has occurred and messages appear on the LCD panel. Follow the procedure bellow to resolve the error. Message Countermeasure 1. - Page 179 When Messages Appear on the OK Monitor Message Countermeasure A document remains in slot 1 or slot 2. There is a document jam in slot 1 or slot 2. Remove the document from slot 1 or slot 2 and then press the STOP key.
- Page 180 When Messages Appear on the OK Monitor When Messages Appear on the OK Monitor Message Countermeasure 1. Waste remains in the waste box. 2. The waste box has become full during processing a document. 1. Remove the waste from the waste box. 2.
-
Page 181: When Messages Appear
When Messages Appear When an error has occurred, messages and fi gures appear on the LCD panel. In such a case, follow the procedure below to resolve the error. Message Status and Solution Status: There is no document on the feed tray. NO DOCUMENT Solution: Load a document on the feed tray. - Page 182 When Messages Appear When Messages Appear Message Status and Solution Status: There is a document jam in the margin slitter module or slot 2. J5-* Solution: Remove the document from the margin slitter module or slot MSM/SLOT2 2 and then press the STOP key. (→P.177 J5 MSM/SLOT2) J5-* Remove document...
- Page 183 When Messages Appear Message Status and Solution Status: The waste box has become full during processing. J9-* Solution: Remove the accumulated waste from the waste box and then WASTE BOX press the STOP key. (→P.187 J9 WASTE BOX) J9-* Remove document from waste box to clear Status: There is a document jam in the reject area.
- Page 184 When Messages Appear When Messages Appear Message Status and Solution Status: The right (or left) tool of the margin slitter is locked. MSM-* LOCK * shows R (right) or L (left). Check document Solution: Remove the document from the margin slitter area and then in MSM press the STOP key.
- Page 185 When Messages Appear Message Status and Solution Status: The reject area is locked. REJECT LOCK Solution: Remove the document from the reject area and then press Check document the STOP key. in reject area (→P.188 J10 REJECT AREA) to clear Status: The cutter fl...
- Page 186 When Messages Appear When Messages Appear Message Status and Solution Status: A document remains in the margin slitter module or slot 2. DOC. IN MACHINE Solution: Remove the document from the margin slitter or slot 2. Remove document (→P.177 J5 MSM/SLOT2) from MSM/SLOT2 to clear Status: A document remains in slot 3 or slot 4.
- Page 187 When Messages Appear Message Status and Solution Status: Emergency stop. EMERGENCY STOP Solution: Turning the switch to the right releases the emergency Release stop. Emergency SW (→P.xiv Emergency Stop Function) Status: Double feed. DOUBLE FEED Solution: Remove the document from the inside of the machine and Remove document then press the STOP key.
- Page 188 When Messages Appear When Messages Appear Message Status and Solution Status: The machine failed to read REG mark because it is not printed REG READ ERROR 3 correctly. Solution: Press the STOP key, then check whether the REG mark is Cannot read printed straight and the document is not skewed.
- Page 189 When Messages Appear Message Status and Solution 1. The message appears when the slit positions that Status : The gutter slits make the gutter slits less than 5 mm that is out of the are output on specifi cations are entered and the barcode is read. 2.
-
Page 190: When Service Call Messages Appear
When Service Call Messages Appear Message Status and Solution Status: Communication error in the DC-646. E00-* Solution: Turn OFF the power and then turn ON again in a few MAIN-PANEL seconds. If the same error message remains displayed, write down the message and contact our service person. - Page 191 E05-* Contact service person Status: Communication error in the DC-646. E06-* Solution: Turn OFF the power and then turn ON again in a few I/O COM seconds. If the same error message remains displayed, write down the message and contact our service person.
- Page 192 When Service Call Messages Appear When Service Call Messages Appear Message Status and Solution Status: Communication error in the DC-646. E08-* Solution: Turn OFF the power and then turn ON again in a few MAIN-SLITTER COM seconds. If the same error message remains displayed, write down the message and contact our service person.
-
Page 193: When A Document Jam Has Occurred
When a Document Jam Has Occurred When a document jam has occurred, messages appear and the error area fl ashes on the LCD panel. Follow the procedure below to remove the jammed document. WARNING • Do not touch the tool. Doing so may cause injury. •... -
Page 194: J3 Feed Error
When a Document Jam Has Occurred When a Document Jam Has Occurred Press the STOP key to clear the error. The machine is reset and the error message is cleared. J3 FEED ERROR A document jam has occurred in the document feed area or J3-* the feeding area. - Page 195 When a Document Jam Has Occurred If the jammed document cannot be removed by the procedure above page, attempt to remove the document according to the following procedure. Open the top cover 1. Top cover 1 Remove the jammed document. Close the top cover 1.
-
Page 196: J4 Ccd Area
When a Document Jam Has Occurred When a Document Jam Has Occurred J4 CCD AREA A document jam has occurred in the CCD area. J4-* Follow the procedure below to remove the jammed document. Remove document from CCD area to clear Press the JOG (Forth) key to eject the document. -
Page 197: J5 Msm/Slot2
When a Document Jam Has Occurred Remove the jammed document in the CCD area. Close the top cover 2 and the top cover 3. Press the STOP key to clear the error. The machine is reset and the error message is cleared. - Page 198 When a Document Jam Has Occurred When a Document Jam Has Occurred Press the JOG (Forth) key to eject the document. IMPORTANT The JOG (Back) key is inactive when a document is jammed or remains in the margin slitter module or slot 2. Press the STOP key to clear the error.
- Page 199 When a Document Jam Has Occurred Grasp the handle to take out the module from slot 1 and slot 2 by lifting it up. Remove the jammed document by using the supplied pliers. Slowly lower the module in slot 1 and slot 2. Check to see that the pins on both sides are securely fi...
-
Page 200: J6 Slot3/4
When a Document Jam Has Occurred When a Document Jam Has Occurred Press the STOP key to clear the error. The machine is reset and the error message is cleared. J6 SLOT3/4 A document jam has occurred in slot 3 or slot 4. J6-* Follow the procedure below to remove the jammed document. - Page 201 When a Document Jam Has Occurred If the jammed document cannot be removed by the procedure above, attempt to remove the document according to the following procedure. Open the top cover 2 and the top cover 3. Loosen the fi xing screws (two of each) of the Slot 4 Slot 3 modules in slot 3 and slot 4.
-
Page 202: J7 Cut, Crease
When a Document Jam Has Occurred When a Document Jam Has Occurred Tighten the fi xing screws (two of each) of the Slot 4 Slot 3 modules in slot 3 and slot 4. Close the top cover 2 and the top cover 3. Press the STOP key to clear the error. - Page 203 When a Document Jam Has Occurred Press the JOG (Forth) key to eject the document. IMPORTANT The JOG (Back) key is inactive when a document remains inside of the machine. Press the STOP key to clear the error. The machine is reset and the error message is cleared.
- Page 204 When a Document Jam Has Occurred When a Document Jam Has Occurred Creaser module: Loosen the two fi xing screws. Cutter module: Remove the two fi xing screws. Grasp the handle to take out the creaser module by lifting it up. Grasp the handle to take out the cutter module by lifting it up.
-
Page 205: J8 Exit Tray
When a Document Jam Has Occurred Tighten the fi xing screws (two of each) of the creaser module and the cutter module. Connect the connectors of the creaser module or the cutter module. (The fi gure on the right shows a view from the non-operator’s side;... - Page 206 When a Document Jam Has Occurred When a Document Jam Has Occurred Press the JOG (Forth) key to eject the document. IMPORTANT The JOG (Back) key is inactive when a document remains inside of the machine. Press the STOP key to clear the error. The machine is reset and the error message is cleared.
-
Page 207: J9 Waste Box
When a Document Jam Has Occurred J9 WASTE BOX The waste box has become full of waste during operation. J9-* Accumulation of waste may cause a document jam. Remove document from waste box to clear WARNING Make sure that the machine is fully stopped before removing the waste. Otherwise, your hands or fi... -
Page 208: J10 Reject Area
When a Document Jam Has Occurred When a Document Jam Has Occurred Put the waste box back in its place and close the front cover. IMPORTANT Make sure to set the waste box properly pushing it all the way in. Press the STOP key to clear the error. - Page 209 When a Document Jam Has Occurred Remove the jammed document from the reject area. Close the top cover 2 and the top cover 3. Press the STOP key to clear the error. The machine is reset and the error message is cleared.
- Page 210 When a Document Jam Has Occurred When a Document Jam Has Occurred Press the STOP key to clear the error. The machine is reset and the error message is cleared. ● When removing the document from the waste box area Open the front cover, then take out the waste box.
-
Page 211: J11 Waste Box
When a Document Jam Has Occurred Press the STOP key to clear the error. The machine is reset and the error message is cleared. J11 WASTE BOX Slit waste is jammed in the chute area because it cannot drop J11-* in the waste box smoothly. -
Page 212: J12 Document Length
When a Document Jam Has Occurred When a Document Jam Has Occurred Put the waste box back in its place and close the front cover. IMPORTANT Make sure to set the waste box properly pushing it all the way in. Press the STOP key to clear the error. - Page 213 When a Document Jam Has Occurred Check that the document length on the feed tray is the one that was saved at JOB entry. Press the STOP key to clear the error. The machine is reset and the error message is cleared.
- Page 215 Chapter Daily Maintenance This chapter describes daily maintenance for the machine................Daily Maintenance .............. Cleaning the Slitter Tool ..............Cleaning the Sensors ..........Cleaning the Conveyance Rollers ..........Cleaning the Skew Correction Belt .......... About Slitter Tool Intersection Correction ..................
-
Page 216: Daily Maintenance
Daily Maintenance Clean the machine periodically to maintain its performance. WARNING ● Before cleaning, be sure to turn the power OFF, wait until the machine cools off and unplug the power cord. Otherwise, fi re or electric shock may occur. ●... -
Page 217: Cleaning The Sensors
Daily Maintenance Cleaning the Sensors ● Sensor on the right side of the reject area Open the top cover 2 and the top cover 3. Clean the sensor on the right side of the reject area with an air blower. Air blower Operator’s side Air blower... - Page 218 Daily Maintenance Daily Maintenance ● Sensor on the right side of slot 2 Open the top cover 2 and the top cover 3. Loosen the two fi xing screws of the module in slot 2. Slot 2 Operator’s side Grasp the handles to take out the module from slot Slot 2 2 by lifting it up.
- Page 219 Daily Maintenance Slowly lower the module in slot 2. Check to see Slot 2 that the pins on both sides are securely fi tted in the module. Operator’s side Tighten the two fi xing screws of the module in slot 2. Slot 2 Operator’s side Close the top cover 2 and the top cover 3.
- Page 220 Daily Maintenance Daily Maintenance Loosen the two fi xing screws of the module in slot 4. Slot 4 Operator’s side Grasp the handles to take out the module from slot Slot 4 4 by lifting it up. Operator’s side Clean the sensor on the right side of slot 4 with an Slot 4 air blower.
- Page 221 Daily Maintenance Close the top cover 2 and the top cover 3. ● Sensor on the right side of the creaser module Open the top cover 2 and the top cover 3. REFERENCE Disconnect the connector of the creaser module. (The fi...
- Page 222 Daily Maintenance Daily Maintenance Grasp the handles to take out the creaser module Creaser module by lifting it up. Operator’s side Clean the sensor on the right side of the creaser module with an air blower. Air blower Operator’s side Enlarged view Operator’s side Slowly lower the creaser module in its position.
- Page 223 Daily Maintenance Close the top cover 2 and the top cover 3. ● Sensors at the exit area Clean the sensors at the exit area with an air blower. Air blower...
-
Page 224: Cleaning The Conveyance Rollers
As the DC-646 processes digital color outputs, toner etc. on the documents may adhere to the surface of the conveyance rollers of the DC-646. Accumulation of toner may aff ect the performance of the DC-646. Clean the rollers according to the following procedure. -
Page 225: Cleaning The Skew Correction Belt
Daily Maintenance Cleaning the Skew Correction Belt Long hours of machine use result in accumulation of paper dust. Wipe off the paper dust with a cloth while turning the skew correction belt with your hand. Open the top cover 1. WARNING Do not put your hands or fi... -
Page 226: About Slitter Tool Intersection Correction
Daily Maintenance Daily Maintenance About Slitter Tool Intersection Correction If a heavy weight document is jammed in the slitter area and the document is pulled out by force, the slitter upper tool and the lower tool may intersect each other. Also, If the document cannot be slit or conveyed, the tools may have intersected. - Page 227 Daily Maintenance 2. Insert the jig into the hole of the lid while sliding the lid upward. 3. Push the jig in the direction of the arrow to correct the intersecting upper tool. The fi gure on the right shows that the upper tool Upper tool and the lower tool intersect.
- Page 228 Daily Maintenance Daily Maintenance ● In the case of slitter 5 and slitter 6 1. Loosen the two hexagon socket head cap screws securing the lid of the slitter with the intersecting tools. (The fi gure on the right shows the slitter 5.) REFERENCE You can lay the slitter module on its side if it is easier for you to carry out the work.
- Page 229 Daily Maintenance 5. Tighten the two hexagon socket head cap screws to secure the lid. Hexagon socket head cap screw REFERENCE Raise the lid and tighten the hexagon socket head cap screws. Attach the front guide assy in the direction of the arrows.
-
Page 230: Waste Box
Waste Box Slit waste accumulates in the waste box. Open the front cover and remove them periodically. Accumulation of waste may cause a document jam. Follow the instructions below for removing the waste. REFERENCE When processing a document of more than 670 mm, remove the waste frequently. WARNING Be sure to confi... -
Page 231: About Protection Of Press Rollers
About Protection of Press Rollers If the press rollers stay at the same position for a long time, they may be deformed by the pressure from the back-up rollers. To prevent them from being deformed, if the machine does not operate for one hour with the power on, the rollers automatically rotate at low speed. When you do not operate the machine for a long period of time (approx. - Page 232 About Protection of Press Rollers About Protection of Press Rollers Open the top cover 2 and the top cover 3. Releasing the back-up roller pressure of 1 to 8, and 10 to 11 Turn the hexagon socket head cap screws (of 1 to 8, Non-operator’s side 1 to 3 and 10 to 11) adjusting the back-up roller pressure counterclockwise by using the supplied hexagon...
- Page 233 About Protection of Press Rollers Releasing the back-up roller pressure of 9 Non-operator’s side 9 Turn the hexagon socket head cap screw (of 9) adjusting the back-up roller pressure clockwise by using the supplied hexagon wrench. REFERENCE You can turn the hexagon socket head cap screws without removing the cover.
-
Page 235: Specifi Cations
Chapter Specifi cations This chapter lists the machine specifi cations................. Specifi cations... -
Page 236: Specifications
Specifications Model name DC-646 Product type Slitter/Cutter/Creaser Floor model Feeding method Belt suction Feed tray Elevator Programmable document Width: 210.0–370.0 mm (8.27–14.56 in) size Length: 210.0–999.9 mm (8.27–39.36 Minimum fi nishing size Width: 48 mm (1.89 in) Length: 50 mm... - Page 237 In use (standard): 2310(W)×1005(D)×1110(H) mm In use (max paper): 2510(W)×1005(D)×1110(H) mm When stored: 1650(W)×1005(D)×1110(H) mm When packed: 1760(W)×880(D)×1335(H) mm ● DC-646 100V, DC-646 230V (ASIA), DC-646 115V (TAIWAN) In use (standard): 2310(W)×765(D)×1110(H) mm In use (max paper): 2510(W)×765(D)×1110(H) mm When stored: 1650(W)×765(D)×1110(H) mm When packed: 1760(W)×880(D)×1335(H) mm...
- Page 238 The specifi cations are subject to change without prior notice. Document Curl Due to the automated slitter function design, the document path of the DC-646 is sensitive to document curl. If document curl is causing document jams, the following are suggestions for remedying the problem: 1.
-
Page 239: Appendix
Appendix This chapter lists an index.................... Index... -
Page 240: Index
Index 3 digits (barcode) ........128 CPM on pos adj ......58,64,128 Crease ..........18,20,40 Crease depth ....33,41,57,62,107,126 Crease position ........32,33 About Slitter Tool Intersection Correction ..206 Creaser ............30 AC inlet ............3 Creaser module ........5,18 Adjust All ..........8,69 Crop marks ..........151 Advanced mode ........30 Cross tool module .......34,43 Advanced Mode ........34,96 Curled Document ........75... - Page 241 Index Index Function Setting 1 .......57,60 Function Setting 2 .......58,63 OK Monitor ..........6 Function Setting 3 ......59,66,67 Option Module 1 ........99 Guide ............4 Paper Jam ..........173 Guide assy ..........14 Paper size ..........114 Guide assy Paper Size ..........99,103 (for card stacker) ........4 Pause Feeding Mode ........53 Gutter Cuts .........99,104 PC arm mount ..........2...
- Page 242 Index SETTING ............95 Top cover 2 ..........2 SETTING 1 ..........96,123 Top cover 3 ..........2 SETTING 2 ..........96,127 Trim ............99 SETTING 3 ..........96,129 Turning Power OFF ........10 Settings1 .............8 Turning Power ON ........9 Settings2 .............8 Settings3 .............8 Setting the Exit Tray .........12 Uninstallation ........88,91 Shape and position of end mark .....27 Update ............94...
- Page 244 4-1-6 Oyama, Chuo-ku, Sagamihara-shi, Kanagawa 252-5280, Japan TEL: +81-42-775-3602 FAX: +81-42-775-3606 E-mail: info@duplo.com W5-Y2047 2019.10...
Need help?
Do you have a question about the DC-646 and is the answer not in the manual?
Questions and answers