Table of Contents
Advertisement
Available languages
Available languages
Quick Links
DEVILBISS
®
PAP SYSTEM – DV57BR
DeVilbiss® SleepCube® Positive Airway Pressure Device
EN
CAUTION–USA Federal law restricts this device to sale by, or on the order of a physician.
Assembled in the USA. Instruction Guide.
Aparelho de pressão positiva nas vias aéreas DeVilbiss SleepCube
PT
AVISO–A lei federal (EUA) restringe a venda deste aparelho a médicos ou mediante prescrição médica.
Montados nos EUA. Manual de instruções.
SLEEPCUBE
AUTOBILEVEL
®
Advertisement
Chapters
Table of Contents

Related Manuals for DeVilbiss Healthcare SLEEPCUBE DV57BR


Summary of Contents for DeVilbiss Healthcare SLEEPCUBE DV57BR
- Page 1 DEVILBISS SLEEPCUBE AUTOBILEVEL ® ® PAP SYSTEM – DV57BR DeVilbiss® SleepCube® Positive Airway Pressure Device CAUTION–USA Federal law restricts this device to sale by, or on the order of a physician. Assembled in the USA. Instruction Guide. Aparelho de pressão positiva nas vias aéreas DeVilbiss SleepCube AVISO–A lei federal (EUA) restringe a venda deste aparelho a médicos ou mediante prescrição médica.
- Page 2 Key Features DV57 / DV5HH DV5HH BR-DV57...
-
Page 3: Table Of Contents
ENGLISH......................EN-3 PORTUGUESE ....................PT-24 TABLE OF CONTENTS Symbol Definitions ..............................EN - 4 Important Safeguards .............................. EN - 4 Introduction ................................EN - 5 Intended Use ..............................EN - 5 Indications for Use ............................EN - 5 Contraindication ............................. EN - 5 AutoBilevel Operating Diagram ........................ -
Page 4: Symbol Definitions
SYMBOL DEFINITIONS Class II electrical protection- Locked Standby-turns blower on/off double insulated Data port input/output Unlocked Heat Next item on LCD display IPX1 Drip-proof, vertical 100-240 VAC input 50/60 Hz DC input: 12 VDC, center pin Previous item on LCD display Delay-starts the delay cycle ... -
Page 5: Introduction
• Do not place the SleepCube where it can be knocked onto the floor or where the power cord may create a trip hazard. • Only the DeVilbiss DV5 series Heated Humidifier system is recommended for use with the SleepCube. Other humidifier systems may prevent the device from detecting snoring and may cause inappropriate pressure levels in the mask. -
Page 6: Key Features
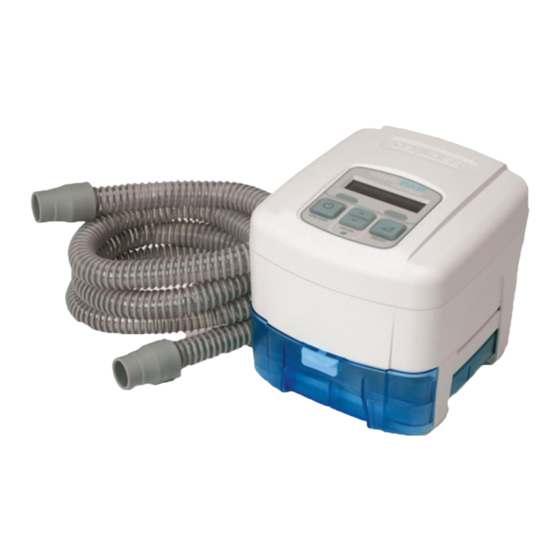
KEY FEATURES (Page 2, Figures A-F) DeVilbiss SleepCube Device (Figures A and B) Humidifier Cradle (Figure D) Keypad/LCD Display (see Figure C) Heater plate Air Supply Port on Back Heater power connector Air Supply Port on Bottom (for optional humidifier) Storage compartment for connector cover (on Air Supply Port Plug bottom) -
Page 7: Operation
OPERATION Fully insert the power cord into the back of the device. Plug the other end of the power cord into the AC wall outlet. Attach air supply tubing to air supply port in the back of the device. Prepare the mask (supplied by your equipment provider) by referring to the mask’s instruction guide. Connect the air supply tubing to the mask. -
Page 8: Using The Smartflex ™ Feature
1,023 days (2.8 years) of data. We recommend you work with your provider to establish a routine for clearing SmartCode data to ensure current usage information is available. Compliance meter should be cleared only after the required report is generated, submitted, and approved by the requestor. Once cleared, a new cycle of 2.8 years begins and the only source for the previous data will be the hard-copy reports. -
Page 9: Shut Down
Shut Down Press the ON/OFF button to turn the device off. You may also simply remove your mask. After a few seconds the device will display the message “Mask Off. Please check mask fi t.” If you do not put the mask on again the device will automatically turn off in about 20 seconds. -
Page 10: Sleepcube Travel Information
Mask Off – This message appears due to a poor mask fit or a removed mask. Check for leak around the mask seal and make adjustments as necessary according to the mask manufacturer’s instructions. This message will be displayed until the high airflow problem is corrected. -
Page 11: Accessories/Replacement Items
ACCESSORIES/REPLACEMENT ITEMS Replacement Items Air-inlet filter (4/pk) DV51D-602 Heater connection cover DV51D-605 Fine particle filter (4/pk) DV51D-603 Oxygen adapter 7353D-601 Air supply tubing (6’) CPAP-TUB 6 Carrying case DV51D-610 Air supply plug DV51D-604 Heated Humidifier DV5HH Humidifier Chamber DV5C Chamber Sealing Gasket DV5C-614 Power Items AC power cord (USA) -
Page 12: Product Disposal
Ensure the filter is completely dry before installation and use. Fine Particle Filter (Optional) If you have an optional fine particle filter (part #DV51D-603), inspect this filter and replace it if it shows signs of dirt or damage. Do not wash. Install the fine particle filter behind the standard filter. -
Page 13: Troubleshooting
TROUBLESHOOTING WARNING Electric Shock Hazard - Do not remove the device cabinet; there are no user-serviceable internal components. The cabinet should only be removed by a qualified DeVilbiss provider. Issue Possible Cause Remedy Nothing shows on 1. Device is not plugged in or the power cord 1a. -
Page 14: Specifications
Issue Possible Cause Remedy Air from flow 1. Air filters are dirty. 1. Clean filters. generator seems to 2. Air inlet port is blocked. 2. Unblock air inlet. be too warm. 3. Room temperature is too high. 3. Lower room temperature. 4. - Page 15 Filter Specifications Standard Filter ............................> 3.0 micron particles Optional Fine Particle Filter ........................> 0.3 micron particles Dynamic Short-Term Pressure Accuracy with and without DV5HH Humidifier (Per ISO 17510-1:2007) Set Pressure Pressure Accuracy Waveform Volume [mL] Breath Rate [min-1] [cmH [Pk-Pk cmH Sinusoidal cycle with I:E = 10, 15, 20...
-
Page 16: Guidance And Manufacturer's Declaration
DEVILBISS GUIDANCE AND MANUFACTURER’S DECLARATION WARNING Medical Electrical Equipment needs special precautions regarding EMC and needs to be installed and put into service according to the Electromagnetic Compatibility [EMC] information provided in the accompanying documents. Portable and Mobile RF Communications Equipment can affect Medical Electrical Equipment. The equipment or system should not be used adjacent to or stacked with other equipment and that if adjacent or stacked use is necessary, the equipment or system should be observed to verify normal operation in the configuration in which it will be used. - Page 17 Immunity Test IEC 60601 Test Level Compliance Level Electromagnetic Environment - Guidance Power Frequency Power frequency magnetic fields should be 50/60Hz Magnetic 3A/m 3A/m that of a typical location in a typical Field IEC 61000-4-8 commercial or hospital environment. Portable and mobile RF communications equipment should be separated from the Conducted RF 3 Vrms from...
- Page 18 ADVANCED MENU CONTROLS With the device on, press the “Next” or “Previous” buttons on the keypad to scroll through the items on the display. Name Symbol Function PREVIOUS ITEM Pressing this button displays the previous menu option. NEXT ITEM Pressing this button displays the next menu option. SETTING CHANGE These buttons allow you to adjust the setting that is shown on the display.
- Page 19 Bilevel S Mode AutoBilevel Mode P:10.0 P:10.0 Auto S Heater setting shown if DV5HH Heat:Off Heat:Off is attached. P:10.0 S–T RR:15 P:10.0 S–T RR:15 I/E: 1:1.0 (50%) I/E: 1:1.0 (50%) LK:123 S–S EV:AS LK:123 S–S EV:AS MV:123.4 VT:1234 MV:123.4 VT:1234 Max IPAP IPAP 10.0 cmH2O...
- Page 20 SmartFlex Menu List The SmartFlex menu is available in all modes and is a sub-menu that allows you to control various functions of your device. It is accessed by pressing the down button while in this Advanced Menu. Display Example Description This setting controls the amount of pressure relief.
- Page 21 Quick View Menu Layout The Quick View Menu shows a summary of information which is reported in the SmartCode data. Information in the Quick View includes: Number of days used more than 4 hours (or can be set to 5 hours by clinician), AHI (Apnea/Hypopnea Index), High Leak percent (percent of time at leak >95 L/m), and Daily Usage (average hours per day used).
- Page 22 Display Example Description Mode Maximum IPAP pressure level that will be administered. Range: (Min AutoBilevel Max IPAP EPAP + Pressure Support) - 25.0 cm H O, increments of 0.5 cm H Mode 15.0 cmH2O Minimum EPAP pressure level that will be administered. Range: 3.0 cm AutoBilevel Min EPAP 0 - (max IPAP - Pressure Support), increments of 0.5 cm H...
- Page 23 Display Example Description Mode Shows version of installed fi rmware. Firmware Version V0.01 30/11/2010 Shows the serial number of the device. Serial Number MD000005 Shows the maximum adherence achieved for any period of thirty Adherence Score consecutive days of use within a ninety-day time frame. The score 83% (25/30) represents the percentage of days, within thirty consecutive days, where usage met or exceeded the ‘Usage Threshold.’...
- Page 24 SUMÁRIO Definições dos símbolos ............................PT - 24 Medidas de proteção importantes ........................... PT - 25 Introdução ................................PT - 26 Uso pretendido .............................. PT - 26 Indicações de uso ............................PT - 26 Contraindicação ............................. PT - 26 Diagrama de operação do AutoBilevel ......................PT - 26 Principais recursos ..............................
-
Page 25: Medidas De Proteção Importantes
MEDIDAS DE PROTEÇÃO IMPORTANTES LEIA TODAS AS INSTRUÇÕES ANTES DE USAR ESTE APARELHO. GUARDE ESTAS INSTRUÇÕES. PERIGO • Perigo de choque elétrico – Não utilize durante o banho. • Perigo de choque elétrico – Não mergulhe este aparelho em água ou qualquer outra substância líquida. •... -
Page 26: Introdução
INTRODUÇÃO Uso pretendido O DeVilbiss SleepCube Modelo DV57 Série AutoBilevel CPAP deve ser usado no tratamento de OSA em pacientes com respiração espontânea e 30 kg (66 lbs) ou mais por meio da aplicação da pressão positiva do ar. O dispositivo deve ser usado em ambientes domésticos e clínicos. -
Page 27: Principais Recursos
PRINCIPAIS RECURSOS (PÁGINA 2, FIGURAS A-F) Aparelho DeVilbiss SleepCube (Figuras Base do umidificador (Figura D) Placa do aquecedor A e B) Teclado numérico/visor LCD (consulte a Figura C) Conector de alimentação do aquecedor Orifício de suprimento de ar na parte posterior Compartimento de armazenamento da tampa do Orifício de suprimento de ar na parte inferior (para o conector (na parte inferior) -
Page 28: Teclado Numérico E Visor
TECLADO NUMÉRICO E VISOR Controles básicos de CPAP Nome Símbolo Função O botão LIGA/DESLIGA inicia e interrompe a vazão de ar do aparelho. LIGA/DESLIGA Se o SleepCube tiver um aquecedor/umidificador conectado, estes botões ajustam as configurações do aquecedor. Aumente a configuração para mais umidade e diminua para AQUECEDOR ... -
Page 29: Informações Sobre Smartcode E Grau De Adesão
ATENÇÃO Nunca toque na placa do aquecedor na base do umidificador. Nunca toque na placa de transferência de calor na parte inferior do compartimento para água. Essas placas podem atingir temperaturas de até 65 °C durante o funcionamento. Não opere o aquecedor se o compartimento para água estiver vazio. A placa do aquecedor pode ser desligada utilizando o controle do aquecedor no teclado numérico quando estiver sendo utilizado sem água. -
Page 30: Utilização Do Recurso De Retardo Para Conforto
Utilização do recurso de retardo para conforto O SleepCube tem um recurso de retardo para conforto que ajuda a facilitar o sono. O vazão de ar é iniciado em uma pressão baixa e, gradualmente, é elevado até a confi guração prescrita nos últimos minutos do tempo de retardo especifi cado. -
Page 31: Mensagens Ao Paciente
Esta opção controla o recurso Auto-ON (Ligamento automático), que inicia Auto-ON automaticamente a vazão de ar após você respirar uma ou duas vezes na máscara. Enabled Ele está sempre ativado quando Auto-OFF (Desligamento automático) está ativado. Se o símbolo de desbloqueio estiver sendo exibido, você pode ajustar esta confi guração. -
Page 32: Informações Para Viagem Com O Sleepcube
INFORMAÇÕES PARA VIAGEM COM O SLEEPCUBE Mudanças na alimentação internacional O SleepCube da DeVilbiss é equipado com uma fonte de alimentação universal. Isso significa que ele é capaz de aceitar automaticamente tensões de linha de 100 a 240 V ~ 50/60 Hz. Não é necessário fazer nenhum ajuste no aparelho se estiver viajando para outro país em que a tensão de linha seja diferente de sua tensão de linha doméstica. -
Page 33: Acessórios/Itens De Reposição
extremidade aberta do adaptador e a outra extremidade do tubo à máscara. Se a máscara for equipada com um orifício de oxigênio, seu médico pode solicitar que você aplique o oxigênio diretamente à máscara. ACESSÓRIOS/ITENS DE REPOSIÇÃO Itens de reposição Filtro da entrada de ar (4/pct.) DV51D-602 Tampa da conexão do aquecedor... - Page 34 Filtros Filtro de entrada de ar O filtro de entrada de ar deve ser verificado a cada 10 dias e limpo conforme necessário. O filtro está localizado na parte posterior do aparelho. AVISO – O funcionamento adequado do filtro é importante para a operação do aparelho e para protegê-lo contra danos. Para limpar, remova o filtro de espuma escura externo da estrutura.
-
Page 35: Descarte Do Produto
DESCARTE DO PRODUTO A embalagem externa é feita de materiais ecologicamente corretos que podem ser usados como matérias-primas secundárias. Caso não precise mais dessa embalagem, leve-a ao local de descarte e reciclagem de resíduos, de acordo com os regulamentos aplicáveis. O equipamento, incluindo os acessórios e componentes internos, não deve ser descartado como resíduo doméstico normal. - Page 36 Problema Causa possível Solução A vazão de ar foi 1. O recurso Auto-OFF (Desligamento 1. Verifique se a máscara está bem ajustada. interrompida automático) detectou uma grande vazão de Ajuste a máscara e o fixador cefálico. inesperadamente ar devido a um ajuste frouxo da máscara. durante o uso ou 2.
-
Page 37: Especificações
Problema Causa possível Solução Nível duplo altera a 1. A sensibilidade do acionador não está 1. Ajuste a sensibilidade do acionador de pressão muito cedo definida corretamente. inspiração e expiração para ajustar a ativação ou muito tarde (sem para o paciente. seguir a respiração). -
Page 38: Diretrizes E Declaração Do Fabricante
Vazão máxima (de acordo com ISO 17510-1:2007) Pressões de teste 3,0 cmH 9,0 cmH 14,0 cmH 20,0 cmH 25,0 cmH Pressão medida na porta do paciente 13,0 19,0 24,0 (cm H Vazão média na porta de conexão do 95,0 160,5 172,2 158,5 139,7... - Page 39 Teste de Nível do teste IEC Nível de imunidade 60601 conformidade Ambiente eletromagnético - Diretrizes Descarga Os pisos devem ser de madeira, concreto ou ±6 kV – contato ±6 kV – contato eletrostática (ESD) cerâmica. Se o piso for sintético, a umidade ±8 kV –...
- Page 40 Distâncias recomendadas de separação entre equipamentos portáteis e móveis de comunicação por RF e este aparelho. Este NÃO é um aparelho ou sistema de suporte de vida. Este aparelho foi concebido para ser usado em ambiente eletromagnético no qual distúrbios irradiados sejam controlados.
- Page 41 CONTROLES DE MENU AVANÇADOS Com o aparelho ligado, pressione os botões Seguinte ou Anterior no teclado numérico para rolar entre os itens no visor. Nome Símbolo Função ITEM ANTERIOR Ao pressionar este botão, a opção de menu anterior é exibida. PRÓXIMO ITEM Ao pressionar este botão, a opção de menu seguinte é...
- Page 42 Modo Bilevel S Modo AutoBilevel P:10.0 P:10.0 Auto S A confi guração do aquecedor é Heat:Off Heat:Off mostrada se o DV5HH estiver conectado. P:10.0 S–T RR:15 P:10.0 S–T RR:15 I/E: 1:1.0 (50%) I/E: 1:1.0 (50%) LK:123 S–S EV:AS LK:123 S–S EV:AS MV:123.4 VT:1234 MV:123.4 VT:1234 Max IPAP...
- Page 43 Lista de menus do SmartFlex O menu SmartFlex está disponível em todos os modos e é um submenu que permite controlar diversas funções do aparelho. Para acessá-lo, pressione o botão para baixo enquanto estiver no menu Advanced (Avançado). Exemplo no visor Descrição Esta confi guração controla a intensidade do alívio de pressão.
- Page 44 Layout do menu Quick View (Exibição rápida) O menu Quick View (Exibição rápida) mostra um resumo das informações relatadas nos dados do SmartCode. As informações contidas no menu Quick View incluem: Número de dias com mais de 4 horas de utilização (a confi guração pode ser alterada para 5 horas pelo médico), índice AHI (apneia/hipopneia), percentual High Leak (Alto vazamento, ou seja, o percentual de tempo com vazamento maior que 95 L/m), e Daily Usage (Utilização diária, ou seja, a média de horas de utilização por dia).
- Page 45 Exemplo no visor Descrição Modo – Tela de informações em tempo real, a linha de cima mostra a pressão Todos P:10.0 S T RR:15 medida (P), a origem do acionador (espontânea ou temporizada), o I/E: 1:1.0 (50%) estado da respiração (o traço no centro da linha de cima vai para o alto durante a inspiração e para baixo durante a expiração).
- Page 46 Exemplo no visor Descrição Modo Ao pressionar a tecla para baixo, entra-se no menu SmartFlex. Consulte Modo SmartFlex Menu a seção “Menu SmartFlex” para obter detalhes CPAP Press Ao pressionar a tecla para baixo, entra-se no menu Enable (Ativar). Todos Enable Menu Consulte a próxima seção para obter detalhes sobre esse menu.
- Page 48 BR-DV57 Rev D DeVilbiss Healthcare LLC • 100 DeVilbiss Drive • Somerset, PA 15501 • USA 8 00 -338-198 8 • 81 4-4 43-488 1 • w ww.D eVilb iss H e a l th c a r e .c o m...
Need help?
Do you have a question about the SLEEPCUBE DV57BR and is the answer not in the manual?
Questions and answers