
Related Manuals for ERA WIRELESS HD CCTV SYSTEM


Summary of Contents for ERA WIRELESS HD CCTV SYSTEM
- Page 1 HOME SECURITY USER MANUAL WIRELESS HD CCTV SYSTEM PLEASE READ THIS MANUAL CAREFULLY BEFORE OPERATING THE SYSTEM. RETAIN FOR FUTURE REFERENCE.
-
Page 2: Table Of Contents
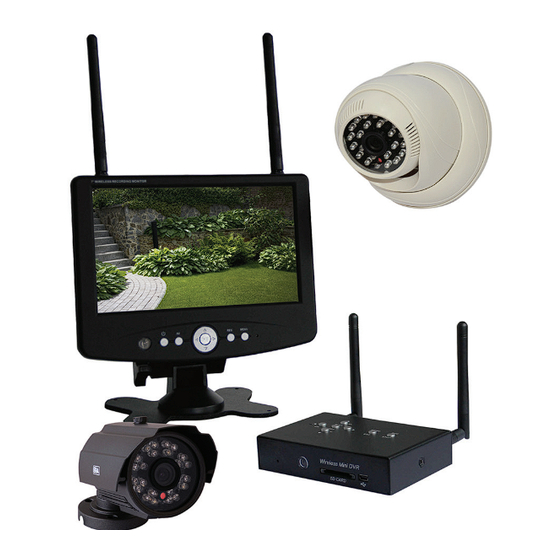
ERA CCTV Contents CONTENTS SAFETY INSTRUCTION ------------------------------------------------------------ 1. INTRODUCTION---------------------------------------------------------------- 1.1 Features ------------------------------------------------------------------ 2. BOX CONTENTS --------------------------------------------------------------- 3. GETTING TO KNOW YOUR DEVICE ------------------------------------------- 3.1 LCD Monitor Overview -------------------------------------------------- 3.2 Cable Connector --------------------------------------------------------- 3.3 Mini DVR ----------------------------------------------------------------- 3.4 Remote Control ---------------------------------------------------------- 3.5 Camera Overview --------------------------------------------------------... - Page 3 ERA CCTV Overview Wireless Bullet Camera 7” LCD Monitor With built in DVR Wireless Dome Camera 20 2...
-
Page 4: Safety Instruction
ERA CCTV Safety SAFETY INSTRUCTION This device has been manufactured in accordance with international safety standards. Please read the enclosed safety information and installation guide fully before proceeding and retain for future use. Unpack all components carefully and check box contents. If any items are missing, please return the product in its original packaging to your retailer. - Page 5 ERA CCTV Safety Explanation of symbols The triangular high voltage symbol is used to warn of the risk of injury or health hazards (e.g. caused by electric shock). The triangular warning symbol indicates important notes in these operating instructions which must be observed.
-
Page 6: Introduction
Introduction 1. INTRODUCTION Thank you for purchasing ERA CCTV. Your new wireless security system has been designed for ease of installation and incorporates a range of features to secure your home. Additional cameras can be purchased separately to extend the system. -
Page 7: Getting To Know Your Device
ERA CCTV Product Overview 3. GETTING TO KNOW YOUR DEVICE 3.1 LCD Monitor with built in DVR Front Side Quad TV-Out Menu Rec IR Sensor: button: Remote control sensor. In the on screen menu, press to select setting MENU button: item or decrease the parameter. -
Page 8: Cable Connector
ERA CCTV Product Overview 3.2 Cable Connector (Monitor) Video Output: Connect the included A/V cable to view video From the receiver on the TV or monitor. DC power outlet: DC 12V/1.5A Rj45: Internet connection 3.3 Mini DVR Front Rear “... -
Page 9: Remote Control
ERA CCTV Product Overview 3.4 Remote Control “Power” button: Power on/off the display screen. “CH1-CH4” button: Single image view mode. “QUAD” button: Quad image view mode “REC/STOP“ button: Press to enter or exit recording mode. “AV” button: Press to output audio/video. When outputting audio and video, the LCD screen will turn black. -
Page 10: Setting Up Your Device
ERA CCTV Installation 4. SETTING UP YOUR DEVICE 4.1 Introduction Careful consideration should be taken when deciding the best place to install the cameras and recording devices. Please read safety instructions on page 1 before proceeding with installation, the below tips may also offer some guidance. - Page 11 ERA CCTV Installation Front of house/door Back of house/door Ideally the camera would be positioned Recommended to install where the roof to view the entire garden, if you have a meets the walls, this will shelter the larger garden you may want to consider camera and maximise the target area.
-
Page 12: Cables
ERA CCTV Installation Side of house/garage Indoors If you want to cover a side entrance or Ideally an indoor camera should be placed blind spot that the front and rear camera in areas of high traffic and close to the can’t see you may want to consider an... -
Page 13: Using Your Device With Your Smartphone
SMARTPHONE 5.1 Installing the App Ensure your smartphone is connected to your home network (Wi Fi). Download the app “ERA CCTV” from your android market or the Apple Store using your smartphone. 5.2 Using the App Once downloaded open the App and select “Add Camera”... -
Page 14: Using Your Device With A Tv/Monitor
ERA CCTV Content If the UID does not appear automatically after search you can add a camera manually by selecting “Add camera”. Enter the UID reference and default password. To find the UID reference use your CCTV device and press “MENU” > “System Info” and select “Network Info”... -
Page 15: Setup Wizard
ERA CCTV Setup 6 SETUP WIZARD 6.1 Introduction When purchased as a kit the cameras are automatically pre-paired to the monitor/DVR. If you have purchased additional cameras please go to section 6.7 Camera Pairing before proceeding. NOTE: It’s highly recommended to pair the cameras to the receiver before permanently mounting the cameras. -
Page 16: Live Display
ERA CCTV Setup 6.4 Live Display Press the “NEXT” button to view each camera channel (1 to 4) individually. When more than one camera is in use press “QUAD” to view all paired cameras. Signal indicator - The signal indicator shows the strength of the connection to the camera. -
Page 17: Recording Mode
ERA CCTV Setup 6.5 Recording Mode The system is designed for SD card recording. Before recording insert the SD card (up to 64 GB capacity) into the SD card slot. Files are recorded in .ASF format and can be played in e.g. -
Page 18: Scheduled Recording Mode
ERA CCTV Setup 6.5.2 Scheduled Recording Mode To schedule a recording press “MENU” > “Record Setting” and enter “Schedule Record”. Enter the schedule settings by pressing “PLAY” Choose one or more cameras to record by using the previous and next button and accept by pressing “PLAY”. -
Page 19: Playback Operation
ERA CCTV Setup 6.6 Playback Operation To view recorded files press “MENU” and select “Playback”. Open the created folder by pressing “PLAY”. Browse through the recordings using the up and down buttons. A recording is selected with the “PLAY” button. -
Page 20: Specification
ERA CCTV Specification 7. SPECIFICATION Monitor Item Parameter Display Screen 7”TFT LCD (16:9) Resolution 800(H) X RGB X 480(V) System PAL / NTSC Video Standard Frequency range 2.400GHz ~ 2.483GHz Wireless Receiving range Up to 200m line of sight Video & Audio... - Page 21 ERA CCTV Specification Mini DVR Mini USB Connector for software update (manufactory use only) Connector SD card 64GB max Power Supply 100-240V~50/60Hz 5V/1A 4W max. Power Consumption Operating Temperature -20°C ~ +50°C Environmental 10% ~ 90% Operating Humidity 86Kpa ~ 106Kpa...
-
Page 22: Troubleshooting
ERA CCTV Troubleshooting 8. TROUBLESHOOTING If you have problems with the system, there is often a quick and simple solution. Please try the following. Problem Solution Check all connections to the camera. Make sure the adapter is plugged in. No picture from a camera Make sure that the receiver is ON. -
Page 23: Monitor System Map
ERA CCTV System Map 9. MONITOR SYSTEM MAP Pairing Camera on/off Camera Setting Camera Resolution Camera Brightness Date & Time Video Out Format Default Setting System Setting Alarm Upgrade Main Menu Language Network SD Card Info Version Info System Info... - Page 24 Guarantee At ERA we take great pride in the quality of our products. Our technology achieves outstanding performance and durability and we can therefore offer a limited guarantee. In the event of any material defects in any product manufactured by us due to faulty design, materials and/or workmanship, and...
Need help?
Do you have a question about the WIRELESS HD CCTV SYSTEM and is the answer not in the manual?
Questions and answers