
Related Manuals for ERA E2


Summary of Contents for ERA E2
- Page 1 ERA Home Security Straight Road, Short Heath, Willenhall, West Midlands, WV12 5RA email: alarms @ eraeverywhere.com Customer Helpline: 0345 257 2500 Garrison V1.0_3616...
-
Page 2: Table Of Contents
Additional Accessories: Pet Friendly PIR Motion Sensor ....................25 This system can easily be extended at any time with the range of ERA Wireless Alarm Accessories, for details visit www.eraeverywhere.com or call our Customer Support team Product Guarantee ........................... 26... -
Page 3: Control Panel
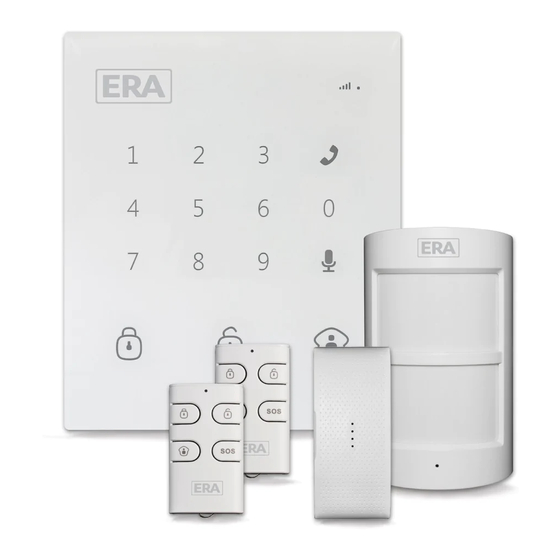
Kit Contents Key Operation Arm: Press to arm your system. All Sensors are now armed. Disarm: Enter the password (default setting: 1234) and press ]. All Sensors except Control Panel those set to a 24-H zone are now inactive. Home Arm: Press to part arm your system. -
Page 4: Accessories
INTRODUCTION Accessories When triggered by the activation of a Sensor, Detector, Remote Control or Personal Alert Remote Control Button the Control Panel sounds the internal siren and sends SMS texts to all stored telephone numbers. When texting is finished the Control Panel will call out to the stored Status Indicator numbers and play the pre-recorded alarm message. -
Page 5: Door/Window Sensor
Door/Window Sensor Pet Friendly PIR Motion Sensor The Door/Window Sensor comprises of a transmitter and a magnet. The Sensor can be The Sensor features pet immunity for animals up to 25kgs. mounted on doors, windows and any other objects that can be opened or closed. When the transmitter and magnet are separated by more than 2 cm, the Sensor will send a Overview signal to the Control Panel to trigger an alarm. - Page 6 Test Mode Pet-Immune Function After self-testing the Sensor automatically enters into Test Mode for 3 minutes and will The Sensor is designed to improve detection accuracy. Pets less than 25kgs will not detect movement every 10 seconds. trigger the alarm. Note: To activate test mode...
-
Page 7: Step 2. Download The App
2G GSM SIM card with calling, SMS and caller display functions. Step 2. Download the App Download the App by searching keywords “ERA Garrison Alarm” in the App Store or Google Play, and then create your own account. ERA Garrison Alarm... -
Page 8: Step 5. System Settings
Step 5. System Settings Change Zone Names The system can easily be extended to include up to 10 Remote Controls and 50 Wireless Sensors. Each sensor can each be assigned a zone name for ease of identification in the event of alarm activation. The naming sequence follows the order of pairing. -
Page 9: Setting Through Sms
Setting through SMS Exit & Entry Delay When the system is armed with Exit/Entry Delay enabled, Sensors on an active zone will not trigger an alarm status until after the Exit/Entry Delay time set has expired. This enables the system to be armed from within the property (at the Control Panel) giving Non-smartphone App users can set-up their system by sending the related SMS text time for the user to exit the property without triggering an alarm. -
Page 10: Other Sms Notifications
Installation Example: 1. Send “5” to the SIM card number of the Control Panel. Sensor Placement The alarm system is most effective with well-placed Sensors. Determine the areas you want to secure and the appropriate Sensor type for the selected areas. The following diagram is for illustration purposes only. -
Page 11: Test Mode
Test Mode Fitting a Door/Window Sensor Test the Sensor prior to installation to ensure that it is in working order. The system can be put into Test Mode for installation & testing purposes. Step 1: Choose a suitable installation location. A Sensor can be fitted to a door, window To enter Test Mode press the button on the Control Panel three times. -
Page 12: Pairing/Deleting Accessories
Pairing/Deleting Accessories Fitting a Pet Friendly PIR Motion Sensor lmportant: Avoid installing Sensors facing windows or near to heat sources, such as; extraction units, air-conditioning, a microwave oven, refrigerator, etc. Avoid placing two The included accessories have been paired with the Control Panel by default. To pair Motion Sensors opposite to each other and within each others detection range. -
Page 13: Pairing A Wireless Solar Siren
Battery Replacement Pairing a Wireless Solar Siren Solar Siren sold separately. 1. Enter the Siren into pairing mode (refer to the relevant user manual). Remote Control 2. Press on the Control Panel to send out a pairing signal to the Siren. When a beep is heard from the Siren it is successfully paired. -
Page 14: Arm & Disarm By Free Phone Call
Arm & Disarm by Free Phone Call Specifications Control Panel To arm the alarm system by free phone call, call the SIM card telephone number in the Control Panel. When you hear the dial tone hang up. The Control Panel will be armed and will call you back - do not answer the call, it will stop automatically. - Page 15 Door/Window Sensor PRODUCT GUARANTEE * We at ERA firmly believe in the quality of our goods. Our technology achieves outstanding Power Supply DC 6V (CR2032 lithium battery x 2pcs) performance and durability and we can therefore offer, in addition to your statutory rights, an Static Current <35 uA...
- Page 16 Suggested installation layout Smartphone not included...
Need help?
Do you have a question about the E2 and is the answer not in the manual?
Questions and answers