Advertisement
Quick Links
SGLB01
Black
SGLS01
Silver
FEATURES
Provides tilt and vertical
adjustment features
to achieve the ideal
viewing angle
Incremental tilt of -2°, 0°
and +5° to achieve the
ideal display viewing angle
Vertical display adjustment
feature for optimal viewing
height
Internal cable management
neatly hides all cords
and cables for a clean,
clutter-free look
Adjustable glass shelving
for AV components and
accessories hold up to 50lb
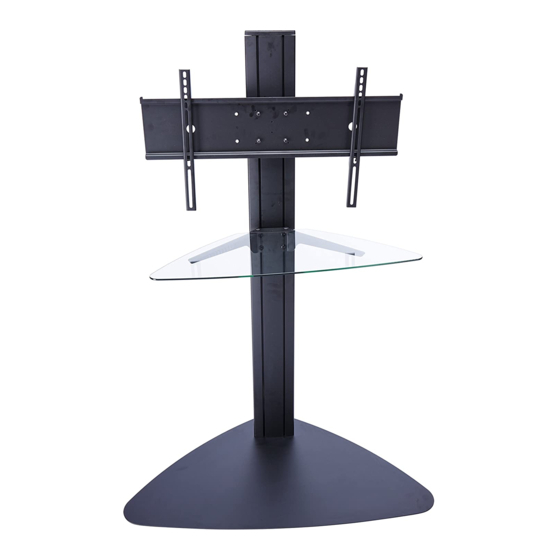
Flat Panel Stand
for 32" to 65" Displays
This flat panel stand for 32" to 65" displays provides tilt and vertical adjustment features to achieve
the ideal viewing angle. Centralized AV component and accessory placement is easy with an
adjustable glass shelf and a triangular base. Designed to hide all cords and cables, its internal
management system offers a clean, clutter-free appearance.
Display size: 32" - 65"
Max load: 200lb (90.7kg)
TV MOUNT BRACKET
Includes tv mount bracket
which features tilt options
HOLLOW FOR CABLES
Internal space for cables
so that they are hidden
VERTICAL ADJUSTMENT
Continuous vertical
adjustment allows you to
position display to desired
viewing height
COMPONENT PLACEMENT
Clear glass shelf provide
storage space for AV
components - also available
as a two shelf configuration
(2nd shelf is extra)
SLEEK DESIGN
Unique triangular base
design is ideal for fitting in
tight locations like a corner
or where space is limited
Internal cable management
150lb display (68kg)
50lb per shelf (22.6kg)
Incremental tilt
Advertisement

Subscribe to Our Youtube Channel
Related Manuals for PEERLESS SGLS01


Summary of Contents for PEERLESS SGLS01
- Page 1 SGLB01 Flat Panel Stand Black SGLS01 for 32" to 65" Displays Silver This flat panel stand for 32" to 65" displays provides tilt and vertical adjustment features to achieve the ideal viewing angle. Centralized AV component and accessory placement is easy with an adjustable glass shelf and a triangular base.
- Page 2 A R C H I T E C T S S P E C I F I C A T I O N S Flat Panel Stand shall be a Peerless model SGLS01, SGLB01 and shall be installed where indicated on the plans.
- Page 3 Installation and Assembly: 32" - 65" Flat Panel Display Stand Model: SGLS01, SGLB01 Max Load Capacity: 150 lb (68 kg) display 50 lb (22.7 kg) per shelf 3215 W. North Ave. • Melrose Park, IL 60160 • (800) 729-0307 or (708) 865-8870 • Fax: (708) 865-2941 • www.peerlessmounts.com...
- Page 4 NOTE: Read entire instruction sheet before you start installation and assembly. WARNING • Do not begin to install your Peerless product until you have read and understood the instructions and warnings contained in this Installation Sheet. If you have any questions regarding any of the instructions or warnings, please call Peerless customer care at 1-800-729-0307.
-
Page 5: Parts List
T M10 x 15 mm socket screw 520-9262 560-9716 U 6 mm allen wrench 560-9716 NOTE: Some parts may appear slightly different than illustrated. 3 of 33 ISSUED: 07-28-06 SHEET #: 202-9156-11 02-25-11 Visit Peerless website at www.peerlessmounts.com For customer care call 1-800-729-0307 or 708-865-8870... -
Page 6: Assembling Floor Stand
Run cords through upright (H) using cord management holes as shown in fi gure 1.2. CORD MANAGEMENT HOLE CORD MANAGEMENT HOLE fi g. 1.1 fi g. 1.2 4 of 33 ISSUED: 07-28-06 SHEET #: 202-9156-11 02-25-11 Visit Peerless website at www.peerlessmounts.com For customer care call 1-800-729-0307 or 708-865-8870... - Page 7 Attach shelf clamp bracket (D) to shelf support (C) using two 1/4-20 x 20 mm screws (M) and two 1/4-20 nuts (N). 5 of 33 ISSUED: 07-28-06 SHEET #: 202-9156-11 02-25-11 Visit Peerless website at www.peerlessmounts.com For customer care call 1-800-729-0307 or 708-865-8870...
- Page 8 (A), leaving 1/8" of exposed thread as shown in fi gure 9 and detail 3. 1/8" DETAIL 3 fi g. 9 6 of 33 ISSUED: 07-28-06 SHEET #: 202-9156-11 02-25-11 Visit Peerless website at www.peerlessmounts.com For customer care call 1-800-729-0307 or 708-865-8870...
-
Page 9: Attaching Display Using Universal Plate With Adapter Brackets
Insert two 1/4-20 x 12 mm screws (L) into holes indicated below for desired display orientation. Tighten all screws using 4 mm allen wrench (R). No Tilt 2° Backward Tilt 5° Forward Tilt 7 of 33 ISSUED: 07-28-06 SHEET #: 202-9156-11 02-25-11 Visit Peerless website at www.peerlessmounts.com For customer care call 1-800-729-0307 or 708-865-8870... - Page 10 NOTE: For fl at back displays proceed to step 13-1. For bump-out or recessed back display skip to step 13-2. 8 of 33 ISSUED: 07-28-06 SHEET #: 202-9156-11 02-25-11 Visit Peerless website at www.peerlessmounts.com For customer care call 1-800-729-0307 or 708-865-8870...
- Page 11 SCREW ADAPTER BRACKET (G) If you have any questions, please call Peerless customer care at 1-800-865-2112. For Bump-out or Recessed Back Display Begin with longer length screw, hand thread through multi-washer, adapter bracket and spacer in that order into 13-2 display as shown below.
- Page 12 To remove display from mount, loosen screws, swing display away from mount, and lift display off of mount. SCREWS DETAIL 4 10 of 33 ISSUED: 07-28-06 SHEET #: 202-9156-11 02-25-11 Visit Peerless website at www.peerlessmounts.com For customer care call 1-800-729-0307 or 708-865-8870...
-
Page 13: Attaching Display With Vesa 100 Mounting Pattern
ISSUED: 07-28-06 SHEET #: 202-9156-11 02-25-11 Visit Peerless website at www.peerlessmounts.com For customer care call 1-800-729-0307 or 708-865-8870 © 2011, Peerless Industries, Inc. All rights reserved. All other brand and product names are trademarks or registered trademarks of their respective owners.
Need help?
Do you have a question about the SGLS01 and is the answer not in the manual?
Questions and answers