
Related Manuals for Slinex ML-30СR


Summary of Contents for Slinex ML-30СR
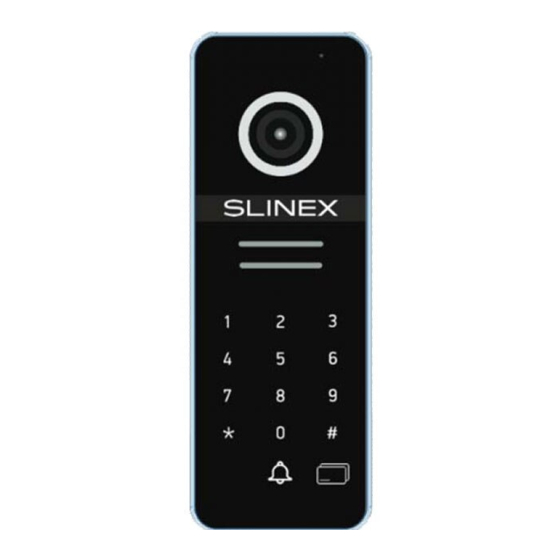
- Page 1 Design. Uniqueness. Innovations . Design. Uniqueness. Innovations . ML-30СR High definition video outdoor panel Technical support AHD 1080P Mifare (2 Mp) User manual Thank you for choosing our equipment...
- Page 2 ML-30CR Safety instructions Nature protection Read and keep that manual. Don’t throw away the device with other industrial or The device installation process should be carried out by the quli ed nutritive trash if you see that symbol. Some regions have specialists.
-
Page 3: Table Of Contents
ML-30CR Table of contents 1. Package 1. Package ..........................ML-30CR outdoor panel − 1 pc. Surface mounting bracket − 1 pc. 2. Speci cation ........................Angle bracket − 1 pc. 3. Description........................Power supply − 1 pc. 4. Schematic diagrams ....................Wireless keys −... -
Page 4: Description
ML-30CR 3. Description Door panel video camera can work in three basic modes: CVBS (PAL), AHD (720p) or AHD (1080p). Remove resin cap on the back cover of the outdoor panel. Then press and hold the camera mode button by screwdriver to switch between the modes in a such sequence: PAL →... -
Page 5: Power Supply − 1 Pc
ML-30CR 4. Schematic diagrams 19 mm 48 mm Diagram 1. Outdoor panel with direct mechanical lock connection. Door 1 CCTV 1 Input Door 2 CCTV 2 Output Power Sonik 7 Wire colors Power (to the monitor) Black Ground (to the monitor) Yellow Video (to the monitor) White... -
Page 6: Installation
ML-30CR 5. Installation Diagram 2. Mechanical lock connection using separate power supply. Mechanical lock Power supply Blue Brown Diagram 3. Magnetic lock connection. Angle mounting: 1) Take the angle bracket from the kit and place it 150-160 cm from the oor line;... -
Page 7: Settings
ML-30CR 6. Settings Connect +12V power supply through the gray (+) and black (–) wires of the door panel communication cable. 6.1. Memory reset Press and hold «reset» button (situated under resin cap on the back cover of the door panel, see page 6) for 3 seconds, until long beep sound is heard. Release «reset»... -
Page 8: Unlock Password Setting
ML-30CR 6.4. Unlock password deleting 6.3. Unlock password setting 1) In standby mode enter master password (default master password is 1) In standby mode enter master password (default master password is 1234) and press # button to enter settings mode. Double long beep 1234) and press # button to enter settings mode. -
Page 9: Wireless Unlock Key Setting
ML-30CR There is also an alternative way to add wireless unlock keys. In standby mode 6.5. Wireless unlock key setting shortly press «reset» button (situated under resin cap on the back cover of the door panel, see page 6). Then touch the new keys near wireless card 1) In standby mode enter master password (default master password is reader zone one by one. -
Page 10: Keyboard Backlight Mode
ML-30CR 7. Settings diagram Example: Change New master password master password delete wireless unlock key from 003 and 004 cell numbers XXXX# 1234# 4# 003# 004# ** Cell number 6.7. Keyboard backlight setup XXX# unlock password new unlock password 1) In standby mode enter master password (default master password is XXXX# 1234) and press # button to enter settings mode. -
Page 11: Limited Warranty
ML-30CR whatsoever resulting from loss of, damage to, or corruption of, content or 8. Limited warranty data or any costs associated with determining the source of system problems Manufacturer guarantees product normal functioning during the warranty or removing, servicing or installing products. This warranty excludes the third period if the user keeps all safety instructions described in that manual.
Need help?
Do you have a question about the ML-30СR and is the answer not in the manual?
Questions and answers