Advertisement
K45R, K45V - Installation Instructions
Models K45RC-XX & K45VC-XX
Please read complete instruction prior to installation and keep for future reference!
1. Product to be installed by a qualified electrician.
2. Prior to installation ensure power is off at fuse box to prevent electrical shock.
1
1.1
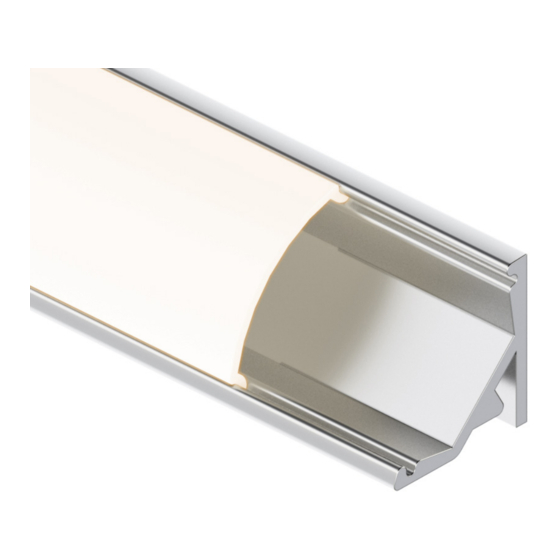
lens
extrusion
Note: Prior to install, 24VDC power must be present for wiring. Also review
and account for all parts necessary to install properly.
1.1 Snap the lens into the extrusion, then align & center the extrusion to the
determined location. Make any reference marks to install the extrusion.
3
extrusion
3.1 LineLED can be shortened by cutting along the dashed lines in between the solder pads. Make sure the cut is made on the side of the LineLED without the wire leads.
LineLED cannot touch the metal endcap which will shorten the circuit.
Optional: Extrusion are not waterproof. If it is going to be installed facing up and in a wet location, drainage holes should be drilled along the inner corner of the extrusion
every 12". Drill 1/16" to 1/8" diameters holes before installing LED strip.
4
0.75"
0.74"
0.77"
MB-K45RC-SS
K45R Channel Stainles steel
screw-in mounting bracket
4.1 Align the mounting brackets to the edge of the surface, followed by securing each mounting bracket with 1 screws. Mounting bracket must be installed every 20". Snap
the extrusion into the mounting brackets. Reference dimensions for additional details. NOTE: If mounting next to a wall, leave a 0.25" gap. To later remove if needed.
4.2 To remove the extrusion from the mounting brackets, carefully insert a flat screwdriver to the bottom edge of the extrusion then pull up until the extrusion pops up.
*LUMINII RESERVES THE RIGHTS TO CHANGE SPECIFICATION & INSTRUCTION WITHOUT NOTICE
reference mark
3.1
cut
LineLED
0.75"
0.60"
0.75"
MB-K45VC-SS
K45V Channel Stainles steel
screw-in mounting bracket
2
tape
lens
extrusion
Caution: Safety equipment is recommended, when modifications are being
made to the extrusion & lens.
2.1 If necessary extrusion & lens can be cut in the field. Using the proper blade
for aluminum, cut to the desired length. To avoid any damages to the lens
while cutting, wrap some tape around the ends. Then remove after the cut.
wire
leads
Page 1 of 2
2.1
miter saw
extrusion
with lens
LineLED
3.1
cut
solder pads
extrusion
screws
4.1
REV1.0 May 27, 2020 1:00 PM
Advertisement
Table of Contents

Related Manuals for luminii Optic Arts K45RC Series


Summary of Contents for luminii Optic Arts K45RC Series
- Page 1 4.2 To remove the extrusion from the mounting brackets, carefully insert a flat screwdriver to the bottom edge of the extrusion then pull up until the extrusion pops up. REV1.0 May 27, 2020 1:00 PM *LUMINII RESERVES THE RIGHTS TO CHANGE SPECIFICATION & INSTRUCTION WITHOUT NOTICE...
- Page 2 5.3 If extrusion going to be installed outside, add silicone to the endcaps & the wiring instructions. full length of the lens. To help avoid getting water inside the extrusion, but will not make waterproof. REV1.0 May 27, 2020 1:00 PM *LUMINII RESERVES THE RIGHTS TO CHANGE SPECIFICATION & INSTRUCTION WITHOUT NOTICE...
Need help?
Do you have a question about the Optic Arts K45RC Series and is the answer not in the manual?
Questions and answers