Advertisement
Available languages
Available languages
Quick Links
WRAP-AROUND HANDGUARD
Husqvarna Motorcycles GmbH
KTM Sportmotorcycle GmbH
Stallhofnerstraße 3
Stallhofnerstraße 3
A-5230 Mattighofen
A-5230 Mattighofen
www.husqvarna-motorcycles.com
www.ktm.com
79602979044
01.2017
3.213.654
*3213654*
Advertisement

Related Manuals for KTM 79602979044


Summary of Contents for KTM 79602979044
- Page 1 WRAP-AROUND HANDGUARD 01.2017 79602979044 3.213.654 Husqvarna Motorcycles GmbH KTM Sportmotorcycle GmbH Stallhofnerstraße 3 Stallhofnerstraße 3 *3213654* A-5230 Mattighofen A-5230 Mattighofen www.husqvarna-motorcycles.com www.ktm.com...
- Page 2 3 DEUTSCH Wir freuen uns, dass Sie sich für dieses Produkt entschieden haben. Unser hochwertiges Qualitätsprodukt ist rennerprobt und wurde speziell für sportliche Herausforderungen entwickelt. Eine korrekte Montage des Produktes ist unerlässlich, um ein Maximum an Sicherheit und Funktionalität gewährleisten zu können. Bitte befolgen Sie daher die Montageanleitung oder wenden Sie sich an Ihren autorisierten Fachhändler.
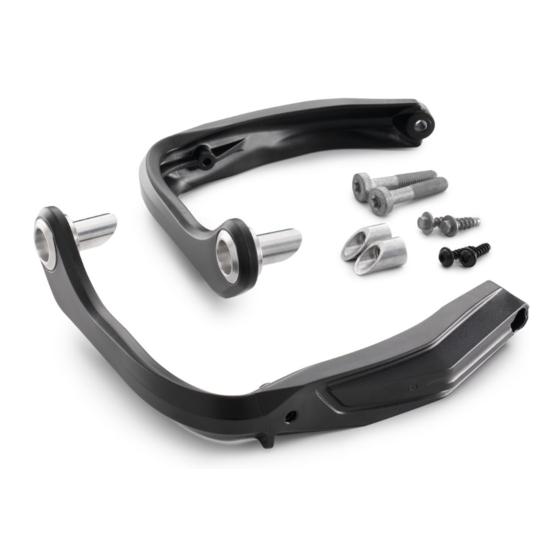
- Page 3 Lieferumfang 1x Bügel Handschutz links 1x Bügel Handschutz rechts 2x Bundschraube M8x40 2x Klemme innen 2x Aluminium-Schraube K60x20 2x Stahl-Schraube K50x18 Die Handschutz-Bügel können nur in Kombination mit fol- genden Artikeln verbaut werden: - Lock-on Griffe mit offenem Griffende (nicht im Lieferumfang) Montage beidseitig - Kabelbinder entfernen.
- Page 4 - Bügel Handschutz links positionieren. - Bügel Handschutz rechts positionieren. - Schrauben (Lieferumfang) montieren und festziehen. - Schrauben (Lieferumfang) montieren und festziehen. - Schrauben mit Klemmen innen (alles Lieferumfang) montieren. - Lock-on Griffe mit offenem Griffende (nicht im Lieferumfang) gemäß Anleitung montieren. - Handschutz links positionieren.
- Page 5 Scope of supply 1x handguard hanger, left 1x handguard hanger, right 2x collar screw M8x40 2x inside clamp 2x aluminum screw K60x20 2x steel screw K50x18 The handguard hanger can only be installed in combination with the following items: - Lock-on grips with open grip ends (not included) Mounting on both sides - Remove the cable tie(s).
- Page 6 - Position left handguard hanger. - Position right handguard hanger. - Mount and tighten screws (included). - Mount and tighten screws (included). - Mount screws with inside clamp (all included). - Mount lock-on grips with open grip ends (not included) in accordance with instructions.
- Page 7 Materiale fornito 1 staffetta del paramano di sinistra 1 staffetta del paramano di destra 2 viti fl angiate M8x40 2 morsetti interni 2 viti in alluminio K60x20 2 viti in acciaio K50x18 Le staffette dei paramani possono essere montate solo in combinazione con i seguenti articoli: - Manopole lock-on con estremità...
- Page 8 - Posizionare la staffetta del paramano di sinistra. - Posizionare la staffetta del paramano di destra. - Montare e serrare le viti (in dotazione). - Montare e serrare le viti (in dotazione). - Montare le viti con i morsetti interni (tutto in dotazione).
- Page 9 Contenu de la livraison 1x bride de fi xation pour protection de main gauche 1x bride de fi xation pour protection de main droite 2x vis à épaulement M8x40 2x guides intérieurs 2x vis aluminium K60x20 2x vis acier K50x18 Les brides de fi...
- Page 10 - Positionner la bride de fi xation pour protection de main gauche. - Positionner la bride de fi xation pour protection de main droite. - Mettre les vis (fournies) en place et les serrer. - Mettre les vis (fournies) en place et les serrer. - Mettre les vis en place avec les guides intérieurs (tous...
- Page 11 Volumen de suministro 1x estribo del cubremanos izquierdo 1x estribo del cubremanos derecho 2x tornillos de collarín M8x40 2x pinzas internas 2x tornillos de aluminio K60x20 2x tornillos de acero K50x18 El estribo del cubremanos solo se puede montar con los artículos que se indican a continuación: - Puños Lock-on con extremos abiertos (no incluidos en el volu- men de suministro)
- Page 12 - Colocar el estribo del cubremanos izquierdo. - Colocar el estribo del cubremanos derecho. - Montar y apretar los tornillos (volumen de suministro). - Montar y apretar los tornillos (volumen de suministro). - Montar los tornillos con las pinzas internas (todo incluido en el volumen de suministro).
Need help?
Do you have a question about the 79602979044 and is the answer not in the manual?
Questions and answers