
Related Manuals for Netstor NS388S


Summary of Contents for Netstor NS388S
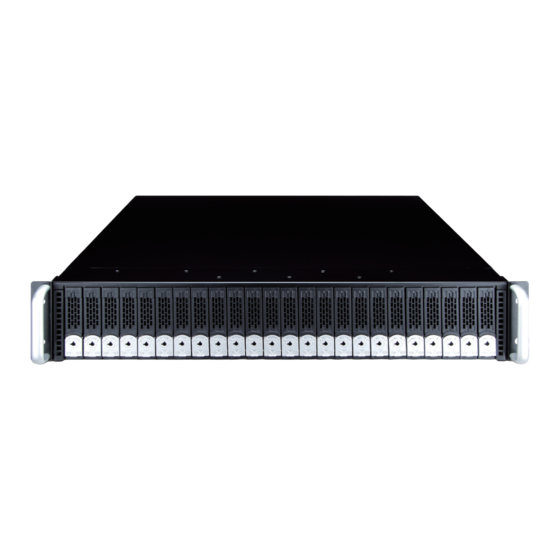
- Page 1 NS388S 2U 24-bay(2.5") SAS (Host) to SAS/SATA (Disk) JBOD with 12Gb/s SAS Expander User Manual Third edition, Feb. 2020...
-
Page 2: Safety Precautions
• If unusual smells, sounds, or smoke come from the device, or if liquids enter it, switch it off immediately and unplug it from the electrical outlet. • Follow the instructions in this manual carefully; contact Netstor Customer Service for additional advice not covered in this User’s Guide. - Page 3 1. Introduction 1.1 Overview 1.2 Package Checklist 2. Hardware Installation 2.1 Panel Layout 2.2 Enclosure Setup 3. CLI Manager 3.1 Expander RS-232C Port Pin Assignment 3.2 Start-up VT100 Screen 3.3 CLI Command •HELP Command •SHOWLOGS Command •PASS Command •CLEARLOGS Command •LO Command •FDL Command •GROUP Command...
-
Page 4: Package Checklist
Before the installation of the enclosure, verify the items below are included in the package. 。A. Enclosure × 1 。B. 2.5” drive tray (installed in the NS388S) × 24 。C. Hard disk drive mounting screw × 96 。D. Key for drive tray × 2 。E. -
Page 5: Hardware Installation
2. Hardware Installation This section gives the layout of the panel and describes the procedures for setting up the NS388S enclosure. 2.1 Panel Layout 1. Drive presence LED 2. Activity indicator LED 。White – Power on 。Blue – HDD ready 。Flash Blue –... -
Page 6: Mute Button
13. Swappable fan 2. Power cord receptacle 1. Power switch 3. Fan status LED 。Normal – No light 。Failure – Red 7 ~ 10. SAS Exp. connector SAS Exp. connector port is with auto detection for host connection and for downstream daisy-chained storage 4. - Page 7 2.2 Enclosure Setup 1. Remove the NS388S enclosure from its packaging, and place the enclosure next to PC, server, or workstation. 2. Hold one of the drive trays from the enclosure and push its button downward for the release of the lever until the lever pops out.
- Page 8 5. Insert the drive module into the NS388S enclosure correctly until its lever appears to shut, and then press the lever to close until it clicks to ensure that the drive module is within the enclosure.
- Page 9 7. Connect NS388S enclosure to the host interface of a RAID card through the SFF-8644 HD mini-SAS data cable. Connection between NS388S enclosure and RAID card port is shown as follows: Host Computer NS388S’s SAS Exp. connectors support auto detection; among enclosure’s four SFF-8644 ports, the right two SFF-8644 ports are for host connection;...
-
Page 10: Zone Mode
12Gbps SAS Expander module within the Netstor unit at the same time. Therefore, when one 12G SAS Expander module accidentally fails, the other host computer will still be able to access the data files stored on the Netstor storage in support of the failover. Host Redundant... - Page 11 NS388S enclosure can be run in one of the two modes: •Normal Mode •Zone Mode You must select either mode using the CLI utility and re-start the NS388S enclosure. The default is Normal Mode. Change the mode while NS388S enclosure is on. This will not affect expander operation until NS388S enclosure is rebooted.
- Page 12 11. The NS388S enclosure provides redundant power supply unit, so connect one end of the two power cords to the two receptacles on rear of NS388S enclosure, and then connect the other end of the two power cords to the power outlets.
- Page 13 CLI function. Whichever terminal emulation program is used must support the 1K XMODEM file transfer protocol. The serial port on NS388S SAS JBOD enclosure’s bracket can be used in VT100 mode. The provided interface cable converts the RS232 signal of the RJ11 connector on the SAS expander controller into a 9-pin D-Sub male connector.
-
Page 14: Start-Up Vt100 Screen
3.1 Expander RS-232C Port Pin Assignment To ensure proper communications between NS388S SAS JBOD enclosure and the VT-100 Terminal Emulation, please configure the VT100 terminal emulation settings to the values shown below: Terminal requirement Connection Null-modem cable Baud Rate 115,200... - Page 15 Step 1. Open the “Taskbar Start” / ”Programs" / "Accessories" / "Communications" / "Hyper Terminal". (Hyper Terminal requires version 3.0 or higher). Step 2. Open “HYPERTRM.EXE”. Go Top ↑...
- Page 16 Step 3. Enter a name you prefer and then click “OK”. Step 4. Select an appropriate connecting port and then click "OK". Step 5. Configure the port parameter settings and then click “OK”. Bits per second: 115200 Data bits: 8 Parity: None Stop bits: 1 Flow control: None...
- Page 17 Step 6. Open the file menu and select “Properties” Step 7. Configure the "Connect To" setting. Step 8. Configure the "Settings" items and then click "OK". Function, arrow and ctrl keys act as: Terminal Keys Backspace key sends: Crtl+H Emulation: VT100 Telnet terminal: VT100 Back scroll buffer lines: 500 Go Top ↑...
-
Page 18: Cli Command
3.3 CLI Command This section provides detailed information about NS388S enclosure’s CLI function. All the commands please type in lower case. The following table gives a summary of all commands to CLI function. Function Command Syntax Set password for SAS Expander enclosure... -
Page 19: Help Command
1. HELP Command This command provides an on-line table of contents, providing brief descriptions of the help sub-commands. You can use the <CLI> help to get detail information about the CLI commands summary. Synt a x : C L I > h e l p [ E n t e r ] CLI>... -
Page 20: Pass Command
2. PASS Command The pass command allows user to set or clear 12Gbps SAS JBOD enclosure password protection feature. Once the password has been set, the user can only monitor and access 12Gbps SAS JBOD enclosure setting by providing the correct password. The password can accept max. -
Page 21: Group Command
4. GROUP Command The group command is used to associate the external port with the devices/phys as one zone group. The three external cable ports and all devices/phys slots will default associate with one zone group. S y n t a x : g r { d e v Gr ou p No[1 ..] { ci, cj , ck ,..} S ta r t- I n de x( D) E nd-I n de x( D )} d e v : u se d r i v e sl ot i nde x... - Page 22 →Set the connector 1 and connector 2 and slot 5 to slot 16 as group 2 Synt a x : C L I > g r d e v 2 c 1 , c 2 5 1 6 [ En t er ] CLI>...
-
Page 23: Disable Zoning
→Enable zoning Synt a x : C L I > g r o n [ En t e r] CLI> GLI>gr on Enable zoning - save zone configuration ok CLI> →Disable zoning Synt a x : C L I > g r o f f [ En t e r] CLI>... - Page 24 ID/chip revision, enclosure ID, chassis type, firmware revision and firmware build date. Synt a x : C L I > s ys [ En t e r] ================================================================================= Hardware Revision Information: - ================================================================================= Vendor ID :Netstor Product ID :NS388S__2 Expander Serial No :151230S324250008 Backplane Serial No :151211S324250001...
- Page 25 6. SPIN Command The spin command defines the mode of staggering SATA drive spin-up function connected to 12Gbps SAS JBOD enclosure. This command gives 12Gbps SAS JBOD enclosure the ability to spin up the disk drives sequentially or in groups, allowing the drives to come ready at the optimum time without straining the system power supply.
- Page 26 7. BU Command The bu command is for enable / disable audible alarm function of the 12Gbps SAS JBOD enclosure. Synt a x : C L I > b u [ e n | d i s ] →Check buzzer status Syn t a x : C L I >...
- Page 27 8. LSD Command The lsd command is use to show the element devices status in the expander controller. With parameter, this command only shows the select device status. S y n t a x : C L I > l s d [ h d d | t e mp | vol t | cur r | pw r | con | f a n | a la r m ] S h ow SE S e l e m e n t s i nf or ma ti on: →Show SES Array Device Element information Synt a x : C L I >...
- Page 28 →Show Temperature Element information Synt a x : C L I > l s d t e m p CLI>lsd temp Temperature Element (0x04): ======================================================================== NAME CT(C) STATUS ======================================================================== Exp Internal Temp Exp Anbient Temp Bp Slot 01 Temp Bp Slot 02 Temp Bp Slot 03 Temp Bp Slot 04 Temp Bp Slot 05 Temp...
- Page 29 →Show Voltage Element information Synt a x : C L I > l s d v o l t CLI> CLI>lsd volt Voltage Element (0x12): ============================================================================= NAME VOLT(V) OVLMT UVLMT STATUS ============================================================================= Exp Voltage 3.3V 3.29 3.46 3.14 Exp Voltage 0.9V 0.92 0.95 0.85...
- Page 30 →Show Power Supply Element information Synt a x : C L I > l s d p w r CLI> CLI>lsd pwr PowerSupply Element (0x02): ==================================================== NAME STATUS ==================================================== PSU 1 PSU 2 CLI> S T A T US : P ow e r S u p ply el em en t sta t us →Show Connector Element information Synt a x : C L I >...
- Page 31 →Show Cooling Element information Synt a x : C L I > l s d f a n CLI> CLI>lsd fan Cooling Element (0x03): ======================================================================== NAME SPEED CODE STATUS ======================================================================== Enclosure Fan 1 2960 Enclosure Fan 2 1480 PSU 1 Fan 1 4000 PSU 1 Fan 2 4000...
- Page 32 9. SHOWLOGS Command The showlogs command allows you to display system event notifications that have been generated by 12Gbps SAS JBOD enclosure. Sy nt a x : C L I> s h o w l o g s [ D i s p l a yMo de ( h e x , de t a i l, d ef a u l t ) ] CL I >...
- Page 33 11. FDL Command 12Gbps SAS JBOD enclosure has added the expander firmware update through the CLI on the external RS-232 port. Before you process the firmware update, there are two block regions that you can update expander firmware on 12Gbps SAS JBOD controller. (1) CODE region - for FW file (2) MFGB region - for MFG file The following firmware and data are available in the following filename format.
- Page 34 C. Then under Tera Term program, use the pull down menu item “File” → “Transfer” → “XMODEM” → “Send” when dialog box prompts, choose and the file in the directory then press “send”. •If the expander receives the file under the timeout limit (60s), the process starts. D.
- Page 35 Update SAS expander MFGB region: A. One command to update firmware. Step as follow, B. Issue download & update command under “CLI>”. CLI > f d l m f g b 0 CLI> CLI>fdl mfgb 0 Please Use XModem Protocol for File Transmission. Use Q Or q to quit Download before starting XModem.
- Page 36 D. You can also cancel the program step by type ‘q’. E. If the transfer process complete, the transferred data is updated. Cold-start expander (Power cycle again) to take effect. CLI Command List 12. HSPC Command (HDD Slot Power Control) The hspc command can set or report power state of each HDD slot in the 12Gbps SAS JBOD enclosure.
- Page 37 →Turn Off Power of HDD Slot 2 and check status again CLI > h s p c 2 o f f CLI> CLI>hspc 2 off Power off HDD slot 2 CL I > h s p c CLI> CLI>hspc HDD Slot Power Status: ======================================================================== SLOT STATUS...
- Page 38 Show or Set Ethernet port configuration. The default IP address for NS388S’s LAN (RJ-45) port is 192.168.10.1 Synt a x : C L I > e t h < i p a d d r( *) > < s u bn et ( *) > < g a t ew a y ( *) >...
-
Page 39: Reset Command
14. RESET Command Reset 12Gbps SAS JBOD controller. Synt a x : C L I > re s e t CLI> CLI>reset CLI Command List Go Top ↑... - Page 40 When one of the fans breaks down, the buzzer inside the SAS Expander enclosure will beep to alert the administrator; how to mute the beep? Answer: Press the alarm mute button on SAS Expander at rear of NS388S enclosure as Figure 4-1 to silence the beeping alert. Mute Button...
- Page 41 Netstor Technology Co. Ltd. 6F, No. 1, Alley 16, Lane 235, Baoqiao Rd., Xindian District, New Taipei City 231-45, Taiwan, R.O.C. www. netstor .com .tw sales @ netstor.com.tw +886 2 2917 1500 Go Top ↑...
Need help?
Do you have a question about the NS388S and is the answer not in the manual?
Questions and answers