
Related Manuals for Netstor NA338TB3


Summary of Contents for Netstor NA338TB3
- Page 1 NA338TB3 2U 16 bay (2.5") Thunderbolt™ 3 Storage and PCIe Expansion User Manual First edition, Nov. 2020...
- Page 2 • With the exception of the user-swappable parts, do no attempt to disassemble or modify the enclosure. If this device appears to be malfunctioning, contact Netstor. • Do not drop the enclosures or any of its drive modules; dropping or mishandling of the enclosure or drive modules may result in a malfunction.
-
Page 3: Table Of Contents
3.3.2 Embedded Mac mini installation 4. Operation and Verification 4.1 Connection and System Power On/Off 4.1.1 Embedded Mac mini Application 4.1.2 Mac/PC Connected to Netstor Unit Externally 4.2 Verification 4.2.1 Verification Steps for macOS 4.2.2 Verification Steps for Windows 4.3 Thunderbolt 3 Card LEDs Status... -
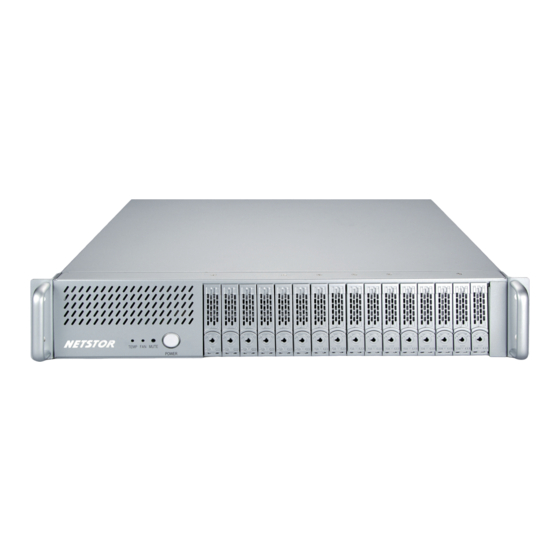
Page 4: Overview
1. Overview 1.1 Overview The Netstor NA338TB3 storage enclosure accommodates up to sixteen high-speed SSDs or 2.5" HDDs for mass data storage. Based on the latest Thunderbolt 3 technology and PCIe architecture, the creative, innovative design of the NA338TB3 features highest RAID level data protection and PCIe expansion to the Thunderbolt 3 computer through the present-day blazing-fast Thunderbolt 3 (40Gbps) interface. -
Page 5: Panel Layout
2. Panel Layout Note: 1. Drive Power LED The NA338TB3 chassis supports SGPIO. When any SSD/HDD fails, the 。White - Power On Indicator red LED indicator on the tray will light. The SGPIO function will be effective when the RAID card supports SGPIO function (for example, 2. -
Page 6: Enclosure Setup
RAID/third-party PCIe card installation, unscrew the three black screws at rear right side of NA338TB3 chassis as well as unscrew the black screw at the front side of PCIe expansion unit. After unscrewing, manually turn the PCIe expansion unit for the upright position. - Page 7 5. The layout of the PCIe slots within the PCIe expansion unit is as follows: slot 4 slot 1 slot 3 slot 2 Slot 1 : Thunderbolt 3 target card (already fixed in the unit) Slot 2 : PCIe x8 slot (open-type; supports PCIe card x16/x8/x4/x1) RAID card is recommended to be installed in this slot Slot 3 : PCIe x8 slot (closed-type;...
-
Page 8: Ssds Or 2.5" Hdds Installation For Storage
3.2 SSDs or 2.5" HDDs installation for storage 1. Take out the drive trays in front of the NA338TB3 chassis. 2. Place each SSD or 2.5" HDD in the drive tray, and fix the drive with the four mounting screws to the tray. -
Page 9: Mac Host Connection
1. After loosening the two thumbscrews on the removable integrated plate drawer, pull the drawer out of the NA338TB3 chassis. Use a tool to bend the metal board on the vertical side of the plate drawer to detach the metal board from drawer. - Page 10 2. Loosen the thumbscrew on plate drawer's cover, and place Mac mini into the drawer case. Close and tighten the thumbscrew to fasten Mac mini with the plate drawer. 3. Insert the drawer with Mac mini back to the NA338TB3 storage enclosure, and tighten the two thumbscrews on the removable integrated plate drawer.
-
Page 11: Operation And Verification
4.1.1 Embedded Mac mini Application 1. After the NA338TB3 storage enclosure is connected to the power source by the power cord, turn the power switch of NA338TB3's PSU at rear of the chassis to "I" position to enable the power supply unit. -
Page 12: Mac/Pc Connected To Netstor Unit Externally
Note: When using the embedded Mac mini within the Netstor unit, if the user wants to force shut down Mac mini due to macOS crash, press and hold the power button in front of NA338TB3 for seven seconds to allow solenoid actuator to push and hold Mac mini's power button for shutting down. -
Page 13: Verification
System Report. As the pane of System Information pops up, select Thunderbolt in the left-hand column. At this time, if NA338TB3 can be selected to see its info, then the Netstor Thunderbolt 3 card is recognized properly by the Mac computer. - Page 14 2. Verify the RAID card and the third-party PCIe cards that are installed in the NA338TB3 storage enclosure. After the verification of Netstor Thunderbolt 3 card, click PCI in the left-hand column within the pane of macOS’s System Information, and at this moment the RAID card and all the third-party PCIe cards installed in the NA338TB3 will be shown in the information area within the pane.
-
Page 15: Verification Steps For Windows
4.2.2 Verification Steps for Windows 1. Verify NA338TB3 is recognized by the host computer. Right click This PC on the desktop of the Windows 10 operating system, and select Manage. After window of Computer Management pops up, select Device Manager in the left-hand column, and click View on the top menu bar, and then select Devices by connection. - Page 16 3. Depending on RAID card’s requirement (here take Areca’s for instance), firstly install NA338TB3’s RAID card Windows Thunderbolt-aware driver and the Windows GUI program on the Windows 10 operating system at your host computer. 4. After installing the driver and the GUI program, launch the GUI program by selecting ArcHttpSrvGUI in All Programs in Windows Start to execute the application.
- Page 17 Eject Areca ARC-188X SCSI Disk Device. Note: The NA338TB3 chassis does support SGPIO. As any HDD fails, the red LED indicator on the drive tray will illuminate. The SGPIO function will be effective when the SAS/SATA RAID controller card used in the Netstor unit supports the SGPIO function.
-
Page 18: Thunderbolt 3 Card Leds Status
4.3 Thunderbolt 3 Card LEDs Status On the Thunderbolt 3 card within the NA338TB3 storage, there are totally five LEDs. From top to bottom, they are: LED 2 (for 3V3), LED 3 (for 5V0_ATX), LED 4 (for 3V3_LC), LED 5 (for 0V9_SVR), and LED 6 (for 0V9_USB). The following information shows what the LEDs illuminating status will be before NA338TB3 is powered on and after the Netstor unit is powered on. - Page 19 Power-on: After NA338TB3 is powered on, LED 2 through LED 5 will illuminate green light. At this time, if a USB device or a monitor is daisy chained to the second Thunderbolt 3 port on the Netstor Thunderbolt 3 card, LED 6 will also illuminate green light. On the other hand, provided that the second Thunderbolt 3 port is not connected with any device/monitor, LED 6 will not illuminate.
-
Page 20: Pcie Expansion Slot Board Leds Status
4.4 PCIe expension slot board LEDs Status SW1-1 Power on/off by Host Power on/off by Manual SW1-2 FAN SPEED HIGH FAN SPEED LOW SLOT1(Upstream PCIex16) Slot 1: Target card Slot 2: PCIe ×8 slot 。(already fixed in the chassis) 。(open-type; supports PCIe card ×16/×8/×4/×1) 。RAID card is recommended to be installed in this slot as it’s closest to backplane’s connectors. - Page 21 If you have any questions, please contact your regional distributor, or Netstor Technology, Taiwan. Netstor Technology Co. Ltd. 6F, No. 1, Alley 16, Lane 235, Baoqiao Rd., Xindian District, New Taipei City 231-45, Taiwan, R.O.C. www. netstor. com .tw sales@ netstor.com.tw +886 2 2917 1500 Go Top ↑...
Need help?
Do you have a question about the NA338TB3 and is the answer not in the manual?
Questions and answers