
Related Manuals for Netstor NA622TB3


Summary of Contents for Netstor NA622TB3
- Page 1 NA622TB3 Thunderbolt™ 3 Four-Slot M.2 NVMe SSD Storage User Manual First edition, May. 2019...
-
Page 2: Table Of Contents
1. Unpack the NA622TB3 2. Install M.2 NVMe SSD and the Stand 2.1 Configuration Options 2.2 Install M.2 SSD Module 2.3 Install the Stand 3. Operation 3.1 macOS High Sierra 10.13 or later 3.1.1 Procedure for setting up a RAID 0 volume 3.1.2 Procedure for setting up a RAID 1 volume... -
Page 3: Unpack The Na622Tb3
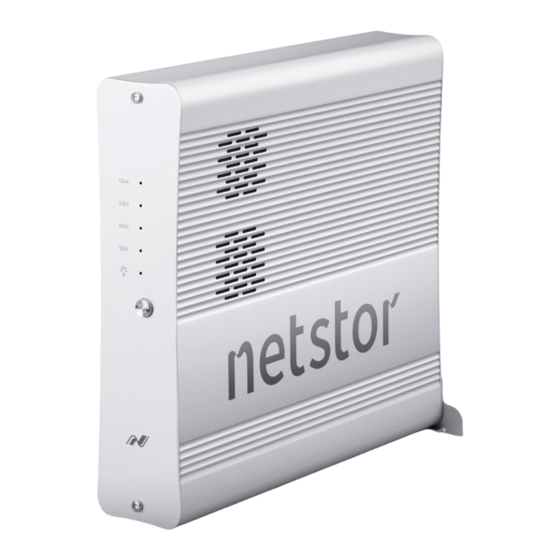
1. Unpack the NA622TB3 The box contains the following items: 。Netstor NA622TB3 enclosure × 1 。Thunderbolt 3 cable (0.5 m) × 1 。Power cord × 1 6. SSD 4 Status 。Flashing white - NVMe access 5. SSD 3 Status 。Flashing white - NVMe access 4. -
Page 4: Install M.2 Nvme Ssd And The Stand
2. Install M.2 NVMe SSD and the Stand ※ If you intend to set a RAID 0 or RAID 1 volume over the M.2 SSDs within storage, it’s recommended the M.2 SSDs are with the same capacity. 2.1 Configuration Options There are three configuration choices for M.2 SSD in the unit;... - Page 5 2. Loosen SSD1 location’s screw. Insert M.2 NVMe SSD module into the M.2 socket. Tighten SSD1’s screw. 3. When installing subsequent M.2 SSD module, repeat the above point 2 for installation. Go Top ↑...
-
Page 6: Install The Stand
fine airflow dissipation. (see Image 1 below) 2. Vertical use: Put the included stand at the rear bottom part of the NA622TB3 enclosure, and then tighten the stand’s two thumbscrews to fasten the stand to the enclosure. After the stand is fastened to the Netstor unit, you can then place the NA622TB3 enclosure vertically on a level surface for work. -
Page 7: Operation
3. Operation 3.1 macOS High Sierra 10.13 or later 1. Connect the Thunderbolt 3 four-slot M.2 NVMe SSD storage with power source by power cord. And then connect storage and Mac computer via Thunderbolt 3 cable. power 2. Press the front power button to switch on the storage. Power LED turns orange indicating standby mode. - Page 8 3. Power on Mac computer and NA622TB3 powers on automatically. Power LED turns blue meaning storage is at the powered on status. powered mode 4. When at macOS’s desktop, click Apple icon at the top menu bar. Select About This Mac, and click System Report. Click Thunderbolt in the left column. As NA622TB3 appears within the information section, the Thunderbolt 3 storage is recognized by Mac computer.
-
Page 9: Procedure For Setting Up A Raid 0 Volume
3.1.1 Procedure for setting up a RAID 0 volume ※ RAID 0 has no backup feature; it is without fault tolerance. 1. Go to macOS’s Disk Utility. The M.2 SSDs in NA622TB3 will appear in the left-hand column. 2. Click File at the top menu bar, and select RAID Assistant. - Page 10 4. Put the checks to the M.2 SSDs, and click Next. 5. Confirm the Properties, and click Next. 6. The confirmation pane for creating RAID 0 volume will pop up; click Create to proceed. Go Top ↑...
- Page 11 7. When the process is complete, click Done to finish. 8. You will see RAID 0 volume is created successfully, and the RAID 0 volume is ready for use. Go Top ↑...
-
Page 12: Procedure For Setting Up A Raid 1 Volume
※ The M.2 SSDs in Netstor unit must be even numbers (2 or 4) 1. Go to macOS’s Disk Utility. The M.2 SSDs in NA622TB3 will appear in the left-hand column. 2. Click File at the top menu bar, and select RAID Assistant. - Page 13 4. Put the checks to the M.2 SSDs, and click Next. 5. Confirm the Properties, and click Next. 6. The confirmation pane for creating RAID 1 volume will pop up; click Create to proceed. Go Top ↑...
- Page 14 7. When the process is complete, click Done to finish. 8. You will see RAID 1 volume is created successfully, and the RAID 1 volume is ready for use. Go Top ↑...
-
Page 15: Thunderbolt 3 Windows Pc/Laptop
When at standby mode, the Thunderbolt 3 port can provide 15W @ 5V / 3A power charging. 3. Power on computer and NA622TB3 powers on automatically. Power LED turns blue meaning storage is at the powered on status. -
Page 16: Procedure For Setting Up A Raid 0 Volume
3.2.1 Procedure for setting up a RAID 0 volume ※ RAID 0 has no backup feature; it is without fault tolerance. 1. Go to Windows’ Disk Management: the M.2 SSDs in storage will appear in information section. 2. Right click first M.2 SSD, and select New Striped Volume. 3. - Page 17 4. Click Add button to add Disk 2 to the Selected section, and then click Next to proceed. 5. Click Finish button to complete setting up RAID 0 volume. 6. The RAID 0 volume of NA622TB3 will appear at This PC, and it’s ready for use. Go Top ↑...
-
Page 18: Procedure For Setting Up A Raid 1 Volume
3.2.2 Procedure for setting up a RAID 1 volume ※ The M.2 SSDs in Netstor unit must be even numbers (2 or 4) 1. Go to Windows’ Disk Management: the M.2 SSDs in storage will appear in information section. 2. Right click first M.2 SSD, and select New Mirrored Volume. - Page 19 4. Click Add button to add Disk 2 to the Selected section, and then click Next to proceed. 5. Click Finish button to complete setting up RAID 1 volume. 6. The RAID 1 volume of NA622TB3 will appear at This PC, and it’s ready for use. Go Top ↑...
-
Page 20: Power Off The System
To power off the system: shut down the computer first; as the computer is powered off, the NA622TB3 will power off automatically. At this time, the unit’s front power LED will turn orange to indicate the storage is at the standby mode (the Thunderbolt 3 port’s 15W power charging still works and is still effective during the standby status). -
Page 21: Internal Fan Speed Adjustment
5. Internal Fan Speed Adjustment If heavy workloads are continuously run with M.2 SSD’s controller, which will generate more heat than average within the storage, then you can increase the internal two 4.5 cm fans’ speed manually to provide more cooling. Go Top ↑... -
Page 22: Thunderbolt 3 Board Leds Status
From top to bottom, they are: LED 2 (for 3V3), LED 3 (for 5V0_ATX), LED 4 (for 3V3_LC), LED 5 (for 0V9_SVR), and LED 6 (for 0V9_USB). The following info describes what the LEDs lighting status will be when NA622TB3 is at the standby mode and when the Netstor unit is at the powered on mode. - Page 23 Power-on mode: As NA622TB3 is at the powered on mode, LED 2 through LED 5 will show green light. At this time, if a USB device or a monitor is daisy chained to the second Thunderbolt 3 port on the Netstor Thunderbolt 3 board, then LED 6 will show green light. On the other hand, provided the second Thunderbolt 3 port is not connected with any device /monitor, LED 6 will not show light.
Need help?
Do you have a question about the NA622TB3 and is the answer not in the manual?
Questions and answers