
Related Manuals for Philips Sonicare FlexCare


Summary of Contents for Philips Sonicare FlexCare
- Page 1 Flexcare_4235_020_2279_3_BOOKLET_A6_bl.pdf 15-12-15 12:33 Philips FlexCare Rechargeable Sonic Toothbrush...
- Page 5 English 6 한국의 19...
- Page 6 English Introduction Congratulations on your purchase and welcome to Philips! To fully benefit from the support that Philips offers, register your product at www.philips.com/welcome. Important Read this user manual carefully before you use the appliance and save it for future reference.
- Page 7 English - Children should be supervised to ensure that they do not play with the appliance. Caution - Do not clean the brush head, the handle, the charger, the charger cover and/or the sanitiser in the dishwasher. - If you have had oral or gum surgery in the previous 2 months, consult your dentist before you use the toothbrush.
-
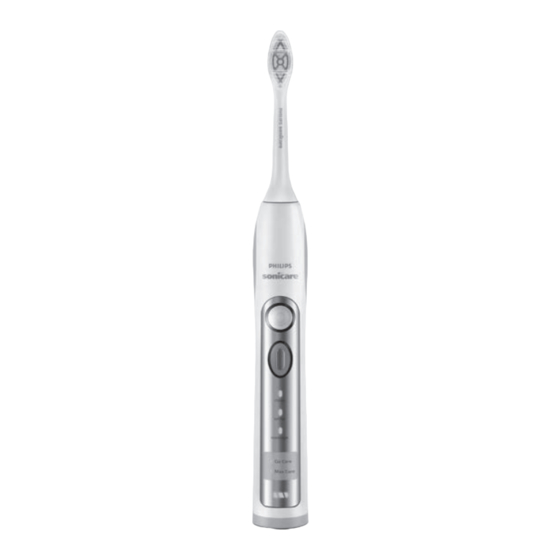
Page 8: General Description (Fig. 1)
UV light can be harmful to the human eye and skin. Keep the sanitiser out of the reach of children at all times. Electromagnetic fields (EMF) This Philips appliance complies with all applicable standards and regulations regarding exposure to electromagnetic fields. General description (Fig. 1) -
Page 9: Preparing For Use
- 1 green LED: 25-49% - 1 flashing yellow LED: less than 25% Note: If the battery charge of your Philips Sonicare is low, you hear 3 beeps and 1 LED on the recharge gauge flashes yellow for 30 seconds after the 2-minute brushing cycle. -
Page 10: Using The Appliance
English Note: To keep the battery fully charged at all times, you may keep your Philips Sonicare on the charger when not in use. It takes at least 24 hours to fully charge the battery. Using the appliance Brushing instructions 1 Wet the bristles and apply a small amount of toothpaste. - Page 11 Philips Sonicare automatically starts in the default Clean mode. To personalize your brushing: 1 Prior to turning on the Philips Sonicare, press the personalized brushing button to cycle through the modes and routines. The green LED indicates the selected mode or routine.
- Page 12 This Philips Sonicare comes with the Easy-start feature activated. The Easy-start feature gently increases the power over the first 14 brushings to help you get used to the brushing with the Philips Sonicare. Note: Each of the first 14 brushings must be at least 1 minute in length...
- Page 13 You hear 2 beeps to indicate that the Easy-start feature has been activated. Note: Using the Easy-start feature beyond the initial ramp-up period is not recommended and reduces Philips Sonicare effectiveness in removing plaque. Note: Easy-start feature is only active in Clean Mode.
- Page 14 English The Quadpacer feature on this model has been activated. To deactivate or reactivate the Quadpacer feature: 1 Place the handle with a brush head attached in the plugged-in charger. 2 Press and hold the personalized brushing button until: a You hear 1 beep to indicate the Quadpacer has been deactivated.
- Page 15 3 Place the brush head on one of the 2 pegs in the sanitizer with the bristles facing the light bulb (Fig. 11). Note: Only clean Philips Sonicare snap-on brush heads in the sanitizer. Note: The Philips Sonicare for Kids brush head wears and degrades in the UV sanitizer.
- Page 16 English Toothbrush handle 1 Remove the brush head and rinse the metal shaft area with warm water. Make sure you remove any residual toothpaste (Fig. 12). Caution: Do not push on the rubber seal on the metal shaft with sharp objects, as this may cause damage. 2 Wipe the entire surface of the handle with a damp cloth.
- Page 17 You can use the integrated cord wrap to store excess cord of the UV sanitizer in an organized manner. Replacement Brush head - Replace Philips Sonicare brush heads every 3 months to achieve optimal results. - Use only Philips Sonicare replacement brush heads. UV light bulb Replacement UV bulbs are available through the Philips Consumer Care Centre in your country.
-
Page 18: Removing The Rechargeable Battery
1 To deplete the rechargeable battery of any charge, remove the handle from the charger, turn on the Philips Sonicare and let it run until it stops. Repeat this step until you can no longer switch on the Philips Sonicare. - Page 19 한국의 소개 필립스 제품을 구입해 주셔서 감사합니다! 필립스가 드리는 지원 혜택을 최대한 누리시려면 www.philips.com/welcome에서 제품을 등록하십시오. 중요 사항 본 제품을 사용하기 전에 이 사용 설명서를 주의 깊게 읽고 나중에 참조할 수 있도록 잘 보관하십시오. 위험 - 충전기를 물기가 있는 곳에 두지 마십시오. 욕조, 세면대, 싱크대 등, 물이...
- Page 20 한국의 주의 - 칫솔모, 손잡이, 충전기, 충전기 덮개 및 살균기를 식기세척기로 세척하지 마십시오. - 최근 2개월 이내에 구강 또는 잇몸 수술을 받은 경우에는 칫솔을 사용하기 전에 치과 전문의와 상의하십시오. - 본 제품을 사용한 후 출혈이 심하거나 1주일이 지나도 증상이 호전되지 않는다면...
- Page 21 한국의 - 살균기의 문을 열었을 때 UV 전구가 켜진 상태인 경우 살균기 사용을 중단하십시오. 자외선은 눈과 피부에 해로울 수 있습니다. 살균기를 항상 어린이의 손이 닿지 않는 장소에 보관하십시오. EMF(전자기장) 이 제품은 EMF(전자기장)와 관련된 모든 기준 및 규정을 준수합니다. 구성품 명칭(그림 1) a 위생...
- Page 22 한국의 필립스 소닉케어 충전 방법 1 충전기를 벽면 콘센트에 꽂으십시오. 2 충전기 (그림 3)에 핸들을 꽂으십시오. - 배터리 전력 표시등의 불빛이 깜박이면 칫솔이 충전되고 있다는 표시입니다. 고급 재충전 게이지: 배터리의 남은 용량 표시 - 녹색 LED 3개: 75-100% - 녹색 LED 2개: 50-74% - 녹색...
- Page 23 한국의 5 치아를 향해 칫솔모를 앞 뒤로 약간씩 움직여서 칫솔모의 끝 부분이 치아 사이 사이에 위치하도록 합니다. 이 방식으로 치아 전체를 닦습니다. 참고: 입 안을 골고루 양치할 수 있도록 Quadpacer(쿼드페이서) 기능을 사용하여 입안을 네 구역으로 나누십시오(‘기능’란 참조). 6 1구역(윗니 바깥쪽)부터 칫솔질을 시작하여 30초 동안 닦은 후 2구역(윗니...
- Page 24 한국의 미백 모드 2분의 일반세정 모드와 눈에 보이는 앞니에 중점을 둔 추가 30초의 미백 모드로 구성됩니다. 미백 모드 칫솔질 지침 1 '칫솔질 방법'란에 설명된 대로 처음 2분 동안 칫솔질을 합니다. 2 2분의 일반세정 모드가 지나면 칫솔질 소리 및 동작이 바뀌면서 미백 모드가...
-
Page 25: 이지스타트 기능 설정 또는 해제 방법
한국의 기능 이지스타트 이 필립스 소닉케어 모델에는 이지스타트 기능이 있습니다. 이지스타트 기능은 최초 14회 양치하는 동안 서서히 출력을 높여서 필립스 소닉케어를 이용한 양치질에 익숙해지도록 도와줍니다. 참고: 이지스타트 점증 사이클을 원활히 작동하기 위해서는 최초 14회의 칫솔질을 할 때 매번 최소 1분 이상 닦아야 합니다. 이지스타트... - Page 26 한국의 쿼드페이서 - 쿼드페이서는 짧은 신호음과 일시 중지 동작으로 입안의 4개 구역을 양치할 수 있도록 알려 주는 간격 타이머입니다. 선택한 칫솔질 모드 또는 칫솔질 과정에 따라 쿼드페이서는 칫솔질 중 각각 다른 간격의 신호음을 울립니다. ‘칫솔질 방법’ 및 ‘사용자의 칫솔 습관 조절’ 부분 (그림...
- Page 27 한국의 경고: 살균 과정을 작동하는 중에는 칫솔모에 여행용 뚜껑을 씌우지 마십시오. 2 살균기 위쪽의 문 홈에 손가락을 넣고 문 (그림 10)을 당겨서 여십시오. 3 칫솔모가 전구 (그림 11)를 향하게 하여 살균기에 있는 2개의 걸이 중 하나에 칫솔모를 놓습니다. 참고: 필립스 소닉케어 스냅형 칫솔모만 살균기에서 세정할 수 있습니다.
- Page 28 한국의 주의: 손상될 수 있으므로 금속 몸체 주위의 고무 덮개를 날카로운 물체로 누르지 마십시오. 2 젖은 천으로 손잡이의 표면을 전체적으로 닦으십시오. 칫솔모 1 사용 (그림 13) 후에는 항상 칫솔모를 물로 헹구십시오. 2 칫솔 핸들에서 칫솔모를 제거하고 매주 1회 칫솔모와 핸들 사이의 연결 부분을...
- Page 29 한국의 7 UV 전구를 다시 끼우십시오. 전구를 다시 끼우려면 전구 아래쪽의 금속 버클을 조정하여 버클쪽으로 누르십시오. 8 보호 스크린 재설치 스크린을 재설치하려면 스크린의 못을 UV 전구 부근에 있는 반사면의 슬롯에 맞추십시오. 스크린을 살균기의 슬롯 안으로 똑바로 밀어 넣으십시오. 보관 오랫동안 제품을 사용하지 않을 경우 제품의 전원을 뽑고 세척('청소'란 참조)한...
-
Page 30: 충전식 배터리를 분리하는 방법
4 배터리 연결부 옆의 회로 기판 아래로 드라이버를 넣고 비틀어서 두 연결부를 분리하십시오. 회로 기판을 제거하고 플라스틱 부분 (그림 18)에서 배터리를 꺼내십시오. 충전식 배터리를 재활용 폐기물로 분리하고 제품의 나머지 부분은 적절하게 폐기하십시오. 보증 및 지원 보다 자세한 정보나 지원이 필요한 경우에는 www.philips.com/support 페이지를 방문하시거나 제품 보증서를 참조하십시오. - Page 31 한국의...
- Page 36 Flexcare_4235_020_2279_3_BOOKLET_A6_bl_back.pdf 15-12-15 11:49 www.philips.com/Sonicare ©2015 Koninklijke Philips N.V. (KPNV). All rights reserved. Philips and the Philips shield are trademarks of KPNV. Sonicare and the Sonicare logo are trademarks of Philips Oral Healthcare, LLC and/or KPNV. >75% recycled paper 4235.020.2279.3 (12/2015)
Need help?
Do you have a question about the Sonicare FlexCare and is the answer not in the manual?
Questions and answers