
Related Manuals for Blizzard Lighting Solar Ray


Summary of Contents for Blizzard Lighting Solar Ray
- Page 1 Blizzard Lighting, LLC www.blizzardlighting.com Waukesha, WI USA Copyright (c) 2015...
-
Page 2: Table Of Contents
Troubleshooting Dimensional Drawings 5. Appendix A Quick DMX Lesson Art-net™ Protocol ArKaos Kling-Net™ Keeping Your Solar Ray As Good As New Returns (Gasp!) Shipping Issues Tech Specs Page 2 Solar Ray™ User Manual Rev. A © 2015 Blizzard Lighting, LLC... -
Page 3: Solar Ray
Congratulations on your purchase of the Solar Ray™, the blindingly bright LED matrix module that is equipped shine like the sun! So, now that you’ve got your Solar Ray™ (or hopefully, Solar Rays!), you should carefully unpack the box and check the contents to ensure that all parts are present and in good condition. -
Page 4: Safety Instructions (Don't Stick Your Hand In The Toaster!)
In the unlikely event your unit may require service, please visit www.blizzardlighting.com/ tickets to request support via our online support ticket system. Page 4 Solar Ray™ User Manual Rev. A © 2015 Blizzard Lighting, LLC... -
Page 5: Meet Solar Ray
2. MEET THE SOLAR RAY LED FIXTURE MAIN FEATURES • 25* high efficiency 3-Watt Edison LEDs • Projects intense narrow beams of 2,800k warm white light • Flexible panel system with integrated locks • Easy configuration and setup via built-in LCD control panel •... -
Page 6: The Solar Ray Pin-Up Picture
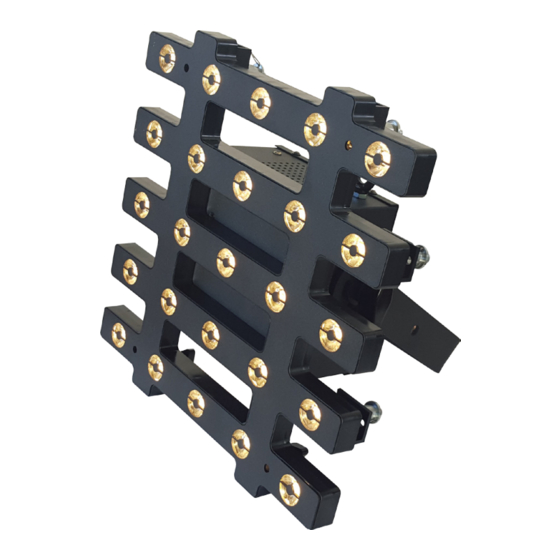
Figure 1: The Solar Ray™ Pin-Up Picture Strong Die-Cast Aluminum Housing 25x 3-Watt Edison Warm White LEDs Mounting bracket with ¼ turn quick clamp bracket connections Figure 2: The Rear Connections Fuse 4-Button Signal Control Status Panel Power In Power Out... -
Page 7: Setup
Maximum resistance of 20 ohms / 1000 ft. Nominal impedance 100 – 140 ohms Power Linking You can link up to 9 Solar Ray™ units (max) at 110V, or 18 (max) units at 220V. Never exceed this number. Power linking cords can be purchased separately. Page 7 Solar Ray™... -
Page 8: Mounting & Rigging
Making A Wall of Solar Ray™ Fixtures 1. Mount the first unit on a truss via its mounting bracket, and an appropriately rated clamp to accommodate the total weight of connected fixtures. -
Page 9: Connection Example
No matter what type of configuration your choose to connect your fixtures together in, always be sure that each fixture is individually secured with a safety cable. Page 9 Solar Ray™ User Manual Rev. A © 2015 Blizzard Lighting, LLC... -
Page 10: Operating Adjustments
4. OPERATING ADJUSTMENTS The Control Panel All the goodies and different modes possible with the Solar Ray™ are accessed by using the control panel on the rear of the fixture. There are 4 control buttons below the LCD display which allow you to navi- gate through the various control panel menus. -
Page 11: Control Panel Menu Structure
1.) To use sound active mode, select Sound Mode from the main menu then press the <ENTER> button. Sound active will now be actively running, using the currently set auto program or Mix Mode. Page 11 Solar Ray™ User Manual Rev. A © 2015 Blizzard Lighting, LLC... -
Page 12: Dmx Channel Values In-Depth
000 <--> 255 LED 20 Intensity (0% <--> 100%) 000 <--> 255 LED 21 Intensity (0% <--> 100%) 000 <--> 255 LED 22 Intensity (0% <--> 100%) Page 12 Solar Ray™ User Manual Rev. A © 2015 Blizzard Lighting, LLC... - Page 13 Fixture 3: LED CH Fixture 4: LED CH Fixture 5: LED CH Fixture 6: LED CH Fixture 7: LED CH Fixture 8: LED CH Fixture 9: LED CH Page 13 Solar Ray™ User Manual Rev. A © 2015 Blizzard Lighting, LLC...
-
Page 14: Troubleshooting
Verify proper mode of operation. Is the fixture in “Auto” mode? If your problem persists or isn’t listed, please open a support ticket online at: www.blizzardlighting.com/support. Dimensional Drawings 3.8” 96 mm 11.8” 300 mm Page 14 Solar Ray™ User Manual Rev. A © 2015 Blizzard Lighting, LLC... -
Page 15: Appendix
• To avoid using expensive hardware video converters to send video to display devices • To allow the creation of an heterogenic network of display devices from different manufacturers, which can all be controlled from one computer Page 15 Solar Ray™ User Manual Rev. A © 2015 Blizzard Lighting, LLC... -
Page 16: Keeping Your Solar Ray As Good As New
Keeping Your Solar Ray As Good As New The fixture you’ve received is a rugged, tough piece of pro lighting equip- ment, and as long as you take care of it, it will take care of you. That said, like anything, you’ll need to take care of it if you want it to operate as designed. -
Page 17: Tech Specs
Neutrik AG, Neutrik USA, or any related entity. Neutrik® and powerCON® are registered trademarks of Neutrik AG. Page 17 Solar Ray™ User Manual Rev. A © 2015 Blizzard Lighting, LLC... - Page 18 This page intentionally left blank. Page 18 Solar Ray™ User Manual Rev. A © 2015 Blizzard Lighting, LLC...
- Page 19 This page intentionally left blank. Page 19 Solar Ray™ User Manual Rev. A © 2015 Blizzard Lighting, LLC...
- Page 20 Enjoy your product! Our sincerest thanks for your purchase! --The team @ Blizzard Lighting...
Need help?
Do you have a question about the Solar Ray and is the answer not in the manual?
Questions and answers