
Subscribe to Our Youtube Channel
Related Manuals for Blizzard Lighting Kaptivator


Summary of Contents for Blizzard Lighting Kaptivator
-
Page 1: Kaptivator
KAPTIV ATOR Blizzard Lighting, LLC www.blizzardlighting.com Waukesha, WI USA Copyright (c) 2013... -
Page 2: Table Of Contents
Slave Mode DMX Mode DMX Channel Values In-Depth Troubleshooting 5. Appendix A Quick DMX Lesson Keeping Your Kaptivator™ As Good As New Returns (Gasp!) Shipping Issues Tech Specs Page 2 Kaptivator™ Manual - Rev. A (c) 2013 Blizzard Lighting, LLC... -
Page 3: Getting Started
Getting It Out Of The Box Congratulations on purchasing one way cool, way original RGB 3D Laser! Now that you’ve got your Kaptivator™ (or hopefully, Kaptivators!), you should carefully unpack the box and check the contents to ensure that all parts are present and in good condition. If anything looks as if it has been damaged in transit, notify the shipper immediately and keep the packing material for inspection. -
Page 4: Laser Safety Requirements
The legal requirements for using laser entertainment products vary from country to country. The user is responsible for the legal requirements at the location/ country of use. Page 4 Kaptivator™ Manual - Rev. A (c) 2013 Blizzard Lighting, LLC... -
Page 5: Meet The Kaptivator
White (all) 250mW DMX Quick Reference - 11 Channel Mode Channel What it does Mode Pattern Select Color Change Moving-X Moving-Y Dimmer-X Dimmer-Y Rotation Zoom (+/-) Drawing Rolling X/Y Page 5 Kaptivator™ Manual - Rev. A (c) 2013 Blizzard Lighting, LLC... -
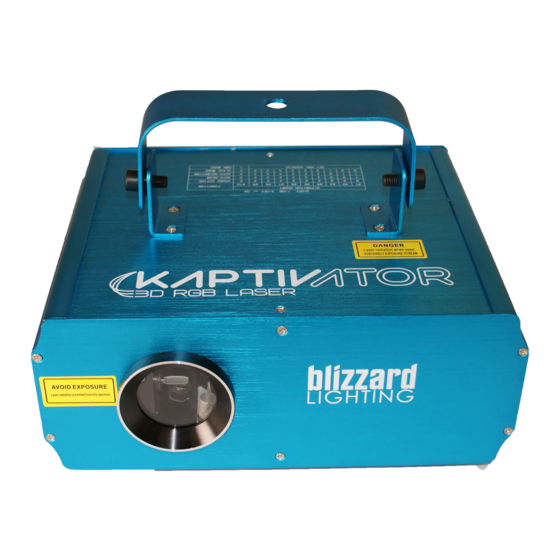
Page 6: The Kaptivator Pin-Up Picture
Figure 1: The Kaptivator™ Pin-Up Picture Convenient Secure Mounting Bracket Dipswitch Chart & Adjustment Screws Attractive Ice Blue Laser Output (A perture) Colored Aluminum Casing Figure 2: The Rear Connections Mic Sensitivity On/Off Switch Cooling Fan Microphone Dipswitches Mic Indicator DMX In DMX Out... -
Page 7: Setup
Remove the damaged fuse from its holder and replace with exact same type fuse. Insert the fuse holder back in its place and reconnect power. Connecting A Bunch of Kaptivator™ Fixtures You will need a serial data link to run light shows using a DMX-512 controller or to run shows on two or more fixtures set to sync in mas- ter/slave operating mode. -
Page 8: Cable Connectors
(input). Note: It doesn’t matter which fixture address is the first one connected. We recommend connecting the fixtures in terms of their proximity to the controller, rather than connecting the lowest fixture number first, and so on. Step 3: Connect other fixtures in the chain from output to input as above. Place a DMX terminator on the output of the final fixture to ensure best communication. Page 8 Kaptivator™ Manual - Rev. A (c) 2013 Blizzard Lighting, LLC... -
Page 9: Fixture Linking (Master/Slave Mode)
Do not mount to surfaces with unknown strength, and ensure properly “rated” rigging is used when mounting fixutres overhead. Adjust the angle of the fixture by loosening both knobs and tilting the fixture. After finding the desired position, retighten both knobs. • When selecting installation location, take into consideration lamp replacement access (if applicable) and routine maintenance. • Safety cables MUST ALWAYS be used. • Never mount in places where the fixture will be exposed to rain, high humidity, extreme temperature changes or restricted ventilation. Page 9 Kaptivator™ Manual - Rev. A (c) 2013 Blizzard Lighting, LLC... -
Page 10: Operating Adjustments
4. OpERATING ADJUSTMENTS DIP Switch Settings All of the various functions of the Kaptivator™ are set up using the 10-position DIP switch located on the rear of the unit. Using this set of switches, you can select the different operating modes and also set up the starting DMX channel in DMX mode. The chart below describes the various operating modes and their respective DIP switch settings. -
Page 11: Dmx Channel Values In-Depth
Auto Zoom (+/-) 000 <-> 064 Manual Drawing Drawing 065 <-> 255 Auto Drawing 000 <-> 128 Rolling Y Direction Rolling X/Y 129 <-> 255 Rolling X Direction Page 11 Kaptivator™ Manual - Rev. A (c) 2013 Blizzard Lighting, LLC... -
Page 12: Troubleshooting
Verify remote is correct type (CA-9 or other as applicable.) Fixture Moving Verify proper mode of operation. Is the fixture in “Auto” On Its Own mode? If your problem isn’t listed, or if problems persist, please contact support: support@blizzardlighting.com. Page 12 Kaptivator™ Manual - Rev. A (c) 2013 Blizzard Lighting, LLC... -
Page 13: Appendix
In summary, since its design and evolution in the 1980’s DMX has become the standard for lighting control. It is flexible, robust, and scalable, and its ability to control everything from dimmer packs to moving lights to foggers to lasers makes it an indispensible tool for any lighting designer or lighting performer. Page 13 Kaptivator™ Manual - Rev. A (c) 2013 Blizzard Lighting, LLC... -
Page 14: Keeping Your Kaptivator™ As Good As New
Damage incurred in shipping is the responsibility of the shipper, and must be reported to the carrier immediately upon receipt of the items. Claims must be made within seven (7) days of receipt. Page 14 Kaptivator™ Manual - Rev. A (c) 2013 Blizzard Lighting, LLC... -
Page 15: Tech Specs
3-pin XLR Female Other Operating Modes Standalone, Master/Slave, Sound Active Coolness Factor Leventy Billion Percent 2-year limited warranty, does not cover malfunction Warranty caused by damage to LED’s. Page 15 Kaptivator™ Manual - Rev. A (c) 2013 Blizzard Lighting, LLC... - Page 16 Enjoy your product! Our sincerest thanks for your purchase! --The team @ Blizzard Lighting...
Need help?
Do you have a question about the Kaptivator and is the answer not in the manual?
Questions and answers