Table of Contents
Advertisement
Quick Links
Advertisement
Table of Contents

Subscribe to Our Youtube Channel
Related Manuals for Joy-it STROMPI 3


Summary of Contents for Joy-it STROMPI 3
- Page 1 STROMPI 3 Power-Solution...
-
Page 2: Table Of Contents
1. TABLE OF CONTENT Table of content General information Overview Power sources QuickStart Functions of the StromPi 3 Prioritisation of input Time-controlled applications 6.2.1 Real Time Clock 6.2.2 Automatic configuration of time 6.2.3 Shutdown Timer 6.2.4 Alarm Modes 6.2.5 PowerOff-Alarm Mode 6.2.6 WakeUp - Alarm Mode... -
Page 3: General Information
LiFePO4 battery which is a rechargeable emergency power source. Unexpected power failures are now in the past! The prioritized inputs can easily be changed which means the StromPi 3 will fit perfectly into your project. With the voltage range from 6V to 61V and a current with up to 3A, there is enough power for even bigger pro- jects. -
Page 4: Overview
- buffering voltage input With heavy load the StromPi 3 can heat up. Do not ouch the circuit board during operation to avoid burns. Also allow a good supply of air to prevent the unit from overheating. www.joy-it.net... -
Page 5: Power Sources
The StromPi 3 can of course, as usual, be powered via the microUSB port. Wide - Range The Wide mode can be used with a voltage source from 6V - 61V. Connect the marked port to an arbitrary voltage source, like a power supply or a vehicle electrical system. -
Page 6: Quickstart
5. QUICKSTART In this chapter, you will find the necessary steps to use the StromPi 3. Activation of the serial communication More details can be found in chapter 8.1 Use the following commands to install the required dependencies and then open the file config.txt . -
Page 7: Functions Of The Strompi
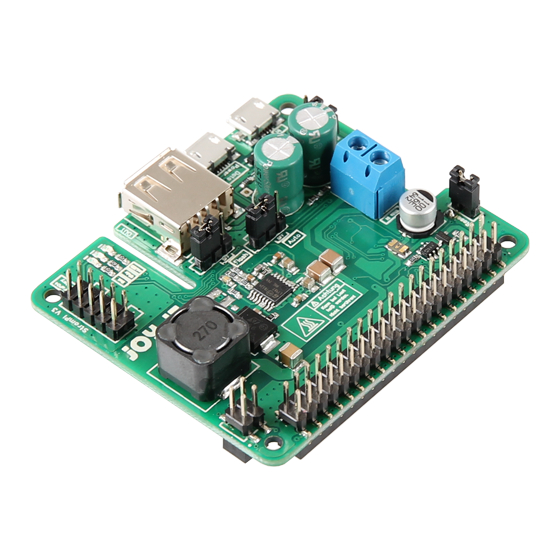
6. FUNCTIONS OF THE STROMPI 3 ① ⑪ ② ③ ④ ⑤ ⑫ ⑥ ⑬ ⑦ ⑧ ⑨ ⑩ ① Choose the StromPi V3 Powerpath Mode ② Enable or disable the Powerfail Warning ③ Adjust the Battery Shutdown Mode ④ Enable or disable the Serialless Mode ⑤... - Page 8 StromPi3 will send a signal to the Raspberry Pi through the serial interface to start the shutdown (according to the script). After the counter has expired, the StromPi 3 will disconnect the power supply of the Raspberry Pi.
-
Page 9: Prioritisation Of Input
6.1 Prioritisation of input The voltage source from which the StromPi 3 obtains its energy can be adjusted according to your wishes and the intended use. In addition, a second or even a third voltage source can be selected, which automatically takes over the supply in case the first source should fail. -
Page 10: Time-Controlled Applications
StromPi 3. If all power sources are disconnected, the current time is not stored. The real time clock (RTC) of the StromPi 3 can be set with the config script: Setting the time and date manually To set the time and date manually, click on Manual Setting. -
Page 11: Shutdown Timer
For example, if you have set the shutdown timer to 600 (600 seconds -> 10 minutes), the system operates like the following: If the StromPi 3 now detects a power failure, the timer starts. After 10 minutes the StromPi 3 will then disconnect the power supply to the Raspberry Pi. -
Page 12: Alarm Modes
Raspberry Pi (e.g. start at 10:45 every day and shut down at 13:00 ). Your Raspberry Pi will only be active during the time window in which the incurring tasks have to be completed. www.joy-it.net Pascalstr. 8 47506 Neukirchen-Vluyn... -
Page 13: Poweroff-Alarm Mode
The WakeUp-Alarm allows you to start the Raspberry time-controlled. In addition, you have the possibility to activate these functions for a specific date or a weekday. If you want to start the StromPi 3 time-controlled, start the config script. Choose WakeUp-Alarm Mode Switch to Enable to activate the WakeUp-Alarm. -
Page 14: Minute Wakeup-Alarm
6.2.8 Weekend WakeUp-Alarm The Weekend WakeUp-Alarm allows you to switch the WakeUp-Alarm on or off during the weekend. If you set this mode to Disabled, the StromPi 3 will be switched off during the weekend (Saturday and Sunday) and will not be launched by the WakeUp-Alarm. -
Page 15: Interval Function
Interval On-Time in minutes, you can set the time that the Raspberry Pi should remain on in minutes. Interval Off-Time in minutes , you can set the time that Raspberry Pi should remain off in minutes. www.joy-it.net Pascalstr. 8 47506 Neukirchen-Vluyn... -
Page 16: Additional Functions
StromPi, you can e.g. use another HAT, which uses the serial inter- face, can be used simultaneously with the StromPi. However, this also prevents the StromPi 3 from being configured, which is why it is useful to configure the StromPi before you activate the Serialless Mode. -
Page 17: Poweron-Button Mode
Then it is possible to re- start the StromPi 3 by bridging the reset pin. If the StromPi 3 is already modified for the Serialless Mode or used in Serialless Mode with the PowerOn-Button modification a further small modification must be made. -
Page 18: Power Save Mode
7.5 Power Save Mode The Power Save Mode allows you to drastically reduce the power consumption of the StromPi 3 by switching off the voltage converter when the Wide port is not in use and switching it only on in case of a power failure of the primary power supply. -
Page 19: Activation Of The Serial Communication
Pi and deactivate the serial console. You can do this either via the Configuration Raspi-Config Raspberry Pi or via the Raspi-Config To do this via the , enter the following command into the ter- minal window on your Raspberry Pi : sudo raspi-config www.joy-it.net Pascalstr. 8 47506 Neukirchen-Vluyn... - Page 20 Select the point P6 Serial. Would you like a login shell to be accessible over serial? The question answer with No. Would you like the serial port hardware to be enabled? The question answer with Yes. www.joy-it.net Pascalstr. 8 47506 Neukirchen-Vluyn...
-
Page 21: Execution Of The Gui Script
Download the Raspberry Pi RealVNC on the device from which you want to control and connect them by entering the IP address. Now, the following window should appear: Here you can then use the console as usual with your Linux system. www.joy-it.net Pascalstr. 8 47506 Neukirchen-Vluyn... -
Page 22: Ssh-Connection Via Putty And Xming
Interfacing Options Go to and activate afterwards. YES. Choose Now you have to download PuTTY and Xming. Xming XLaunch.exe Start the file in the installation directory of Xming. Multiple Windows Display number Select as 0. www.joy-it.net Pascalstr. 8 47506 Neukirchen-Vluyn... - Page 23 Start no client Make sure that is selected: Press Next without making any changes: Now press Finish: www.joy-it.net Pascalstr. 8 47506 Neukirchen-Vluyn...
- Page 24 → Enable X11 fowarding is switched on and Xdisplay location enter → localhost:0.0 . Now press Open and you should see the following: Now enter your login data. You have successfully established the SSH connection. www.joy-it.net Pascalstr. 8 47506 Neukirchen-Vluyn...
-
Page 25: Ssh-Connection Via Mobaxterm
Update to change the settings of your StromPi. 8.5 SSH-connection via MobaXterm Make sure that SSH is enabled, if it is not enabled already, refer to the last chapter on how to enable SSH. Next, download MobaXTerm. www.joy-it.net Pascalstr. 8 47506 Neukirchen-Vluyn... - Page 26 . Then press OK and enter the password of your Raspberry Pi when prompted. You can call the graphical interface with the following command: sudo -E python3 strompi_config_gui.py The interface will look like this: www.joy-it.net Pascalstr. 8 47506 Neukirchen-Vluyn...
-
Page 27: Strompi 3 Scripts
Power Save Mode were added on a later firmware version. 9. STROMPI 3 SCRIPTS You can download all StromPi scripts published by us here. The serial scripts read and send the required information via the serial port, the serialless scripts use a GPIO pin instead. -
Page 28: Serialless Scripts
Another email will be sent when the primary power supply is available again or when the Raspberry Pi has been restarted. www.joy-it.net Pascalstr. 8 47506 Neukirchen-Vluyn... - Page 29 Raspberry Pi. You must have this script in the autostart of your Raspberry Pi to make it work. You will find instructions on how to do this in chapter 9.4 Automatic execution of scripts. www.joy-it.net Pascalstr. 8 47506 Neukirchen-Vluyn...
- Page 30 Raspberry Pi. You must have this script in the autostart of your Raspberry Pi for it to work. You will find instructions on how to do this in chapter 9.4 Automatic execution of scripts. www.joy-it.net Pascalstr. 8 47506 Neukirchen-Vluyn...
- Page 31 In line 9 of the script, you can change the GPIO pin you use for alternative communication in the Serialless Mode. In chapter 9.3 Raspberry Pi Pin-Layout, you can take a look at the pin assignment of the Raspberry Pi. www.joy-it.net Pascalstr. 8 47506 Neukirchen-Vluyn...
-
Page 32: Raspberry Pi Pin-Layout
GPIO 11 (SPI, CLK) GPIO 8 (SPI) Ground GPIO 7 (SPI) ID_SD (I2C, EEPROM) ID_SC GPIO 5 Ground GPIO 6 GPIO 12 GPIO 13 Ground GPIO 19 GPIO 16 GPIO 26 GPIO 20 Ground GPIO 21 www.joy-it.net Pascalstr. 8 47506 Neukirchen-Vluyn... -
Page 33: Automatic Execution Of Scripts
In this chapter, we describe all modifications that are necessary for some functions of the StromPi. Serialless Mode For the modification for the Serialless Mode, there are 3 different vari- ants, which are explained in the following. www.joy-it.net Pascalstr. 8 47506 Neukirchen-Vluyn... - Page 34 To do this, you have to remove the jumper. The other end of the cable must be connected to a GPIO pin. You can use any other GPIO pin, but the software must be adapted accordingly. www.joy-it.net Pascalstr. 8 47506 Neukirchen-Vluyn...
- Page 35 Solder one end of the cable to the free pad as shown in the picture. Note that the jumper on the reset pin must be set. The other end of the cable is connected to a free GPIO pin. www.joy-it.net Pascalstr. 8 47506 Neukirchen-Vluyn...
- Page 36 For variant 3, solder one end of the cable to the free pad of the reset pin, like in variant 2. Again, the jumper must remain set. Solder the other end of the cable as shown in the picture below to one of the GPIO pins. www.joy-it.net Pascalstr. 8 47506 Neukirchen-Vluyn...
- Page 37 The two solder pads marked in red must be bridged with a cable. First apply some solder to both pads. Now solder one end of the cable to the upper pad. Finally the other end of the cable is soldered to the lower solder pad. www.joy-it.net Pascalstr. 8 47506 Neukirchen-Vluyn...
- Page 38 Serialless and PowerOn-Button Since the pad which is normally used for the serialless modification is occupied by the poweroff modification, the cable for the serialless mode must now be soldered to the red marked pad. www.joy-it.net Pascalstr. 8 47506 Neukirchen-Vluyn...
- Page 39 For more information about the Serialless Mode please read the Serialless instructions. www.joy-it.net Pascalstr. 8 47506 Neukirchen-Vluyn...
-
Page 40: Opening The Serial Console
- … or the abbreviation : sspc The serial console of the StromPi 3 now opens. The current configuration setting of your device can be seen with the command show-status. The help command provides a general overview. Use the key combination CTRL + A / X / Enter to close Minicom. - Page 41 To achieve this, enter the following command: sudo minicom -s You will now see the following window: Serial port setup Select here. Then the following window appears: /dev/tty8 /dev/serial0 Now press A and change Then confirm with Enter. www.joy-it.net Pascalstr. 8 47506 Neukirchen-Vluyn...
- Page 42 If everything looks like in the picture above, Minicom is configured correctly. Now you can type the following command to start Minicom: sudo minicom Now you can open the StromPi 3 console with following command... startstrompiconsole - … or the abbreviation .
-
Page 43: Commands For The Console
Bat, <5>: mUSB → Wide, <6>: Wide → mUSB → Bat) strompi-mode <number> Output of the current time of the RTC of the StromPi: time-output Display the current global settings: show-status Display the current alarm settings: show-alarm www.joy-it.net Pascalstr. 8 47506 Neukirchen-Vluyn... - Page 44 Set the weekday of the WakeUp-Alarm: alarm-set-weekday <weekday> Set the date of the WakeUp alarm: alarm-set-date <date> <month> Set the time of the Poweroff-Alarm: poweroff-set-time <hour> <minutes> Enable <1> or disable <0> the Poweroff-Alarm: poweroff-enable <option> www.joy-it.net Pascalstr. 8 47506 Neukirchen-Vluyn...
-
Page 45: Eu Declaration Of Conformity
Directives EMV-Richtlinie 2014/30/EU (EMV) & 2011/65/EU (Rohs). The norms listed below were applied to assess the device: EN 55022:2010+ AC:2011 EN55024:2010 61000-3-2:2014 EN 61000-3-3:2013 Date Operational status Name of the person in charge Signature 24.08.2018 Xu Lu Managing director www.joy-it.net Pascalstr. 8 47506 Neukirchen-Vluyn... -
Page 46: Further Information
We send you a parcel stamp with which you can send us your old appliance free of charge. For this possibility, you must contact us via e-mail at service@joy-it.net or via telephone. Information about packaging: Please package your old appliance safe during transport. Should you not...
Need help?
Do you have a question about the STROMPI 3 and is the answer not in the manual?
Questions and answers