Table of Contents
Advertisement
Quick Links
Advertisement
Table of Contents

Summary of Contents for Joy-it MotoDriver2
- Page 1 MotoDriver2...
-
Page 2: Table Of Contents
MotoDriver2 TABLE OF CONTENTS Introduction Device Overview Using with an Arduino Connection Example-Code Using with a Raspberry Pi Connection Example-Code Additional Informations Support Published: 16.04.2019 Copyright by Joy-IT... -
Page 3: Introduction
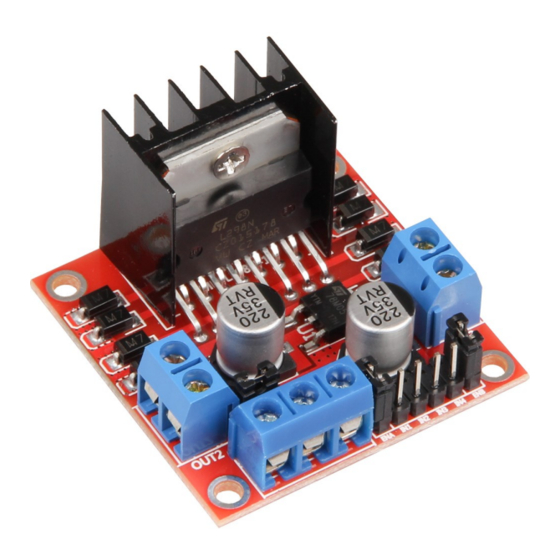
In the following we have listed what you have to consider during the setup. DEVICE OVERVIEW The MotoDriver2 is an expansion board that allows the control and use of up to two DC motors. The DC motors can be controlled with a constant voltage between 5V and 35V. Model... - Page 4 Remove the jumper from slot 3 if the power supply is above 12V. This will activate power to the Onboard 5V Regulator. The 5V output is ideal for powering an Arduino, for example. This is only active if the jumper is set to slot 3. Published: 16.04.2019 Copyright by Joy-IT...
-
Page 5: Using With An Arduino
CONNECTION MotoDriver 2 Arduino Input 1 Input 2 Input 3 Input 4 The power supply for the MotoDriver2 (PIN 4) should be between 5V and 35V. This depends on your configuration and the used components. Published: 16.04.2019 Copyright by Joy-IT... -
Page 6: Example-Code
//Motor Control A in both directions analogWrite(motorPin1, speed); delay(2000); analogWrite(motorPin1, 0); delay(200); analogWrite(motorPin2, speed); delay(2000); analogWrite(motorPin2, 0); //Motor Control B in both directions analogWrite(motorPin3, speed); delay(2000); analogWrite(motorPin3, 0); delay(200); analogWrite(motorPin4, speed); delay(2000); analogWrite(motorPin4, 0); void loop(){ Published: 16.04.2019 Copyright by Joy-IT... -
Page 7: Using With A Raspberry Pi
USING WITH A RASPBERRY PI CONNECTION MotoDriver 2 Arduino Input 1 GPIO26 Input 2 GPIO20 The power supply for the MotoDriver2 (PIN 4) should be between 5V and 35V. This depends on your configuration and the used components. Published: 16.04.2019 Copyright by Joy-IT... -
Page 8: Example-Code
RPi.GPIO GPIO mode=GPIO.getmode() GPIO.cleanup() Forward=26 Backward=20 GPIO.setmode(GPIO.BCM) GPIO.setup(Forward, GPIO.OUT) GPIO.setup(Backward, GPIO.OUT) forward(x): GPIO.output(Forward, GPIO.HIGH) print("Moving Forward") time.sleep(x) GPIO.output(Forward, GPIO.LOW) reverse(x): GPIO.output(Backward, GPIO.HIGH) print("Moving Backward") time.sleep(x) GPIO.output(Backward, GPIO.LOW) while (1): forward(5) reverse(5) GPIO.cleanup() Published: 16.04.2019 Copyright by Joy-IT... -
Page 9: Additional Informations
Possibility of return in your area: We will send you a parcel stamp with which you can return the device to us free of charge. Please contact us by e-mail at Service@joy-it.net or by telephone. Information on packaging: If you do not have suitable packaging material or do not wish to use your own, please contact us and we will send you suitable packaging. -
Page 10: Support
We are also there for you after the purchase. If you still have questions or problems, we are also available by e-mail, telephone and ticket support system. E-Mail: service@joy-it.net Ticket-System: http://support.joy-it.net Phone: +49 (0)2845 98469 – 66 (9:30 - 17:00 o‘clock) For further information please visit our website: www.joy-it.net Published: 16.04.2019 Copyright by Joy-IT...


Need help?
Do you have a question about the MotoDriver2 and is the answer not in the manual?
Questions and answers