Table of Contents
Advertisement
Available languages
Available languages
Advertisement
Table of Contents

Related Manuals for CDVI Digicode Series


Summary of Contents for CDVI Digicode Series
- Page 1 PROFIL100EC Illuminated Mullion Weatherproof Keypad Remote Electronics Clavier codé rétro-éclairé avec électronique déportée ® ® Range: Digicode Gamme : Digicode INSTALLATION MANUAL MANUEL D’INSTALLATION Group Products...
-
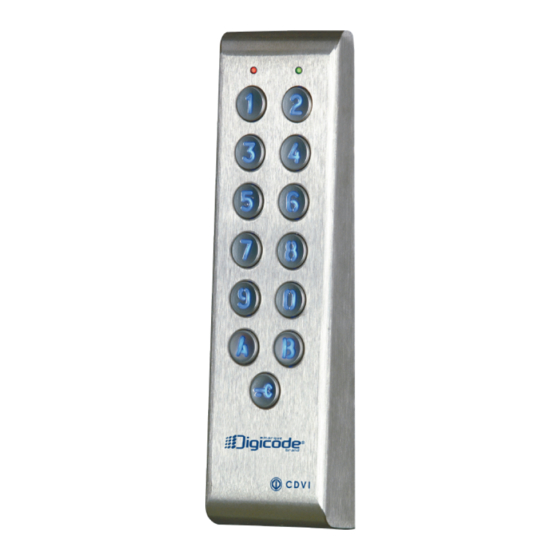
Page 2: Product Presentation
ArD12 (230v input) or BS60 (230v input). 3] MOUNTING KIT Mounting plate (M4x30) Wiring (M5x8 Diax T20 Diax Plastic ® ® for remote Varistor mounting sealed cap screw) Spanner anchors electronics box screws Remote electronics PROFIL100EC cdvi.com cdvigroup.com... -
Page 3: Mounting Instructions
® T20 Diax spanner hardware. on the wall using the supplied to install the varistor on the ® M4x30 screws. Slide the box lock (refer to page 3, Notes from up to down on the bracket. and Recommendations‘). cdvi.com cdvigroup.com... -
Page 4: Wiring Diagram
When the contact is open then request-to-enter input the request-to-enter is disabled. Timer contact When the contact is closed then White wire from keypad press the button with the key Brown wire from keypad logo to enter. green or Blue wire (illumination) cdvi.com cdvigroup.com... - Page 5 2. Put the power back. keypad is in stand-by operating mode. - Wait approximately 3 seconds. - Two beeps are emitted to confirm reset 4 beeps indicate a data computing error. of the keypad. - remove P2 jumper. cdvi.com cdvigroup.com...
-
Page 6: Changing The Master Code
2 beeps are emitted to confirm that user code. the keypad is in stand-by operating mode. 4. To delete a User code enter the user location. 4 beeps indicate a data computing error. - 4 beeps are emitted. cdvi.com cdvigroup.com... -
Page 7: Reset Master Code
2. Press A7 to program a sub master code for the user individual Pin code modification. - One beep is emitted. - Enter the new 2-digits sub master code. - One beep is emitted to confirm programming of the sub master code. cdvi.com cdvigroup.com... - Page 8 1 x beep = OK 1 x beep = OK 1 x beep = OK 1 x beep = OK 4 beeps = ERROR 4 beeps = ERROR 4 beeps = ERROR 4 beeps = ERROR 4 bips = ERROR cdvi.com cdvigroup.com...
- Page 9 1 x beep = OK 1 x beep = OK 2 x beeps = OK 1 x beep = OK 4 beeps = ERROR 4 beeps = ERROR 4 beeps = ERROR Press B to exit from programming 2 beeps cdvi.com cdvigroup.com...
- Page 10 This spread sheet will help you keep track of the user codes programmed in the keypad User User User Code Name Code Name Code Name location location location Relay 1 (1 output) Relay 2 (2 output) NOTE From user location 00 to 59. From user location 60 to 99. cdvi.com cdvigroup.com...
-
Page 11: Presentation Du Produit
3] KIT DE MONTAGE Plaque de fixation Vis Diax à Clé mâle Vis cruciforme ® Cheville de l’électronique Passe fil Varistance tête fraisée coudée pour à tête fraisée plastique déportée (M5x8) vis Diax (M4x30) ® Electronique déportée PROFIL100EC ** Tension libre cdvi.com cdvigroup.com... -
Page 12: Montage
Pour finaliser le montage de ce surface de votre choix, à l’aide pas de placer la varistance produit, placez le cache-vis. des vis. Venez ensuite placer (Voir page «Rappels l’électronique déportée sur son préconisations»). support. cdvi.com cdvigroup.com... - Page 13 Si le contact horloge est ouvert, la touche contact horloge «clé» n’est pas utilisable, dans le cas Clavier fil blanc contraire, la touche «clé» peut être Clavier fil marron utilisée pour l’ouverture libre. clavier vert ( éclairage ) cdvi.com cdvigroup.com...
- Page 14 - Enlevez le cavalier P2. - Le code maître est de nouveau 1 2 3 4 5 Cas de figure : et tous les codes sont effacés. vous avez un code maître et des codes utilisateurs - Les valeurs par défaut sont rétablies. cdvi.com cdvigroup.com...
-
Page 15: Programmation Des Codes
- Pour la première utilisation, le code maître usine est : 1 2 3 4 5. 4. Pour sortir de la programmation, tapez B. - Deux bips sonores sont émis pour confirmer l’entrée en programmation. Deux bips sonores sont émis pour confirmer cdvi.com cdvigroup.com... - Page 16 2. Relais 1 (Groupe 1) : Tapez A7. Relais 2 (Groupe 2) : Tapez A8. Rose 2.2KΩ - Suivant le nombre de relais, cette saisie 12 v Dc vous permettra de composer Verte Bleu les nouveaux termes de modifications des codes utilisateurs pour chaque groupe. cdvi.com cdvigroup.com...
- Page 17 Ci-joint un tableau récapitulatif qui vous servira à indiquer le code attribué à chaque utilisateur. Rangs Code Rangs Code Rangs Code Prénom Prénom Prénom Relais 1 Relais 2 RAPPEL Du rang 00 au rang 59. Du rang 60 au rang 99. cdvi.com cdvigroup.com...
- Page 18 1 x bip = OK 1 x bip = OK 1 x bip = OK 1 x bip = OK 4 bips = ERREUR 4 bips = ERREUR 4 bips = ERREUR 4 bips = ERREUR 4 bips = ERREUR cdvi.com cdvigroup.com...
- Page 19 1 x bip = OK 1 x bip = OK 2 x bip = OK 1 x bip = OK 4 bips = ERREUR 4 bips = ERREUR 4 bips = ERREUR Tapez B pour sortir de la programmation 2 bips cdvi.com cdvigroup.com...
- Page 20 Reference : g0301Fr0270v04 Extranet : EXE-cDvI_IM PrOFIL100Ec cMYK A5 EN-Fr 03 Manufacturing Access Control since 1985 CDVI CDVI CDVI LA GÂCHE ÉLECTRIQUE (Headquarters/Siège social) FrANcE SWITZErLAND MArOc FrANcE Phone: +33 (0)1 48 91 01 02 Phone: +41 (0)21 882 18 41...
Need help?
Do you have a question about the Digicode Series and is the answer not in the manual?
Questions and answers