Table of Contents
Advertisement
Quick Links
Advertisement
Table of Contents

Related Manuals for Crestron Sonnex SWAMP-24X8


Summary of Contents for Crestron Sonnex SWAMP-24X8
- Page 1 Crestron SWAMP(I)-24X8 Sonnex Multiroom Audio System ® Operations Guide...
- Page 2 Important Safety Instructions • Read these instructions. WARNING: Keep these instructions. • TO REDUCE THE RISK OF FIRE OR ELECTRIC SHOCK, • Heed all warnings. DO NOT EXPOSE THIS APPARATUS TO RAIN OR Follow all instructions. • MOISTURE. THE APPARATUS SHALL NOT BE EXPOSED •...
- Page 3 Other trademarks, registered trademarks, and trade names may be used in this document to refer to either the entities claiming the marks and names or their products. Crestron disclaims any proprietary interest in the marks and names of others. Crestron is not responsible for errors in typography or photography.
-
Page 5: Table Of Contents
Check Network Wiring ....................46 Reference Documents ....................47 Further Inquiries ......................47 Future Updates ......................47 Return and Warranty Policies ....................49 Merchandise Returns / Repair Service ..............49 Crestron Limited Warranty ..................49 Operations Guide – DOC. 7049E Contents • i... -
Page 7: Sonnex Multiroom Audio System: Swamp(I)-24X8
Provides two additional S/PDIF stereo zone outputs • (Continued on following page) For connection of the Sonnex Link between the SWAMP-24X8 and each expander, use Crestron ® DM-CBL-8G or high-quality CAT5e shielded twisted-pair cable. The maximum cable length using DM-CBL-8G or CAT5e is 200 ft (61 m) per run. For longer distances, use the S-EXT1-S Sonnex Link over Fiber Extender (sold separately). - Page 8 1. Additional S/PDIF and analog line outputs may be added using the SWE-8 Sonnex Multiroom Audio Unamplified Expander (sold separately). 2. For connection of the Sonnex Link between the SWAMP-24X8 and each expander, use Crestron DM-CBL-8G or high-quality CAT5e shielded twisted-pair cable. The maximum cable length using DM-CBL-8G or CAT5e is 200 ft (61 m) per run.
- Page 9 These outputs can even be extended to feed remote AV receivers anywhere in the house using AUD-EXT Audio Extenders. 1. CH (Crestron Home) CAT5 balanced audio is supported using balanced inputs 13 – 16. All other inputs require an ABAR-1 CAT5 Balanced Audio Receiver.
- Page 10 1. If using Cresnet as the control system interface, system expansion is limited to one expander. Support for more than one expander requires Ethernet as the control system interface. 2. For connection of the Sonnex Link between the SWAMP-24X8 and each expander, use Crestron DM-CBL-8G or high-quality CAT5e shielded twisted-pair cable. The maximum cable length using DM-CBL-8G or CAT5e is 200 ft (61 m) per run.
- Page 11 Crestron SWAMP(I)-24X8 Sonnex Multiroom Audio System • Dynamic Range Control (DRC) is a user-selectable feature to help keep everything at a consistent level, whether in a quiet bedroom, a loud swimming pool, or an outdoor patio, facilitating a more cohesive listening experience.
- Page 12 Ethernet, Sonnex affords incredible integration ®* potential as part of a complete Crestron system, enabling seamless control of every room and source through a wide selection of touch screens, keypads, wireless remotes, computers, and mobile devices. Complete setup is afforded via USB or Ethernet, using Sonnex Tools software, part of the Crestron Toolbox™...
-
Page 13: Applications
Crestron SWAMP(I)-24X8 Sonnex Multiroom Audio System Applications The following diagram shows a SWAMP-24X8 in a multizone application. SWAMP-24X8 in a Multizone Application Operations Guide – DOC. 7049E Sonnex Multiroom Audio System: SWAMP(I)-24X8 • 7... -
Page 14: Specifications
Sonnex Multiroom Audio System Crestron SWAMP(I)-24X8 Specifications Specifications for the SWAMP(I)-24X8 are listed in the following table. SWAMP(I)-24X8 Specifications SPECIFICATION DETAILS Audio Features 24 x 10 stereo matrix switcher, 8-channel stereo DSP, 8-channel stereo power amplifier, Sonnex Digital Audio Transport,... - Page 15 Crestron SWAMP(I)-24X8 Sonnex Multiroom Audio System SWAMP(I)-24X8 Specifications (Continued) SPECIFICATION DETAILS Audio (continued) Power Limiting Sonnex Speaker Protect (SSP) output limiting; Configurable 40 to 140 watts @ 8 ohms 40 to 240 watts @ 4 ohms 40 to 400 watts @ 8 ohms bridged...
- Page 16 ® Surface Mount Outdoor Speakers ASPIRE Series Aspire ® Speakers AUD-EXT Audio Extenders CBL Series Crestron Certified Interface Cables DM-8G-CONN Cable Connector for DM-CBL-8G Cable Connector with Wire Guide for DM-8G-CONN-WG DM-CBL-8G DM-8G-CRIMP Crimping Tool for DM-8G-CONN DM-8G-CRIMP-WG Crimping Tool for DM-8G-CONN-WG...
-
Page 17: Physical Description
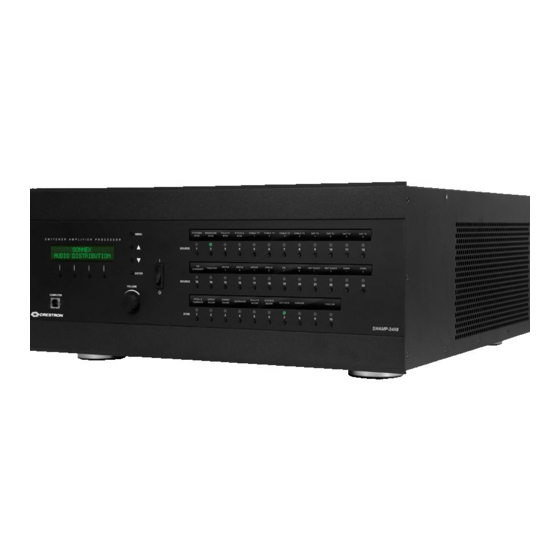
Crestron SWAMP(I)-24X8 Sonnex Multiroom Audio System Physical Description This section provides information on the connections, controls, and indicators available on the SWAMP-24X8. SWAMP-24X8 Physical View (Front) SWAMP-24X8 Physical View (Rear) Operations Guide – DOC. 7049E Sonnex Multiroom Audio System: SWAMP(I)-24X8 • 11... - Page 18 Sonnex Multiroom Audio System Crestron SWAMP(I)-24X8 SWAMP-24X8 Overall Dimensions (Top) 18.47 in (470 mm) 17.29 in (439 mm) 19.00 in (483 mm) 12 • Sonnex Multiroom Audio System: SWAMP(I)-24X8 Operations Guide – DOC. 7049E...
- Page 19 Crestron SWAMP(I)-24X8 Sonnex Multiroom Audio System SWAMP-24X8 Overall Dimensions (Front and Back) 6.97 in (178 mm) 7.51 in (191 mm) 19 12 Connectors, Controls, and Indicators CONNECTORS, DESCRIPTION CONTROLS, AND INDICATORS LCD Display and Green LCD alphanumeric, adjustable BUTTONS backlight, 2 lines x 20 characters per line;...
- Page 20 Sonnex Multiroom Audio System Crestron SWAMP(I)-24X8 Connectors, Controls, and Indicators (Continued) CONNECTORS, DESCRIPTION CONTROLS, AND INDICATORS Up, Down (2) Push buttons, scroll up or down through menu and adjust menu parameters ENTER (1) Push button, executes highlighted menu item or value...
- Page 21 Crestron SWAMP(I)-24X8 Sonnex Multiroom Audio System Connectors, Controls, and Indicators (Continued) CONNECTORS, DESCRIPTION CONTROLS, AND INDICATORS FUSE US/North America: T15AH (1/4” x 1-1/4”, 250 V, 15 A, time-lag, high-rupture rated) fuse International: T8AH (5 mm x 20 mm, 250 V,...
- Page 22 2. Refer to “Fuse Replacement” on page 25 for additional details. 3. Port on SWAMPI-24X8 is labeled 220-240V~50/60Hz MAX 6A. 4. For connection of the Sonnex Link between the SWAMP-24X8 and each expander, use Crestron DM-CBL-8G or high-quality CAT5e shielded twisted-pair cable. The maximum cable length using DM-CBL-8G or CAT5e is 200 ft (61 m) per run.
-
Page 23: Setup
SWAMP-24X8 devices in the same system must be unique. The Net ID can be set from the SWAMP-24X8’s front panel or with Crestron Toolbox. For more details, refer to “Set the Cresnet ID” on page 39 or the Crestron Toolbox help file. Operations Guide – DOC. 7049E... -
Page 24: Installation
SWAMP-24X8’s IP table using Crestron Toolbox. For more details, refer to “Set the IP ID” which starts on page 39 or the Crestron Toolbox help file. The IP IDs of multiple SWAMP-24X8 devices in the same system must be unique. - Page 25 To install the ears, use the following procedure. CAUTION: To prevent equipment damage, use only the rack ears Crestron provides for this device. There are screws that secure each side of the SWAMPE-8 top cover. Using a #1 or #2 Phillips screwdriver, remove the three screws closest to the front panel from one side of the unit.
-
Page 26: Hardware Hookup
Sonnex Multiroom Audio System Crestron SWAMP(I)-24X8 Hardware Hookup Make the necessary connections as called out in the illustration that follows this Connect the Device paragraph. Refer to “Network Wiring” and “Sonnex Link Wiring” on page 17 for additional information. Apply power after all connections have been made. - Page 27 Crestron SWAMP(I)-24X8 Sonnex Multiroom Audio System Typical Balanced/Unbalanced Inputs Balanced Input Unbalanced Input Shield Jumpers Left Left Right Right Devices with a RJ-45 CH output such as the CEN-IDOCV can be connected to the CH Device Connections balanced inputs on the SWAMP-24X8 as shown in the following table.
- Page 28 Sonnex Multiroom Audio System Crestron SWAMP(I)-24X8 The speaker outputs on the SWAMP-24X8 can be bridged to deliver higher power to Bridge Speaker Outputs a speaker. The left channel on an individual output can be bridged with the right (Optional) channel on the same output. Refer to the following diagram when bridging outputs.
- Page 29 Crestron SWAMP(I)-24X8 Sonnex Multiroom Audio System Wiring Diagram: Passive Subwoofer Using Bridged Output BUSSED BRIDGED LEFT RIGHT STEREO PAIR ROOM Connect the speakers and subwoofer as shown in one of the previous diagrams. The SWAMP-24X8 can use a 2 or 4 order crossover filter to separate the audio signals between the subwoofer and the left-right stereo pair speakers.
- Page 30 SWAMP-24X8 to SWAMPE Connection (SWAMPE-8 shown) NOTE: When connecting a SWAMP-24X8 to an expander, Crestron recommends using Crestron DM-CBL-8G or high-quality CAT5e shielded twisted-pair cable. Shielded connectors such as the DM-8G-CONN must be used.
- Page 31 Push in the fuse holder a little further and turn the screwdriver clockwise until the fuse holder locks in place. Connect power to the SWAMP-24X8. Use Crestron Engraver software to print custom labels for the SWAMP-24X8’s front Label the Buttons panel buttons and LEDs. Crestron recommends printing on 100-pound paper. Paper weighing less than 100 pounds tends to crumple while sliding in, while paper weighing more than 100 pounds may not fit.
-
Page 32: Configuration
The SWAMP-24X8 can be configured from the SWAMP-24X8’s front panel using the “Installer Mode” menu or from a PC using the Sonnex Tools application in Crestron Toolbox. This document contains instructions for using the "Installer Mode” menu. For information on using Sonnex Tools to configure the SWAMP-24X8, refer to the Sonnex Tools help file. -
Page 33: Zone Setup
Crestron SWAMP(I)-24X8 Sonnex Multiroom Audio System Press ENTER to select Source Setup. Press ENTER to select Compensation. Press q or ▲ until the input source to be adjusted is displayed. Press ENTER to select the input source and display the Gain screen. - Page 34 • NOTE: As speaker ratings vary greatly across manufacturers, there is no guarantee that Sonnex Speaker Protect protects against speaker damage in all situations. Crestron DRC enables or disables the Crestron Dynamic Range Control • function. • Global EQ sets the same EQ preset for all zones in the system. Setting this option overrides any EQ selection that was previously set for an individual zone.
- Page 35 Crestron SWAMP(I)-24X8 Sonnex Multiroom Audio System Bass Screen Zone 1 ▲ Bass 0.0 dB Press q or ▲ to display the bass setting to be applied and press ENTER. Repeat for every zone to be adjusted. Press MENU to return to the “Zone Setup” menu.
- Page 36 Sonnex Multiroom Audio System Crestron SWAMP(I)-24X8 Press q or ▲ to display Balance and press ENTER. A list of zones is displayed. Press q or ▲ to display the zone to be controlled and press ENTER. The Balance screen is displayed.
- Page 37 Crestron SWAMP(I)-24X8 Sonnex Multiroom Audio System Repeat for every zone to be adjusted. Press MENU to return to the “Zone Setup” menu. To adjust a zone’s maximum volume setting, perform the following procedure: Set Maximum Volume Enter the “Zone Setup” menu as described in “Enter/Exit the “Zone Setup”...
- Page 38 Sonnex Multiroom Audio System Crestron SWAMP(I)-24X8 Bus Screen Zone 1 ▲ Press q or ▲ to display the bus to which the zone is to be assigned and press ENTER. Repeat for every zone to be assigned. Press MENU to return to the “Zone Setup” menu.
- Page 39 Crestron SWAMP(I)-24X8 Sonnex Multiroom Audio System To bridge outputs together, perform the following procedure: Bridge Outputs Enter the “Zone Setup” menu as described in “Enter/Exit the “Zone Setup” Menu” on page 28. Press q or ▲ to display Bridging and press ENTER. A list of zones is displayed.
- Page 40 Enter the “Zone Setup” menu as described in “Enter/Exit the “Zone Setup” Menu” on page 28. Press q or ▲ to display Crestron DRC and press ENTER. A list of zones is displayed. Press q or ▲ to display the zone to be configured and press ENTER. The Crestron DRC screen is displayed.
-
Page 41: Expander Status
Crestron SWAMP(I)-24X8 Sonnex Multiroom Audio System Crestron DRC Screen Zone 1 Crestron DRC Press q or ▲ to display the desired DRC setting and press ENTER. Repeat for every zone to be configured. Press MENU to return to the “Zone Setup” menu. -
Page 42: Amplifier Status
Sonnex Multiroom Audio System Crestron SWAMP(I)-24X8 Amplifier Status Select this option to view the settings and operating status of each of the SWAMP-24X8 amplifiers as well as the amplifiers of connected expanders. To view information about the amplifier, perform the following procedure: Enter the “Installer Mode”... - Page 43 Crestron SWAMP(I)-24X8 Sonnex Multiroom Audio System Press q or ▲ to set the first octet of the IP address. Press the button under the next octet (or press ENTER to move to the next octet) to select it for editing.
- Page 44 Press q or ▲ to display Hostname and press ENTER. The hostname is displayed. Press ENTER to return to the previous screen. NOTE: The hostname can be changed with Crestron Toolbox. To display the domain name, perform the following procedure: Display Domain Name Enter the “Network Setup”...
-
Page 45: Control Setup
Press q or ▲ to display Domain Name and press ENTER. The domain name is displayed. Press ENTER to return to the previous screen. NOTE: The domain name can be changed with Crestron Toolbox. Control Setup Select this option to configure and view the SWAMP-24X8 control system settings. -
Page 46: About
Sonnex Multiroom Audio System Crestron SWAMP(I)-24X8 Press q or ▲ to display IP ID and press ENTER. The “IP ID” screen is displayed. “IP ID” Screen IP ID ▲ Press q or ▲ to display the desired setting and press ENTER. The display returns to the previous screen. -
Page 47: Uploading And Upgrading
Finally, program checks can be performed (such as changing the device ID or creating an IP table) to ensure proper functioning. NOTE: Crestron software and any files on the website are for authorized Crestron dealers and Crestron Service Providers (CSPs) only. New users must register to obtain access to certain areas of the site (including the FTP site). -
Page 48: Programs And Firmware
Toolbox. For details on uploading and upgrading, refer to the Crestron Studio help file, SIMPL Windows help file, or the Crestron Toolbox help file. If a Crestron Studio (or SIMPL Windows) program is provided, it can be uploaded to Crestron Studio or SIMPL Windows the control system using Crestron Studio (or SIMPL Windows) or Crestron Toolbox. -
Page 49: Program Checks
Crestron SWAMP(I)-24X8 Sonnex Multiroom Audio System Check the Crestron website to find the latest firmware. (New users must register to Firmware obtain access to certain areas of the site, including the FTP site.) Upgrade SWAMP-24X8 firmware via Crestron Toolbox. Establish communication with the SWAMP-24X8 as described in “Establishing Communication”... -
Page 50: Operation
Operation The SWAMP-24X8 can be controlled from the front panel or the Sonnex Tool in Crestron Toolbox. NOTE: For information on Crestron Toolbox, refer to the Crestron Toolbox help file. Power To turn on the SWAMP-24X8, move the POWER switch to . To turn off the... -
Page 51: Volume Control
Crestron SWAMP(I)-24X8 Sonnex Multiroom Audio System Press MENU to return to the “Main Menu”. Volume Control To raise the volume in the selected zone(s), turn the VOLUME knob clockwise. To lower the volume in the selected zone(s), turn the VOLUME knob counterclockwise. -
Page 52: Problem Solving
Use the Right Wire To ensure optimum performance over the full range of the installation topology, use Crestron Certified Wire only. Failure to do so may incur additional charges if support is required to identify performance deficiencies because of using improper wire. -
Page 53: Reference Documents
Cresnet power usage of the entire chain. If the unit is run from a Crestron system power supply network port, the Cresnet power usage of that unit is the Cresnet power usage of the entire run. The wire gauge and the Cresnet power usage of the run should be used in the following equation to calculate the cable length value on the equation’s left side. - Page 54 These updates are solely electronic and serve as intermediary supplements prior to the release of a complete technical documentation revision. Check the Crestron website periodically for manual update availability and its relevance. Updates are identified as an “Addendum” in the Download column.
-
Page 55: Return And Warranty Policies
(property or economic damages inclusive) arising from the sale or use of this equipment. Crestron is not liable for any claim made by a third party or made by the purchaser for a third party. - Page 56 Crestron Electronics, Inc. Operations Guide – DOC. 7049E 15 Volvo Drive Rockleigh, NJ 07647 (2028550) Tel: 888.CRESTRON 06.20 Fax: 201.767.7576 Specifications subject to www.crestron.com change without notice.
Need help?
Do you have a question about the Sonnex SWAMP-24X8 and is the answer not in the manual?
Questions and answers