Table of Contents
Advertisement
Quick Links
Advertisement
Table of Contents

Subscribe to Our Youtube Channel
Related Manuals for Pepperl+Fuchs ENI11HD


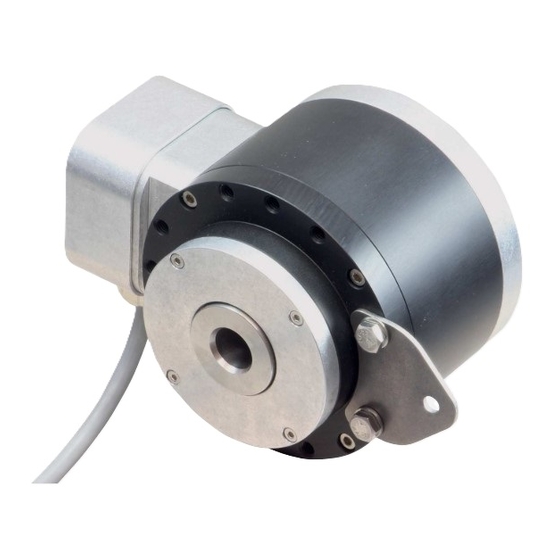
Summary of Contents for Pepperl+Fuchs ENI11HD
- Page 1 ENI11HD Heavy-Duty Incremental Rotary Encoder Manual...
- Page 2 Phone: +49 621 776 - 0 E-mail: info@de.pepperl-fuchs.com North American Headquarters Pepperl+Fuchs Inc. 1600 Enterprise Parkway Twinsburg, Ohio 44087 Phone: +1 330 425-3555 E-mail: sales@us.pepperl-fuchs.com Asia Headquarters Pepperl+Fuchs Pte. Ltd. P+F Building 18 Ayer Rajah Crescent Singapore 139942 Phone: +65 6779-9091 E-mail: sales@sg.pepperl-fuchs.com https://www.pepperl-fuchs.com...
-
Page 3: Table Of Contents
ENI11HD Contents Introduction........................ 4 Declaration of Conformity..................5 Safety .......................... 6 Symbols Used ....................6 Intended Use ....................6 General Safety Information................6 Product Description ....................8 Use and Application ..................8 Included in Delivery..................9 Accessories....................9 Installation........................ 10 Safety Information .................. -
Page 4: Introduction
ENI11HD Introduction Introduction Congratulations You have chosen a device manufactured by Pepperl+Fuchs. Pepperl+Fuchs develops, pro- duces and distributes electronic sensors and interface modules for the market of automation technology on a worldwide scale. Contact If you have any questions about the device, its functions, or accessories, please contact us at: Pepperl+Fuchs Group Lilienthalstraße 200... -
Page 5: Declaration Of Conformity
This product was developed and manufactured in line with the applicable European standards and directives. Note A declaration of conformity can be requested from the manufacturer. The product manufacturer, Pepperl+Fuchs Group, 68307 Mannheim, Germany, has a certified quality assurance system that conforms to ISO 9001. ISO9001... -
Page 6: Safety
Intended Use The ENI11HD incremental rotary encoder is used to record rotations though a direct mechani- cal coupling with a rotating drive shaft. Internally, the rotation is converted into a sequence of electrical pulses which are provided by the rotary encoder on several output channels. With its robust design, the rotary encoder is particularly suitable for applications in which strong exter- nal mechanical loads can affect the rotary encoder. -
Page 7: General Safety Information
In the event of any serious errors, stop using the device. Secure the device against unintended operation. To have the device repaired, return it to your local Pepperl+Fuchs representative or your sales center. Additional documents relating to this device, such as the data sheet, declarations of conformity, certificates, etc. -
Page 8: Product Description
A high level of immunity to electromagnetic interference. • A high dielectric strength of 2.5 kV (optional) This ensures a long service life. ENI11HD rotary encoders offer a high level of process safety and thus minimize the risk of failure. -
Page 9: Included In Delivery
If the incremental rotary encoder was ordered with an extension arm, then one of the swivel heads is already pre-assembled on the support plate. Accessories Note Various accessories are available. Find accessory products can be found online on the product page for the ENI11HD incremental rotary encoder at www.pepperl-fuchs.com. -
Page 10: Installation
ENI11HD Installation Installation Safety Information Danger! Risk of injury Injury due to unexpected startup of the drive shaft. • Stop the drive before carrying out any work on the device. • Secure the drive in an appropriate manner against unexpected restart, in particular against recommissioning by another person. -
Page 11: Designations Of The Rotary Encoder Parts
ENI11HD Installation Designations of the Rotary Encoder Parts In the following diagram, you will find the designations of the most important components of the rotary encoder. To avoid misunderstandings, these designations will be used in the following sections. Figure 5.1... -
Page 12: Assembling Hollow Shaft Rotary Encoders (General)
ENI11HD Installation Assembling Hollow Shaft Rotary Encoders (General) Preventing Malfunctions Correct mounting of the rotary encoder on the drive shaft, as well as the torque rest, is required for the rotary encoder to function correctly. When assembling a hollow shaft rotary encoder, observe in particular the following points: •... -
Page 13: Preparation Of The Rotary Encoder For Shaft Mounting (All Types)
ENI11HD Installation 5.3.1 Preparation of the Rotary Encoder for Shaft Mounting (All Types) The instructions show the preparatory steps using the example of a rotary encoder with contin- uous hollow shaft. Preparation is identical for all types of rotary encoders described here. Pre-... - Page 14 ENI11HD Installation Mounting the Torque Rest Warning! Damage to the swivel head When mounting the extension arm, tighten the self-locking nut on the screw that leads through the socket of the swivel head to a torque of 1 Nm ... 2 Nm.
- Page 15 ENI11HD Installation Figure 5.5 Mounting of the support plate and extension arm on the rotary encoder Item Name Rotary encoder Extension arm Support plate Washer for M6 (DIN 125A), 2 units M6 x 12 hexagon head screw (DIN 933), 2 units...
-
Page 16: Shaft Mounting (Rotary Encoder With Continuous Hollow Shaft)
ENI11HD Installation 5.3.2 Shaft Mounting (Rotary Encoder with Continuous Hollow Shaft) When assembling a rotary encoder with continuous hollow shaft, proceed as follows: Loosen the screw on the shaft clamping ring of the rotary encoder. Slide the rotary encoder onto the drive shaft. - Page 17 ENI11HD Installation Figure 5.7 Dismounting the rotary encoder cover Item Name Rotary encoder Rotary encoder cover 3 mm hexagon wrench (not included in the scope of delivery) Four captive M4 hexagon socket cap head screws (DIN 912) Check the drive shaft. The drive shaft must be clean and free from grease, rust, and burrs.
- Page 18 ENI11HD Installation Secure the rotary encoder shaft with a size 27 open-end wrench. Now turn the mounting screw into the thread on the face side of the drive shaft and tighten to a torque of 6 Nm. Figure 5.8 Mounting of a rotary encoder with recessed hollow shaft (the rear rotary encoder cover is...
-
Page 19: Shaft Mounting (Rotary Encoder With Tapered Shaft)
ENI11HD Installation 5.3.4 Shaft Mounting (Rotary Encoder with Tapered Shaft) Note Rotary encoders with a tapered shaft do not have a shaft clamping ring. Mounting to the drive shaft is through a central mounting screw. The drive shaft must have an M6 threaded hole on the face side for this purpose. - Page 20 ENI11HD Installation Slide a washer for M6 over the M6 x 30 screw. Insert the M6 x 30 screw through the central hole on the back of the rotary encoder. Secure the rotary encoder shaft with a size 27 open-end wrench. Now turn the M6 x 30 screw into the thread on the face side of the tapered drive shaft and tighten to a torque of 3 Nm ...
-
Page 21: Assembling The Extension Arm (All Types)
ENI11HD Installation 5.3.5 Assembling the Extension Arm (All Types) Observe the general assembly instructions, see chapter 5.3. Warning! Damage to the swivel head When assembling the extension arm, tighten the self-locking nut on the bolt that leads through the socket of the swivel head to a torque of 1 Nm ... 2 Nm. This will prevent the plastic socket of the swivel head from being crushed. - Page 22 ENI11HD Installation Adjust the length of the extension arm by turning the swivel heads to the calculated dimension. Note: Both ends of the threaded rod should grip at least 5 mm deep into the threads of the swivel heads. Secure the swivel heads with the lock nuts on the threaded rod of the extension arm to a torque of maximum 1.5 Nm.
- Page 23 ENI11HD Installation Assembling the Extension Arm with M6 Mounting Screw Figure 5.14 Recommended assembly of the extension arm, on the drive side when using a mounting screw Item Description M6 mounting screw Washer for M6 (DIN 125A) Swivel head Self-locking nut...
- Page 24 ENI11HD Installation Assembling the Extension Arm with M6 Threaded Rod Figure 5.15 Recommended assembly of the extension arm, on the drive side when using a threaded Item Description M6 threaded rod Self-locking nut Washer for M6 (DIN 125A) Swivel head...
-
Page 25: Electrical Connection
ENI11HD Installation Electrical Connection For your safety and for reliable operation, observe the following notes: Warning! Risk of short circuit Working on live parts can cause injuries and can compromise the function and the electrical safety of the device. •... -
Page 26: Connection Box With Cable Duct And Terminals
ENI11HD Installation 5.4.2 Connection Box with Cable Duct and Terminals Note Use a shielded connection cable for the electrical connection. For the required conductor cross section and diameter of the cable sheath, please see the technical data in the datasheet. - Page 27 ENI11HD Installation Loosen the union nut of the cable duct. From the seal inserts supplied, select the one that is appropriate for your cable diameter (see datasheet). Run the stripped cable end through the union nut and the seal insert. Then pull the cable back until the end of the cable sheath is in line with the inner end of the seal insert.
- Page 28 ENI11HD Installation Now create the electrical connection between the connection strands of your cable and the removable screw terminals. Figure 5.20 Assignment of the screw terminals in the connection box Insert the removed screw terminals into the socket and tighten the lock screws.
-
Page 29: Connection Box With Connection Cable
ENI11HD Installation 5.4.3 Connection Box with Connection Cable Check that the cable outlet is pointing down. If this is not the case, turn the connection box cover so that the cable outlet is pointing down. Proceed as follows: Loosen the connection box cover (four screws). The screws are captive screws. -
Page 30: Connection Box With Connector Plug
ENI11HD Installation 5.4.4 Connection Box with Connector Plug Note Use a shielded connection cable with a suitable connector or a preconfigured shielded single- ended female cordset for the electrical connection . Check that the connector outlet is pointing down. If this is not the case, turn the connection box cover so that the connector outlet is pointing down. - Page 31 ENI11HD Installation Rotary encoders in this series can be ordered with a right-rotating or left-rotating plug. The con- nector pins are arranged as follows: Pinout of the Connector Plug M23 connector plug, 12-pin, right-rotating M23 connector plug, 12-pin, left-rotating 1 2 11...
-
Page 32: Dismounting, Storage, And Disposal
ENI11HD Dismounting, Storage, and Disposal Dismounting, Storage, and Disposal Dismounting the Rotary Encoder Warning! Risk of injury To protect against injury when carrying out any work on the rotary encoder, observe the safety instructions, see chapter 5.1. When dismounting the rotary encoder, proceed in the reverse order to that described in section see chapter 5.3. - Page 33 ENI11HD Dismounting, Storage, and Disposal Figure 6.1 Preparation for dismounting Item Name Drive Rotary encoder Torque rest (already loosened from the drive) Rotary encoder shaft with flat area for open-end wrench Size 27 open-end wrench (not included in the scope of delivery)
- Page 34 ENI11HD Dismounting, Storage, and Disposal Note: Do not turn the threaded pin fully into the thread of the drive shaft. The threaded pin should still protrude slightly from the drive shaft. This will prevent the thread of the drive shaft on the face side from being damaged by the jack screw when the rotary encoder is subsequently removed.
-
Page 35: Storage And Transportation
ENI11HD Dismounting, Storage, and Disposal Figure 6.3 Lifting off the rotary encoder Item Name Drive Rotary encoder Torque rest (already loosened from the drive) Rotary encoder shaft with flat area for open-end wrench Size 27 open-end wrench (not included in the scope of delivery) - Page 36 Pepperl+Fuchs Quality Download our latest policy here: www.pepperl-fuchs.com/quality www.pepperl-fuchs.com © Pepperl+Fuchs · Subject to modifications Printed in Germany xxxxxx / DOCT-3604A...
Need help?
Do you have a question about the ENI11HD and is the answer not in the manual?
Questions and answers