
Related Manuals for Kichler Lighting XETY LED


Summary of Contents for Kichler Lighting XETY LED
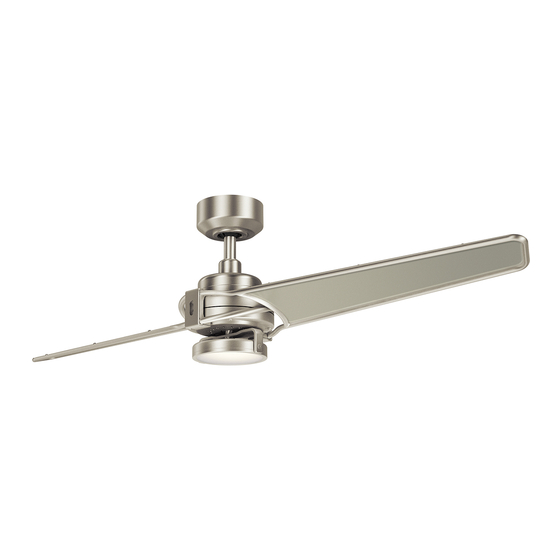
- Page 1 56" XETY Product images may vary slightly from actual product. INSTRUCTION MANUAL...
-
Page 2: Table Of Contents
TABLE OF CONTENTS SAFETY RULES ................4 INSTALLING THE TRANSMITTER ........15 TOOLS AND MATERIALS REQUIRED ........5 CONTROL SYSTEM SET-UP ..........16 PACKAGE CONTENTS ..............5 OPERATION INSTRUCTIONS ...........17 MOUNTING OPTIONS .............6 TROUBLESHOOTING ............18 HANGING THE FAN ..............7 FCC WARNING .................19 INSTALLATION OF SAFETY SUPPORT ......9 SPECIFICATIONS ..............20 ELECTRICAL CONNECTIONS ..........10 FINISHING THE INSTALLATION ........12... -
Page 3: Safety Rules
SAFETY RULES TOOLS REQUIRED PACKAGE CONTENTS 1. To reduce the risk of electric shock, insure electricity has been turned 8. Avoid placing objects in the path of the blades. Philips screw driver Unpack your fan and check the Blade screw driver contents . -
Page 4: Mounting Options
MOUNTING OPTIONS HANGING THE FAN If there isn’t an existing UL (cUL for Canadian Installation) listed REMEMBER to turn o the power before you begin installation. mounting box, then read the following instructions. Disconnect the This is necessary for your safety and also the proper programming of the control system. -
Page 5: Installation Of Safety Support
HANGING THE FAN HANGING THE FAN Clip Cross Pin Step 3. Loosen the two set screws and remove the clip and Step 5. Now lift the motor body into position and place the hanger cross pin from the top coupling of the motor body. ball into the mounting bracket. - Page 6 INSTALLATION OF SAFETY SUPPORT MAKE THE ELCTRIC CONNECTIONS Mounting Bracket (required for Canadian installation ONLY) Receiver Safety Cable Bolt Step 2. Insert the safety cable through the mounting bracket and one of the holes in the Step 1. Insert the receiver into the mounting bracket, and keep flat in opposition Wood Screw outlet box into the ceiling.
-
Page 7: Finishing The Installation
FINISHING THE INSTALLATION FINISHING THE INSTALLATION NOTE: Before continuing , make sure the power is disconnected by turning o Step 3. Securely attach and tighten the canopy hole cover over the the circuit breaker of removing the fuse at the circuit box. shoulder screws in the mounting bracket utilizing the keyslot twist-lock Shoulder Screw feature. -
Page 8: Installing The Transmitter
ATTACHED THE FAN BLADES INSTALLATING THE TRANSMITTER Blade Step 2. Attach the blade to the the blade arm and position the highter All wiring nust be in accordance with the National Electrical Code and Outlet Box side of blade over the top of blade arm. Make sure the screw holes of local electrical codes. -
Page 9: Control System Set-Up
CONTROL SYSTEM SET-UP OPERATING INSTRUCTIONS Wall Switch NOTE: Make sure the power is completely disconnected Restore power to ceiling fan and test for proper operation (Fig. 25) before you begin this procedure. Switch Plate 1. Fan Control: Read all of these steps before preceeding.Each step must Battery To start the fan. -
Page 10: Troubleshooting
TROUBLESHOOTING FCC WARNING Fan will not start. 1. Check circuit fuses or breakers. This device complies with part 15 of the FCC Rules. Operation is subject to the folioeing two conditions: 2. Check all electrical connections to insure proper contact. CAUTION: Make sure the main power is OFF when checking any electrical connection. - Page 11 TROUBLESHOOTING Overall Airflow Fan Size Speed Volts Amps Watts Efficiency N.W. G.W. C.F. (CFM/Watt) High 0.71 81.87 5,854.35 56” 0.49 38.42 3,717.19 74.16 9.17 kgs 10.42 kgs 2.01 (300702) 0.25 10.92 1,039.09 These are approximate measures . They do not include data for any lamps or fixtures attached to the ceiling fan.
- Page 12 www.kichler.com KICHLER® LIGHTING 7711 EAST PLEASANT VALLEY ROAD P.O. BOX 318010 CLEVELAND, OHIO 44131-8010 CUSTOMER SERVICE 866.558.5706 8:30 AM TO 5:00 PM EST, MONDAY - FRIDAY...
Need help?
Do you have a question about the XETY LED and is the answer not in the manual?
Questions and answers