Advertisement
Assembly and care instructions
This cot can be assembled in a number of configurations.
Instructions for all configurations are included in this manual
Bassinet
Chaise lounge
Junior Bed
RECYCLED
Packaging and instructions
printed on recycled materials
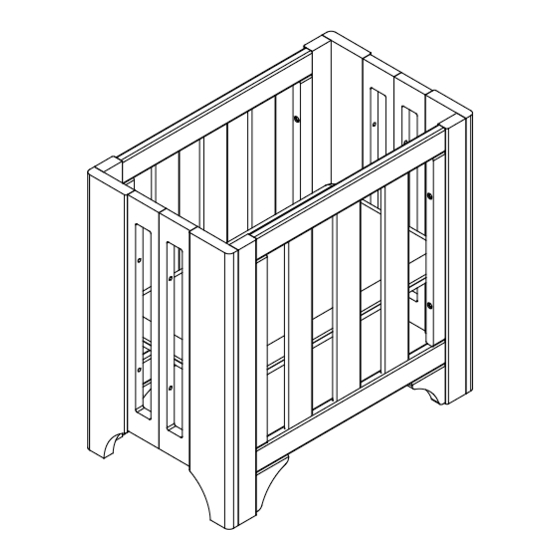
Alfresco cot
Mattress and accessories not included
Single Bed - Optional Kit
Save these instructions for future reference. Due to the heavy nature
of the cot, it is recommended assembly is undertaken by two people.
TM
Cot
Optional double bed rails and
base kit purchased separately
SJC Brands Pty Ltd
abn.
58 106 988 578
4 Merryvale Road, MINTO, NSW 2566
t.
02 9603 5000 f. 02 9603 7000
e.
info@tasmaneco.com.au
p.o. box
5878 MINTO DC, NSW 2566
w.
www.tasmaneco.com.au
Advertisement
Table of Contents

Subscribe to Our Youtube Channel
Related Manuals for TasmanEco Alfresco cot


Summary of Contents for TasmanEco Alfresco cot
- Page 1 Alfresco cot Assembly and care instructions This cot can be assembled in a number of configurations. Instructions for all configurations are included in this manual Bassinet Chaise lounge Mattress and accessories not included Single Bed - Optional Kit Optional double bed rails and...
- Page 2 • Regularly check cot for weakness in timber joints and timber panels. If any weaknesses are found, report immediately to Tasman Eco via: www.tasmaneco.com.au Side panels x 2 Base x 1 •...
- Page 3 Assembly overview Hardware needed A:M6 x 60mm connector bolts x 8 Before commencing assembly, note that Alfresco cot can be B:Camlock x 4 assembled as a full cot with the base set in the lower position; or as a bassinet with the base set in the high position.
-
Page 4: Bassinet - Assembly
Bassinet - Assembly Step 4 - Attached side panels to cot ends Assembly overview Hardware needed 8 x 60mm connector bolts x 8 Optional baby bassinet kit Parts List Bassinet Base x 1 Corner Post x 4 End panels x 2 Extension panel x 4 Secure side panel to cot ends using 8x60mm connector bolts. -
Page 5: Hardware Needed
Step 1 -Prepare the Extension panels Hardware needed 8 x 50mm connector bolts x 8 4 x end cap screws Attach the extension panels in pairs. Secure each pair of the extension panels using the 35mm connector bolts and end caps. Tighten the bolts firmly but do not overtighten Step 2 - Attach the end panels to Extension panels... -
Page 6: Step 3 - Attach The Brackets
Single Bed - Assembly Step 3 - Attach the brackets Optional single bed kit purchased separately 4 x Brackets Step 1 Hardware needed M6 x 50mm connector blot x 8 8 x end cap screws Attach each brackets into the hole provided on each corner frame Attach the extension panels to end panels. - Page 7 Step 3 - Attach the corner posts to the end panels Step 5 - Attach base frames as shown below: Hardware needed A:M6 x 60mm connector bolt x 8 Note: Do not cut the fabric webbing that holds the slats together.
- Page 8 Converting the cot into a Chaise lounge/Junior bed these steps are best undertaken by two people. 1. To convert your Tasman Eco cot into 2. Remove the 4 connector bolts from the inner a chaise lounge, begin by loosening the front panel.
- Page 9 For claims under either the 100% Satisfaction Guarantee or the 5 year Materials and Workmanship Warrranty, please email us via our claims section on our website at www .tasmaneco.com.au or visit the store where the product was purchased. The product must be returned to SJC Brands Pty Ltd or to the place of purchase with proof of purchase, including date and purchase price.
Need help?
Do you have a question about the Alfresco cot and is the answer not in the manual?
Questions and answers