Table of Contents
Advertisement
Advertisement
Table of Contents

Related Manuals for SATO VP208


Summary of Contents for SATO VP208
- Page 1 Barcode Printer Operator Manual...
- Page 2 Regulatory Approval Preface Thank you for purchasing SATO VP208 printer (hereafter “the printer”). This manual supplies basic information on how to operate (Pb) (Hg) (Cd) (Cr6+) (PBB) (PBDE) the printer in a short period. Read the manual carefully to understand each function before use.
-
Page 3: Table Of Contents
Table of Contents Safety Precautions ........2 Precautions for Handling .......4 Checking the Including Items ......4 1 Before You Start .........5 1. Parts Identification ..........5 2. Charging a Battery ..........6 3. Setting the Label ..........7 4. Display ..............8 5. Icon ..............8 6. -
Page 4: Safety Precautions
AC ● T he symbol explanations are as follows. adapter from the outlet. Then contact your SATO reseller or technical support center. If you operate the printer in this condition, it The Warning symbol may cause fire or electric shock. indicates that you can WARNING ■... - Page 5 • When maintaining and cleaning the printer, contact your SATO reseller or technical support center. remove the battery to maintain safety. Also • Do not place the battery together with other batteries, disconnect the AC adapter from the outlet.
-
Page 6: Precautions For Handling
Check the including items. Place the printer on a surface that is flat and level. If there is a missing item, contact the SATO reseller or technical support center. Do not place the printer in an unlevel or slanted place. Doing so could cause falling. -
Page 7: Before You Start
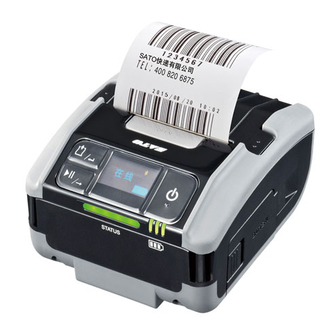
1 Before You Start 1. Parts Identification Top cover Cover open button Display Media feed / Enter button button Print / (Power Select button button) Battery cover Battery level Status LED Platen roller (Consumables) Cutter USB Connector Print head AC adapter (Consumables) terminal... -
Page 8: Charging A Battery
2. Charging a Battery 2. Charging the Battery 1. Inserting a Battery . Connect the AC adapter. Connect the DC plug to the printer and the AC plug to the AC outlet. . Open the battery cover. Printer side 1) Slide the lever of the battery cover . AC outlet side 2) Open the battery cover . -
Page 9: Setting The Label
3. Setting the Label On Batteries ● The battery is consumable. Even if the battery is fully charged, operation time gradually becomes shorter. It is . Open the top cover. the battery’s characteristics, not an error or problem. 1) Push the cover open button . ● The number of charges (about 500 times) and charging 2) Open the top cover . time (about 4 hours) are for reference. -
Page 10: Display
5. Icon 4. Display The icons indicate three types of information. The display has three modes. 1. Interface information 1. Normal mode 2. Warning information 2. Error message mode 3. Battery information 3. Settings mode The information is displayed in the position corresponding to Displayed items differ depending on the mode. -
Page 11: Lighting Pattern When The Led Lights
2. Warning Information 6. Lighting Pattern When the LED Lights This information appears at positions to on the display. The lighting patterns of the LEDs are described here. Icon Description The filament of the print head is open. Command error is detected. ① Status LED ②... - Page 12 2. Energy Saving Mode Remaining battery level AC adapter Battery Status connection mode (STATUS) (Green) (Green) (Green) Green Level 3 1800 Green Level 2 1800 Green connected Level 1 1800 Level 0* installed Charging – complete. Green Level 3 1800 Green Level 2 Connected...
-
Page 13: Operations
1-2. Printer Shut Down 2 Operations . Press the button ( button). Power This printer has two modes, normal startup and test print mode. Power supply NORMAL MODE . The SAVING MEMORY screen appears. PRINT SCREEN This appears when the power is turned off while data are being stored or being cleared. - Page 14 2. Normal Mode 2-3. Cancel Printing Clears the received data PAUSE 2-1. ONLINE completely. CANCEL PRINT JOB ONLINE screen YES NO Screen for waiting for data Default: NO reception. ONLINE YES: Clears the data and changes to OFFLINE. NO: Does not clear the data and changes to OFFLINE. Button name and PRINTING screen Screen and printer operation...
- Page 15 3. Adjustment Mode 3-1. Pitch Position Adjustment Adjust the pitch position. When you press and hold the Print/Select button for 3 ADJUSTMENT MODE seconds or more, the screen changes to the adjustment PITCH POSITION Initial value: +0.00 mm mode. +0. 00mm Setting range: –3.75 to +3.75 The adjustment mode has five types. The media-feed direction is 1 Pitch position adjustment ADJUSTMENT MODE...
- Page 16 3-2. Offset Position Adjustment 3-3. Print Darkness Adjustment Adjust the offset position. Adjust the print darkness. ADJUSTMENT MODE ADJUSTMENT MODE OFFSET POSITION PRINT DARKNESS Initial value: +0.00 mm Initial value: 50 +0. 00mm Setting range: –3.75 to +3.75 Setting range: 00 to 99 The adjustment direction is The value “00” is the lightest ADJUSTMENT MODE ADJUSTMENT MODE indicated by a plus or minus sign.
- Page 17 4. Settings Mode 3-4. Buzzer Setting Enable or disable buzzer This mode is for the administrator. ADJUSTMENT MODE activation. The settings mode has six types. BUZZER 1 ONLINE MODE (page 16) ENABLE DISABLE Default: ENABLE 2 BASIC SETTINGS (Page 16) ENABLE: The buzzer will sound. 3 I/F SETTINGS (page 23) DISABLE: The buzzer will not 4 ADVANCE SETTINGS (page 27) sound.
- Page 18 4-1. ONLINE MODE 4-2. BASIC SETTINGS Select ONLINE MODE. Select BASIC SETTINGS. When one second has passed after the screen appears, the When one second has passed after the screen appears, the message shown below scrolls on the lower part of the message shown below scrolls on the lower part of the screen.
- Page 19 Screen Transition for Basic Settings 4-2-1. PRINT SETTINGS Select PRINT SETTINGS. When one second has passed after the screen appears, the SETTING MENU message shown below scrolls on the lower part of the BASIC SETTINGS screen. BASIC SETTINGS BASIC SETTINGS PRINT SETTINGS PRINT SETTINGS ADJUST SETTINGS Message: Configure Print Settings.
- Page 20 4-2-1-2 PRINT SPEED Print/Select + Media feed/Enter Changes to the PRINT SETTINGS Set the print speed. PRINT SETTINGS + Press for 3 sec. or screen (page 17). more. PRINT SPEED Initial value: 4 Setting range: 4 to 6 4-2-1-4 PRINT DARKNESS 2 4: 100 mm/sec. (4 inch/sec.) 5: 125 mm/sec. (5 inch/sec.) Set the print darkness and PRINT SETTINGS 6: 140 mm/sec.
- Page 21 4-2-1-5 PRINT OFFSET [Example for setting the print offset] Set the print offset. PRINT SETTINGS PRINT SETTINGS PRINT OFFSET PRINT OFFSET Initial value: V:+0000, H:+000 V:+0000 H:+000 V:+0000 H:+000 Setting range: V: Set the print position by setting From the print reference point PRINT SETTINGS how many dots are apart +40 dots (5 mm) vertically (V) from the print reference point PRINT OFFSET...
- Page 22 4-2-2. FONT SETTINGS 4-2-2-2 CHARACTER PITCH Select FONT SETTINGS. Set the character pitch (set FONT SETTINGS When one second has passed after the screen appears, the whether to print based on width of CHARACTER PITCH message shown below scrolls on the lower part of the each character or fixed character ENABLE DISABLE screen.
- Page 23 4-2-3-1 OPERATION MODE Tear-Off Operation Mode After printing the specified number of sheets continuously, the roll Sets the operation mode. OP SETTINGS is fed to the cutter position automatically. OPERATION MODE In this mode, the roll is easily cut manually after printing. Default: TEAR OFF: For the next printing, the roll is fed back to the print head and TEAR OFF After printing, the label is printing will start.
- Page 24 4-2-3-3 ENERGY SAVING 4-2-3-4 AUTO POWER-OFF Set the time to make the transition Set the time to turn the printer off OP SETTINGS OP SETTINGS to the energy saving mode. when the printer has not been ENERGY SAVING AUTO POWER-OFF operated within the specified 005 sec 000 min...
- Page 25 4-3-1. INTERFACE SELECT Screen 4-3. I/F SETTINGS Set the interface. I/F SETTINGS Select I/F SETTINGS. When one second has passed after the screen appears, the INTERFACE SELECT Default: Bluetooth message shown below scrolls on the lower part of the screen. Bluetooth SETTING MENU I/F SETTINGS...
- Page 26 < Bluetooth > 4-3-1-2 SCAN DETECT This is the setting screen activated when “Bluetooth” is Set the communication protocol. Bluetooth selected on the 4-3-1 INTERFACE SELECT Screen. SCAN DETECT Default: ENABLE 4-3-1-1 Authentication Level ENABLE DISABLE Set the authentication level. Bluetooth Button name and Screen and printer operation AUTHENTICATION button pressing...
- Page 27 4-3-1-4 PARAMETER SETTING (ISW) 4-3-1-5 PARAMETER SETTING (PSI) Set the communication parameter Set the communication parameter Bluetooth Bluetooth ISW. PSI. SETTING(ISW) SETTING(PSI) Hexadecimal display. Hexadecimal display. 0012 0090 Displayed when SCAN DETECT is set to “ENABLE.” Initial value: 0090 Setting range: 0012 to 1000 Initial value: 0012 •...
- Page 28 4-3-1-6 PARAMETER SETTING (PSW) 4-3-1-8 CRC CHECK Set the communication parameter Set the CRC check function. Bluetooth Bluetooth PSW. CRC CHECK SETTING(PSW) Hexadecimal display. Default: DISABLE ENABLE DISABLE 0012 • The setting value is enabled Initial value: 0012 when the power is supplied on Setting range: 0011 to 1000 the next time.
- Page 29 Screen Transition for Advance Setting 4-4. ADVANCE SETTINGS Select ADVANCE SETTINGS. SETTING MENU When one second has passed after the screen appears, the ADVANCE SETTINGS message shown below scrolls on the lower part of the screen. SETTING MENU BEEP ON ERROR ADVANCE SETTINGS COMMAND ERROR Message: Configure Advanced Functions.
- Page 30 4-4-1. BEEP ON ERROR 4-4-3. HEAD CHECK Set whether to perform head check Select whether it is to beep or ADVANCE SETTINGS ADVANCE SETTINGS or not. not when a command error is HEAD CHECK BEEP ON ERROR Default: DISABLE generated. ENABLE DISABLE ENABLE DISABLE ENABLE: Enables the head check function.
- Page 31 4-4-5. HEAD CHECK MODE 4-4-6. NO. OF LABELS Set the mode for head check. Set the interval to perform head ADVANCE SETTINGS ADVANCE SETTINGS check. HEAD CHECK MODE NO. OF LABELS Default: ALL 000001 Initial value: 000001 NO. OF LABELS Setting range: 000001 to 999999 ADVANCE SETTINGS START-END...
- Page 32 4-4-8. AUTO ONLINE 4-4-10. FEED AFTER ERROR Set the status for when the printer Set whether the label roll is to be ADVANCE SETTINGS ADVANCE SETTINGS is booted. fed by one sheet after an error is AUTO ONLINE FEED AFTER ERROR generated.
- Page 33 4-5. HEX DUMP MODE 4-5-2. HEX DUMP OFFLINE Select HEX DUMP MODE. “HEX” is displayed at the upper left of the display. OFFLINE screen SETTING MENU HEX DUMP MODE Screen for waiting for label data. OFFLINE Message: Enter Hex Dump Mode. PAUSE screen Screen for pausing label printing. Button name and Screen and printer operation button pressing...
- Page 34 4-6-1. Selection of Items to be Initialized 4-6. DEFAULT MODE Select the items to be initialized. DEFAULT SETTING Select DEFAULT MODE. DEFAULT MODE SETTING MENU FACTORY SETTING DEFAULT MODE PRINTER SETTING I/F SETTINGS USER MEMORY Message: Default Printer Settings. Default: FACTORY SETTING FACTORY SETTING: Set to the factory settings.
-
Page 35: Test Print Mode
4-6-3. COMPLETED 2. Test Print Mode This is the screen displayed when FACTORY SETTING initialization is completed. Turning the power on while the Media feed/Enter button is COMPLETED held pressed activates test print mode. PLEASE POWER OFF The seven items below can be printed in test print mode. Turn the power off. - Page 36 1. Selecting an Item for Test Printing 1-1. Test Print Start Screen for starting test printing. Select an item for test TEST PRINT printing. TEST PRINT MODE SELECT FEED - >PRINT USER TEST Default: USER TEST SERVICE TEST Button name and BD ADDRESS Screen and printer operation button pressing...
-
Page 37: List Of Initial Value
3. List of Initial Value Setting Items Initial Value ADVANCE SETTINGS Setting Items Initial Value BEEP ON ERROR DISABLE ADJUSTMENT MODE COMMAND ERROR DISABLE PITCH POSITION +0.00mm HEAD CHECK DISABLE OFFSET POSITION +0.00mm HEAD CHECK RANGE BARCODE PRINT DARKNESS HEAD CHECK MODE BUZZER ENABLE NO. -
Page 38: Troubleshooting
Type of error ROM Error Light in red Buzzer Long sound, one time ① Cannot access the Flash ROM. ② Exceeds the time for Cause writing. ③ Cannot access the EEPROM. ① ② ③ Contact the SATO Countermeasure reseller or technical support center. - Page 39 ③ Pitch sensor error ① Restart the printer. Countermeasure ① ② Load the media ERROR07 correctly. Countermeasure COVER OPEN ② Contact the SATO reseller Screen Close cover. or technical support center. ERROR10 Message Close cover. CORRECT MEDIA SETTING Screen Releasing the Check and l o ad paper properl y .
- Page 40 Short sound, 3 times ① The filament of the print ① No free space in memory. Cause Cause head is open. ① Delete unwanted data. Countermeasure ① Contact the SATO reseller Countermeasure ERROR14 or technical support center. DOWNLOAD DATA ERROR Screen ERROR12 MEMORY R/W ERROR Screen Contact customer servi c e.
- Page 41 Long sound, one time Buzzer Short sound, 3 times ① Read incorrect kanji data. ① Command error is Cause Cause detected. ① Contact the SATO reseller Countermeasure ① Check the print data. or technical support center. Countermeasure On Caaa:<bb>:cc ERROR26 HEAD OVERHEAT...
- Page 42 Buzzer Short sound, 3 times ① Bluetooth module error ① A battery is disconnected. Cause Cause ② A battery is not installed. ① Contact the SATO reseller Countermeasure ① ② Insert a battery. or technical support center. Countermeasure ERROR41 ERROR43...
- Page 43 Type of error Printer overheat Light in red Buzzer Long sound, one time The temperature of the printer Cause is outside the specified range. Contact the SATO reseller or Countermeasure technical support center. The power will automatically Notes be turned off after 30 to 40 seconds.
-
Page 44: List Of Warning Icons
Buzzer – finishes on the printer. ① After detecting the head error, the head error is Cause released and printing continues. ① Contact the SATO reseller Countermeasure or technical support center. Replace the print head. ONLINE Screen Warning Command error If the next item is received or... -
Page 45: Options
Clean the platen roller softly from side to side using a cotton cloth dabbed with cleaning liquid.* 3. Label Guide Clean the label guide softly using a cotton cloth dabbed with cleaning liquid.* * The cleaning liquid is not included. Contact the SATO reseller or technical support center for purchasing. -
Page 46: Basic Specifications
Model name VP208 6 Basic Specifications Print position, stop position, print Level adjustment darkness, brightness Media length I-mark sensor 1. Printer detection sensor UPC-A/UPC-E, JAN/EAN, CODE39, Model name VP208 CODE93, CODE128, Barcode GS1-128 (UCC/EAN128), Print Method Direct thermal method CODABAR (NW-7), ITF,... -
Page 47: Battery
3. Label Specifications Model name VP208 ① Status return Media type/ Roll ② Graphic Media form Dimension : Φ36 mm maximum ③ Form overlay (99) Coreless ④ Foreign letter registration (95) (For China) Media size Standard Length 20 to 1000 mm Built-in ⑤ Character modification (20 to 1000 mm) ⑥...
Need help?
Do you have a question about the VP208 and is the answer not in the manual?
Questions and answers