Table of Contents
Advertisement
Quick Links
TC-2190 A
M
INICONNECTORS
Introduction
Conventions
»
National Instruments™, NI™, ni.com™, and NI-DAQ™ are trademarks of National Instruments Corporation. Product and
company names mentioned herein are trademarks or trade names of their respective companies. For patents covering
National Instruments products, refer to the appropriate location: Help»Patents in your software, the patents.txt file
on your CD, or ni.com/patents.
ni.com
© 1997–2002 National Instruments Corp. All rights reserved.
DAPTER WITH
I
NSTALLATION
This installation guide describes how to install and connect thermocouples
and digital I/O signals to the TC-2190 adapter with thermocouple
miniconnectors to use with the NI USB-4350, NI PXI-4351, and
NI PCI-4351 data acquisition (DAQ) devices.
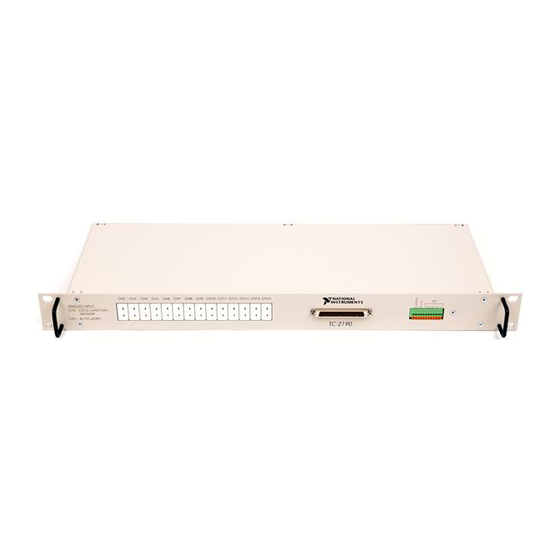
The TC-2190 adapter consists of a shielded box with 14 miniconnectors
that you can use to connect the thermocouples to the NI 435X for USB,
PXI, and PCI. This adapter has two 68-pin connectors—one on the front
and one on the rear. You can use either of the two connectors to connect the
TC-2190 to the NI 435X using an SH6868 shielded cable (recommended)
or an R6868 ribbon cable. You can also access the eight digital I/O lines
and the digital ground of the NI 435X using the spring terminal blocks.
This adapter is designed specifically for ease of use with thermocouples.
It features isothermal construction to minimize the temperature gradients
across the thermocouple junctions and a high-accuracy thermistor
cold-junction temperature sensor.
The TC-2190 connects to all the digital I/O lines on the NI 435X and all but
two analog input channels (CH)—CH0 is dedicated to the cold-junction
sensor and CH1 is dedicated to auto-zeroing circuitry. Refer to the
NI 435X User Manual for further details on the cold-junction sensor and
auto-zeroing circuitry.
The following conventions are used in this guide:
The » symbol leads you through nested menu items and dialog box options
to a final action. The sequence File»Page Setup»Options directs you to
pull down the File menu, select the Page Setup item, and select Options
from the last dialog box.
T
HERMOCOUPLE
G
UIDE
October 2002
321674C-01
Advertisement
Table of Contents

Subscribe to Our Youtube Channel
Related Manuals for National Instruments TC-2190


Summary of Contents for National Instruments TC-2190
- Page 1 The TC-2190 connects to all the digital I/O lines on the NI 435X and all but two analog input channels (CH)—CH0 is dedicated to the cold-junction sensor and CH1 is dedicated to auto-zeroing circuitry. Refer to the NI 435X User Manual for further details on the cold-junction sensor and auto-zeroing circuitry.
-
Page 2: What You Need To Get Started
NI 435X Refers to all devices in the National Instruments 4350 and 4351 families. What You Need to Get Started You need the following items to set up and use the TC-2190: ❑ TC-2190 adapter with thermocouple miniconnectors ❑... - Page 3 Jumper W1, located inside the TC-2190 on the bottom of the board, connects the shield of the 68-pin connectors and the TC-2190 metal case to NI 435X ground through a 100 Ω resistor (default setting) or directly to NI 435X ground, or keeps the metal case and NI 435X ground separate.
- Page 4 Remove the two rear panel screws that hold the rear 68-pin connector. Hold the front panel and slide the assembly out of the metal case. Set jumper W1 as needed. Reassemble the TC-2190, following this procedure in reverse order. Do not overtighten the screws. TC-2190 Adapter Installation Guide...
-
Page 5: Connecting The Signals
Connecting Thermocouples Insert the thermocouple miniconnector to the mating miniconnector on the TC-2190. Each miniconnector is keyed; that is, it has two spades of different widths so that you can insert the thermocouple in only one way. Do not force the miniconnector. If you encounter difficulty while inserting the miniconnector, check whether the polarity is correct. -
Page 6: Connecting Digital I/O Signals
Before installing the TC-2190, make sure you have set jumper W1 correctly for the application. You can mount the TC-2190 into a 19 in. rack or place it on a workbench near the NI 435X. If you do not rack-mount the TC-2190, attach the four adhesive rubber feet included in this kit to the TC-2190 to keep it stationary. - Page 7 2 Front Panel 6 NI 435X for USB, PXI, and PCI 3 Front 68-Pin Connector 7 Rear Panel 4 Ejector Ears 8 Rear 68-Pin Connector Figure 2. Connecting the TC-2190 to the NI 435X © National Instruments Corporation TC-2190 Adapter Installation Guide...
- Page 8 Cold-Junction Temperature Sensor The TC-2190 cold-junction temperature sensor consists of a precision thermistor excited by the 25 µA current source on the NI 435X. At 25 °C, the resistance of the thermistor is 5,000 Ω. The thermistor resistance varies from 16,305 to 1,492 Ω over the 0 to 55 °C temperature range. The corresponding sensor output voltage varies from 408 to 37 mV over this temperature range.
-
Page 9: Specifications
(signal + common mode) ....... Each input should remain within ±42 V of ground Safety The TC-2190 meets the requirements of the following standards for safety and electrical equipment for measurement, control, and laboratory use: • EN 61010-1, IEC 61010-1 •... -
Page 10: Technical Support Resources
Technical Support section of ni.com Worldwide Support National Instruments has offices located around the world to help address your support needs. You can access our branch office Web sites from the Worldwide Offices section of . Branch office Web sites provide ni.com... - Page 11 Portugal 210 311 210, Russia 095 238 7139, Singapore 65 6 226 5886, Slovenia 3 425 4200, South Africa 11 805 8197, Spain 91 640 0085, Sweden 08 587 895 00, Switzerland 056 200 51 51, Taiwan 02 2528 7227, United Kingdom 01635 523545 © National Instruments Corporation TC-2190 Adapter Installation Guide...
Need help?
Do you have a question about the TC-2190 and is the answer not in the manual?
Questions and answers