Sensear SM1P Ex Manual
Hide thumbs
Also See for SM1P Ex:
- Technical information (15 pages) ,
- Quick start manual (2 pages) ,
- Manual (29 pages)

Subscribe to Our Youtube Channel
Related Manuals for Sensear SM1P Ex


Summary of Contents for Sensear SM1P Ex
- Page 1 SM1P Ex MANUAL ENGLISH IEC Controlled Document – modifications to this document must follow IEC Document Control Procedures. Document Revision: Date: Reference: IECEx126 AA.02 1/11/2018...
- Page 2 Please consult with the website for more information. *SRCK61XXCCXX part numbers vary depending on the radio connector. Consult your supplier for the appropriate cable. For language translated manuals and further information, please refer to the website. IECEx126 SM1P Ex Manual 2 Printed in Australia...
-
Page 3: Maintenance And Safety Instructions
SPECIFIC CONDITIONS OF USE Potential Electrostatic hazard, clean with damp cloth only. WARNING The SM1P Ex must not be disassembled. In the event of a malfunction the unit should be switched off and returned to Sensear Pty Ltd. The battery is not user replaceable; the SM1P Ex must be returned to Sensear for battery replacement. -
Page 4: Entity Parameters
ENTITY PARAMETERS The following entity parameters are for when SM1P Ex is used with SRCK61XXCCXX at the radio end of the interface cable. Entity parameter Value 8.4 V 0.15µF 0 µH ≥ Ci + Ccable ≥ Li + Lcable IECEx126 SM1P Ex Manual... - Page 5 MARKINGS The SM1P Ex contains the following markings: Hazardous location class and group and temperature class A scratch-resistant classification label is located at the top of the left-side earcup on the headset. where “XXXX” is the number of the ATEX Notified Body responsible for the ATEX QAN.
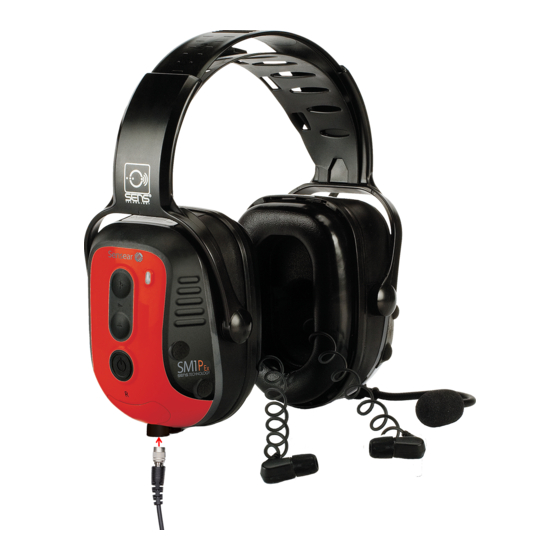
- Page 6 HEADSET ANATOMY FIGURE 1 IECEx126 SM1P Ex Manual 6 Printed in Australia...
- Page 7 1.12 Inline PTT 1.13 Inline PTT button Two-way radio connector (note, these will vary depending on your 1.14 two-way radio) 1.15 SRCK61XXCCXX cable assembly 1.16 To the two-way radio 1.17 LED light (one on each side of headset) IECEx126 SM1P Ex Manual...
-
Page 8: Wearing The Headset
WEARING THE HEADSET FIGURE 2 Description Headset Boom microphone Inline PTT Two-way radio IECEx126 SM1P Ex Manual 8 Printed in Australia... -
Page 9: Fitting The Headset
The SM1P Ex headset is designed to be worn with the headset sealing around the ears. Specific examples of how to fit the headset around the ears are covered in the next three pages. The fit does alter slightly depending on what style of brace is used - headband, behind the neck or mounted to a helmet directly. - Page 10 3.2 The ear muff cushions should seal firmly against the head. 3.3 For best results, remove all hair from under the ear cushion. Noise reduction will be adversely affected by anything that breaks the seal of the ear muff ear cushions. IECEx126 SM1P Ex Manual 10 Printed in Australia...
- Page 11 4.3 Fit the ear muffs over the ears ensuring a tight fit around the ears. 4.4 Ensure the muff completely surrounds the ears. 4.5 Press down on the headband to obtain a snug and comfortable fit. IECEx126 SM1P Ex Manual...
- Page 12 The mounts should be evenly spaced around the rear outside of the helmet. Fit the tie through the mount. The cable should feed through each tie and secured in place. IECEx126 SM1P Ex Manual 12 Printed in Australia...
- Page 13 Place the earmuff back over the ears. Ensure the retractable, coiled cable is fully located within the ear cup. Noise reduction will be adversely affected by anything that breaks the seal of the earmuff cushions. IECEx126 SM1P Ex Manual...
- Page 14 Place foam tip at an not to crease the angle to plastic foam canal IECEx126 SM1P Ex Manual 14 Printed in Australia...
- Page 15 Make sure the plug seals well into the ear canal. The ear tip should not protrude out of the ear canal. If using foam ear tips hold the plug in place for 20 seconds or until the foam has fully expanded. IECEx126 SM1P Ex Manual...
-
Page 16: Operating The Headset
By pressing the power button, this toggles ‘Quiet mode’. Quiet mode only allows two-way radio communications to pass through the headset. mode Green LED, blink twice every 4 seconds Quiet mode Green LED, blink once every 4 seconds IECEx126 SM1P Ex Manual 16 Printed in Australia... -
Page 17: Setup Mode
Headset is powered off Hold Volume Up button While holding Volume Up, Press & release Power button Will hear “system setup” Release Volume Up button Cycle down through system setup options (short) Power off the headset. (long) IECEx126 SM1P Ex Manual... - Page 18 Changing Short Range frequencies: Ensure you hear “short range FM frequency”. Change frequency: up = increment 0.1MHz, (short) down = decrement 0.1MHz Change bank: up = increment bank, (long) down = decrement bank IECEx126 SM1P Ex Manual 18 Printed in Australia...
- Page 19 Range” Changing VOX trigger level: Ensure you hear “VOX level”. cycle through “low”, “medium” and (short) “high” trigger levels “low” is the most sensitive/easiest to trigger VOX and “high” is the least sensitive/hardest to trigger VOX. IECEx126 SM1P Ex Manual...
- Page 20 COMMUNICATING COMMUNICATING OVER TWO-WAY RADIO: Only approved two-way radio cables containing a certified IS barrier (SRCK61XXCCXX) may be used with SM1P Ex. To transmit over the two-way radio: • Press and hold the button located on the inline PTT. •...
-
Page 21: Listening To Fm Radio
Bluetooth radio. ® LISTENING TO FM RADIO: (short press) together to toggle FM radio on /off. Note, FM radio cannot be turned on while Short Range is turned on and vice versa. When on: IECEx126 SM1P Ex Manual... - Page 22 (e.g. mobile phone that has the headset stored in its device list). Incoming call Answer call: From handset Press and release MFB Reject call: From handset Press and hold Multi-function button IECEx126 SM1P Ex Manual 22 Printed in Australia...
- Page 23 ® : To transmit, use the radio’s PTT. For some select device, MFB will perform as a Bluetooth PTT (if short range off). ® Contact Sensear representative for compatible devices. Bluetooth ® phone call: During a Bluetooth ® phone call, if two-way radio or...
- Page 24 Cushions can be removed simply by gripping the cushion and pulling firmly to unclip from the baseplate. Replacement cushions may be pushed into the clips around the baseplate. The headset should be stored at room temperature (between 15°C/59°F and 25°C/77°F). IECEx126 SM1P Ex Manual 24 Printed in Australia...
-
Page 25: Accessories And Spare Parts
Smart Muff Boom Microphone Wind Sock X5 SMPW0001 Wall Charger 5.5V 1.0A PRGTAB01 Programming Tablet Further information may be obtained from your Sensear representative, via the Sensear web site, or by emailing or writing to the address on this User Manual. IECEx126 SM1P Ex Manual... - Page 26 To charge the headset, follow the steps below: Plug the Sensear AC adapter into an appropriate power outlet. Insert the cable end of the Sensear AC adapter into the DC power socket on the SM1P headset (located on the left-hand- side of the unit).
-
Page 27: Technical Specifications
C ≤ Ta ≤ +40 Check the product label to identify the ratings applicable to the headset. Charging C to +40 C (32 F to 104 temperature Battery charge 4 hours time Operating time 18-24 hours IECEx126 SM1P Ex Manual... -
Page 28: Declaration Of Conformity
EN 301 489-1: V2.1.1 (2017-02) • EN 301 489-17: V3.1.1 (2017-02) • EN 300 328: V2.1.1 (2016-11) • EN 61000-6-2 Ed 3.0 • EN 61000-6-3 Ed 2.1 • EN 60950-1:2006 inc amendments A1, A2, A11, A12 IECEx126 SM1P Ex Manual 28 Printed in Australia...
Need help?
Do you have a question about the SM1P Ex and is the answer not in the manual?
Questions and answers