Sensear SM1R Manual
Hide thumbs
Also See for SM1R:
- Instruction (50 pages) ,
- Technical information (14 pages) ,
- User manual (4 pages)
Table of Contents
Advertisement
Quick Links
Advertisement
Table of Contents

Related Manuals for Sensear SM1R


Summary of Contents for Sensear SM1R
- Page 1 SM1R MANUAL ENGLISH DOC00074 Rev.04...
- Page 3 Contact through two-way radios is enabled by the SRCK60xx* cable assembly available separately. Please note that the SM1R headset uses power from the two-way radio. The SM1R must be connected by the appropriate SRCK60xx cable to the radio to provide both situational awareness and communication to the two-way radio.
-
Page 4: Maintenance And Safety Instructions
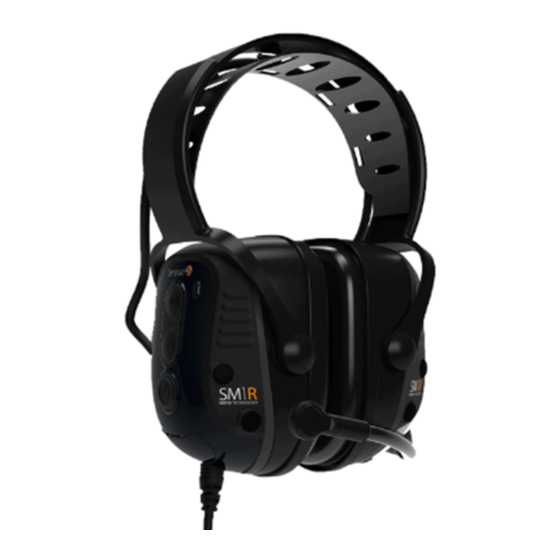
MAINTENANCE AND SAFETY INSTRUCTIONS The SM1R has been designed such that minimal user maintenance is required. Only those parts listed on page 21 of this instruction manual are user replaceable. SPECIFIC CONDITIONS OF USE Potential Electrostatic hazard, clean with damp cloth only. - Page 5 HEADSET ANATOMY FIGURE 1 DOC00074 SM1R Manual rev 04...
- Page 6 Inline PTT button Two-way radio connector (Note: these will vary depending on your two- 1.14 way radio) 1.15 SRCK60xx cable assembly 1.16 To the two-way radio 1.17 LED light (one on each side of headset) DOC00074 SM1R Manual rev 04...
-
Page 7: Wearing The Headset
WEARING THE HEADSET FIGURE 2 Description Headset Boom microphone Inline PTT Two-way radio DOC00074 SM1R Manual rev 04... -
Page 8: Fitting The Headset
The SM1R headset is designed to be worn with the headset sealing around the ears. Specific examples of how to fit the headset around the ears are covered in the next three pages. The fit does alter slightly depending on what style of mount is used - Headband, Behind-the-Neck, or Helmet mounted. - Page 9 The earmuff cushions should seal firmly against the head. For best results, remove all hair from under the ear cushion. Noise reduction will be adversely affected by anything that breaks the seal of the earmuff cushions. DOC00074 SM1R Manual rev 04...
- Page 10 Ensure no hair is inside the earmuff cushions. Fit the earmuffs over the ears ensuring a tight fit around the ears. Ensure the muff surrounds the ears. Press down on the headband to obtain a snug and comfortable fit. DOC00074 SM1R Manual rev 04...
- Page 11 Three adhesive mounts and ties are included to secure the earmuff cable to the helmet. The mounts should be evenly spaced around the rear outside of the helmet. Fit the tie through the mount. The cable should feed through each tie and secured in place. DOC00074 SM1R Manual rev 04...
-
Page 12: Operating The Headset
• The volume control buttons can be used to raise or lower the audio level of mode • *The default mode on power up can be programmed using the Sensear QUIET MODE: By pressing the power button, this toggles ‘Quiet mode’. Quiet mode only allows audio from two-way radios to pass through the headset. - Page 13 Refer to the two-way radio documentation for the setup and use of the VOX feature. To disable VOX, you can either turn VOX off on the two-way radio or press the headset PTT once, depending on which two-way radio model you use. DOC00074 SM1R Manual rev 04...
- Page 14 Cushions can be removed simply by gripping the cushion and pulling firmly to unclip from the baseplate. Replacement cushions may be pushed into the clips around the baseplate. The headset should be stored at room temperature (between 15°C/59°F and 25°C/77°F). DOC00074 SM1R Manual rev 04...
-
Page 15: Accessories And Spare Parts
Smart Muff Boom Microphone Wind Sock X5 SMPW0001 Wall Charger 5.5V 1.0A PRGTAB01 Programming Tablet Further information may be obtained from your Sensear representative, via the Sensear website, or by emailing or writing to the address on this User Manual. DOC00074 SM1R Manual rev 04... - Page 16 Trade Practices Act, or relevant legislation in your state or territory. SENSEAR reserves the right to limit its liability to the repair, replacement, or refund of the purchase price of a Product. Under no event shall SENSEAR be liable for damages more than the original purchase price of the...
- Page 17 • All other warranties, conditions, terms, representations, and undertakings whether express or implied. How to Get Warranty Service To register your product visit: sensear.com/support/headset-registration If you require warranty service visit: sensear.com/support/returns-repairs-new DOC00074 SM1R Manual rev 04...
-
Page 18: Troubleshooting
If the receiver can’t hear your voice and you can only hear the background noise: • Refer to the ‘Wearing the headset’ chapter of the manual. Ensure that your boom microphone is set appropriately. DOC00074 SM1R Manual rev 04... -
Page 19: Technical Information
SM1R TECHNICAL INFORMATION Rev: 6/30/22 For most recent technical information, visit sensear.com/support/technical-information... -
Page 20: Fcc Compliance Statement
Increase the separation between the equipment and receiver • Connect the equipment into an outlet on a circuit different • from that to which the receiver is connected Consult the dealer or an experienced radio/TV technician for help • DOC00074 SM1R Manual rev 04... -
Page 21: Declaration Of Conformity
DECLARATION OF CONFORMITY For most recent Declaration of Conformity, please visit sensear.com/support/declaration-of-conformity... -
Page 22: Technical Specifications
Helmet Mount Behind-the-Neck Headband 495g (17.46 428g (15.09 480g (16.93 Weight oz.) oz.) oz.) Operating -20°C to +60°C (-4°F to 140°F) temperature See radio cable documentation Power PP, ABS + TPE Housing material RoHS Compliant DOC00074 SM1R Manual rev 04... - Page 23 NRR AND SLC80 The SM1R has been certified to international hearing protection standards including AS/NZS 1270:2002, ANSI S3.19-1974, ANSI S12.6- 2008, EN352-1, EN352-3, EN352-4, and EN352-6. The following passive attenuation ratings were observed: PASSIVE ATTENUATION (ANSI S3.19-1974) SM1R measured in accordance with ANSI S3.19 -1974.
- Page 24 PASSIVE ATTENUATION (ANSI S12.6– 2008) SM1R measured in accordance with ANSI S12.6 - 2008. Headband mount- SM1RB001 Frequency (Hz) 1000 2000 4000 8000 NRR(SF) Mean 21.4 21.9 29.8 33.7 35.8 37.2 38.5 attenuation (dB) 27 dB Standard Dev. (dB) APV80 18.9...
- Page 25 PASSIVE ATTENUATION (AS/NZS 1270:2002) SM1R measured in accordance with AS/NZS 1270:2002. Headband mount - SM1RB001 SLC80 Frequency (Hz) 1000 2000 4000 8000 Mean atten. 20.3 21.7 30.3 33.2 35.2 36.6 37.3 (dB) Standard 31dB, dev. (dB) Class 5 Mean atten. –...
- Page 26 PASSIVE ATTENUATION (EN352-1 ANDEN352-3) SM1R measured in accordance with EN352-1 and EN352-3. Headband mount - SM1RB001 (EN352-1) 250 500 1000 2000 4000 8000 H Frequency (Hz) (dB) Mean attenuation 22.5 24.5 31.5 34.9 35.8 38.0 39.8 (dB) 35 30 24 Standard Dev.
- Page 27 The SM1R has level dependent facilities and the criterion levels as defined in EN352-4 are displayed below: Model dB(A) SM1R 108.6 104.6 103.4 EARMUFFS WITH ELECTRICAL AUDIO INPUT (EN352-6) The electrical input level for which the mean plus one standard deviation is A-weighted diffused-field related sound pressure level is equal to 82 dB(A) is an RMS voltage U = 108mV.
-
Page 28: Maintenance And Cleaning
• The output of the level-dependent circuit of this hearing protector may exceed the daily limit sound level. This limit can be adjusted with a Sensear programming tablet. This headset has been tested and approved according to the • methods described in the EN352 series of standards. -
Page 29: Clamping Force
CLAMPING FORCE The clamping force of the SM1R has been measured in accordance with AS/NZS 1270: Initial Post-flex Model Part # Units measurements measurements SM1R – SM1RB001 Newtons 11.6 11.1 11.1 11.1 10.7 11.1 Headband mount Pounds (lbs) SM1R –... - Page 30 INTRINSICALLY SAFE CERTIFICATION – IS MODEL The SM1R-IS meets the following international standards for use in explosive gas environments: • TIA-4950-A Rev. May 13, 2014 Requirements For Battery-Powered, Portable Land Mobile Radio Applications in Class I, II, III, Division 1, Hazardous (Classified) Locations CSA C22.2 No.
-
Page 31: Copyright Notice
While Sensear Pty. Ltd. makes every effort to ensure that the information in this document is correct at the time of publication, users and potential users should first check with Sensear Pty. Ltd. to ensure that they have received the most up-to-date documentation. - Page 32 Waste (Disposal) of your Electronic and Electric Equipment European Union (EU) Waste of Electrical and Electronic Equipment (WEEE) directive The European Union’s WEEE directive requires that products sold into EU countries must have the crossed- out trash bin label on the product (or the package in some cases). As defined by the WEEE directive, this cross- out trash bin label means that customers and end-users in EU countries should not dispose of electronic and electrical equipment or accessories in household waste.
- Page 33 La direttiva de la Unione Europea (EU) sui rifiuti di apparecchiature elettriche ed elettroniche (RAEE) Ladirettiva RAEE della Unione Europea richiede che i prodotti venduti nei paesi della UE devono essere marcati conil simbolo di un contenitore di spazzatura mobile barrato sul prodotto (oincasi eccezionali sull'imballaggio).
- Page 35 Printed in Australia...
Need help?
Do you have a question about the SM1R and is the answer not in the manual?
Questions and answers