
Related Manuals for OAKWORKS PROLUXE convertible


Summary of Contents for OAKWORKS PROLUXE convertible
- Page 1 I N S T R U C T I O N M A N U A L PROLUXE convertible ™ converts in seconds! ...then back to a portable! your portable table converted to a lift table and back again www.oakworks.com · 717.235.6807...
- Page 2 © Copyright 2011 , Inc. ® akworks Notice The information contained in this document is subject to change without notice and should not Manual Part # MMMNST0022 be construed as a commitment by 1st Edition, January 2011 , Inc. ® akworks Printed in U.S.A.
-
Page 3: Table Of Contents
Loading your portable table ..........pg 9 - 11 Remove your portable table ........... pg. 12 Controls - Foot control & Hand control ........pg 13 Using your ProLuxe Convertible ..........pg 14 General care of equipment ............... pg 15 Electrical specifications ................pg 15 Power &... -
Page 4: Symbol Identification
SYMBOL IDENTIFICATION - WARNINGS & CAUTIONS SYMBOL IDENTIFICATION This symbol, when used in this manual and on product labels, represents a caution warning. Be sure to read and comply with all precautions and warnings. This symbol, when used in this manual and on product labels, warns against an electrical shock hazard. -
Page 5: Grounding Instructions
GROUNDING GROUNDING INSTRUCTIONS This product must be grounded. If it should malfunction or breakdown, GROUNDING grounding provides a path of least resistance for electrical current to reduce the risk of electric shock. This product is equipped with a cord having an INSTRUCTIONS equipment-grounding conductor and a grounding plug. -
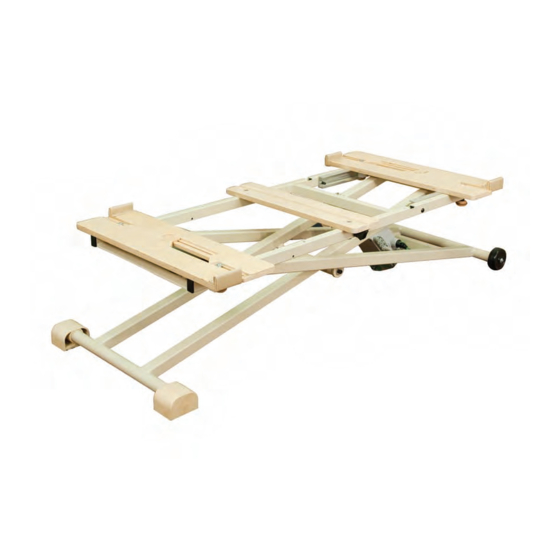
Page 6: Product Description & Specs
DIRECTIONS FOR USE PRODUCT DESCRIPTION knobs (4) wheels (2) electric motor End bumper of portable table support Center alignment groove Adjustable portable table supports (2 sets) Portable table secure strap Strap cleat Hook behind the cleat TABLE SPECIFICATIONS • Height Range: 20”... -
Page 7: One Time Only Set Up
PREPARE YOUR PROLUXE CONVERTIBLE ONE TIME ONLY PROLUXE CONVERTIBLE SET-UP This is a one time only procedure for each given portable table. STEP 1 Loosen all knobs below the adjustable portable table supports by turning the knob counter-clockwise. STEP 2 Slide the adjustable portable table supports to their widest position. - Page 8 PREPARE YOUR PROLUXE CONVERTIBLE STEP 5 Open your portable table on its side. STEP 6 CAUTION Remove the shiatsu cables or bolts on one side to enable your table to lay flat. Follow your table There are different types of shiatsu manufacturer’s instructions...
- Page 9 PREPARE YOUR PROLUXE CONVERTIBLE STEP 6 With your ProLuxe Convertible at its lowest height, stand at the side where the portable table supports are towards the outside, as shown here. Have the widest side of the adjustable portable table supports facing you.
- Page 10 PREPARE YOUR PROLUXE CONVERTIBLE STEP 8 Once your portable table is on the ProLuxe Convertible, you are ready to align & secure it to the base. Align the hinge of the portable table over the center alignment groove. Hinge of portable table...
- Page 11 PREPARE YOUR PROLUXE CONVERTIBLE Once the table supports are snug against the sides of the portable table, tighten the knobs to secure into place. NOTE: On tables with a backrest, leave a little space between the end bumpers and the backrest before tightening to allow movement of the backrest.
-
Page 12: Loading Your Portable Table
DIRECTIONS FOR USE LOADING YOUR PORTABLE TABLE This is done every time you remove and replace your portable table. All the adjustments to the base do not need to be done again. STEP 1 Open your portable table on its side. STEP 2 CAUTION Remove the shiatsu cables or bolts to... - Page 13 DIRECTIONS FOR USE Follow these steps to place your portable table on top of the ProLuxe Convert- ible. Make sure you have already completed the “one-time” set up section called “Prepare your ProLuxe Convertible” (page 4-8) STEP 3 With your ProLuxe...
- Page 14 DIRECTIONS FOR USE STEP 7 Make sure your portable table fits down and inside the end bumpers of the portable table supports. STEP 8 Align the hinge of the portable table over the center alignment groove. Hinge of portable table Center alignment groove STEP 9...
-
Page 15: Remove Your Portable Table
STEP 2 Reattach your portable table’s cabling system to restore Lift your portable table off your table to a safe operating configuration. the ProLuxe Convertible base. Fold your portable table & you’re ready to go! CAUTION Be sure to secure your portable table’s Shiatsu... -
Page 16: Controls - Foot Control & Hand Control
DIRECTIONS FOR USE HAND CONTROL OPERATIONS DIRECTIONS FOR USE - CONTROLS The ProLuxe Convertible comes with choice of either hand or foot control for easy height adjustments. CAUTION When operating the controls and making any and all adjustments to the... -
Page 17: Using Your Proluxe Convertible
DIRECTIONS FOR USE USING YOUR PROLUXE CONVERTIBLE - ACCESSORIES All of your portable table accessories will work with the ProLuxe Convertible. Install according to manufacturer’s instructions. FACE REST Shown here with QuickLock™ Face Rest & Boiance™ crescent. ARM HAMMOCK Shown here with QuickLock™... -
Page 18: General Care Of Equipment
MAINTENANCE GENERAL CARE OF EQUIPMENT COMPONENTS • Use only a mild solution of 4:1 diluted non-alcohol cleaner such as 409®, Fantastik® or some other non-abrasive cleaner to wipe down the metal surfaces. Apply with a damp (not wet) lint-free cloth. Be sure excess liquid does not drip onto, or into, any of the electrical controls or mechanisms. -
Page 19: Power & Lead Plug Id
POWER PLUGS PRODUCT IDENTIFICATION - POWER LEAD PLUGS Part #: Voltage (AC) Power Cord Plug ® akworks 5097-11 120v 60 Hz 3 prong grounded hospital grade; North America 5097-3 220v 50 Hz Continental Plug; Europe 5097-4 220v 50 Hz Swiss plug; Switzerland 5097-2 220v 50 Hz British plug;... -
Page 20: Contact Information
I N S T R U C T I O N M A N U A L CONTACT INFORMATION: Inc. ® akworks 923 East Wellspring Road New Freedom, PA 17349 Toll Free (USA only): 800-916-4613 Phone: 717-235-6807 FAX: 717-235-6798 www.oakworks.com Manual Part Number MMMNST0022 Revision date: 05.10.11 Edition 1, English Printed in USA...
Need help?
Do you have a question about the PROLUXE convertible and is the answer not in the manual?
Questions and answers