
Subscribe to Our Youtube Channel
Related Manuals for STEIN EMILIO


Summary of Contents for STEIN EMILIO
- Page 1 EMILIO SHOWER UNIT ACRYLIC AND TILE INSTALLATION INSTRUCTIONS THIS PRODUCT REQUIRES 2 PACKAGES FOR INSTALLATION 2015 / V4...
-
Page 2: Installation Instructions
If damage has occurred advise your supplier immediately and do not proceed with installation. Damage reported after installation will not be accepted. DISCLAIMER Stein International Ltd are not liable for any Emilio Shower that has not been installed correctly. INSTALLATION NOTES •... - Page 3 3mm masonry drill bit • NG Sika Silaflex cartridge and gun WE RECOMMEND THAT A PROFESSIONAL SHOWER INSTALLER IS USED FOR INSTALLATION OF THIS PRODUCT TO ENSURE THE VERY BEST OUTCOME EMILIO SHOWER UNIT Acrylic and Tile - Installation Instructions...
- Page 4 Emilio Shower - 2 Sided Acrylic ............Layout Plan A ... Page 4 Emilio Shower - 2 Sided Tile with Ezi-Lay Tile Tray......Layout Plan B ... Page 5 Emilio Shower - Alcove (Door Only) ..........
- Page 5 Emilio Acrylic Shower with Stein Acrylic Tray and ABS/Acrylic Liner: Set out the Emilio Shower by marking out the outside line of the wall channels (A) 12mm in from the outside edge of the tray. This will allow for suitable placement of the shower plus some variances from plumb on the walls.
- Page 6 Emilio Tile Shower with Ezi-Lay Tile Tray with Hobs Application: Set out the Emilio Shower place by marking out the outside line of the Wall channels (A) 30mm in from the outside edge of the tiled hob. This will allow for suitable placement of the shower plus some variances from plumb on the walls.
- Page 7 (See Table) PLEASE NOTE: When installing the Emilio Frameless Shower on to a tiled wall some local authorities do not allow wall channels to be fixed by screwing through tiles. In this instance use BOSTIK V60 to fix the wall channels to the tiles. You must leave the wall channel to set for the minimum time required as instructed on the BOSTIK cartridge before installing glass.
- Page 8 GLASS LINE: 5MM BACK FROM DOTTED LINE OPTION D: EMILIO SHOWER - ALL OTHER APPLICATIONS AND SIZE RANGES Emilio Shower - All other Tile Bases or Entry Level Applications: A and B measurements are the range that can be used for the outer boundary lines for the wall channels.
- Page 9 PAR1042 LH: PAR1032 End blocks (L/R) Allen wrench RH: PAR1033 LH: PAR1034 Sliding blocks (L/R) Wrench RH: PAR1035 Water bar Screws M5 x 10 PAR1031 PAR1043 Roller sets PAR1040 Rail PAR1030 EMILIO SHOWER UNIT Acrylic and Tile - Installation Instructions...
- Page 10 Insert the return panel (2) and fixed front panel (22) into the wall channels (1). TILING NOTE: Place 10mm wide thin clear plastic strips as isolation packers at 90 degrees under the fixed glass. Finally before finishing with silicone, trim the excess with a knife. EMILIO SHOWER UNIT Acrylic and Tile - Installation Instructions...
- Page 11 38MM Allow a 5mm gap between channel and bracket without the outer cover. Rail Bracket Fit rail into both Covers end brackets Front glass fixing. Fit covers onto both end brackets EMILIO SHOWER UNIT Acrylic and Tile - Installation Instructions...
- Page 12 (9) against the return panel. Tape in position with duct tape and allow 24 hours for this to cure. Install lock in knobs on the door & tighten rail fixings. 4.4 B1 END BLOCK WATER BAR - SLIDING BLOCK ASSEMBLY EMILIO SHOWER UNIT Acrylic and Tile - Installation Instructions...
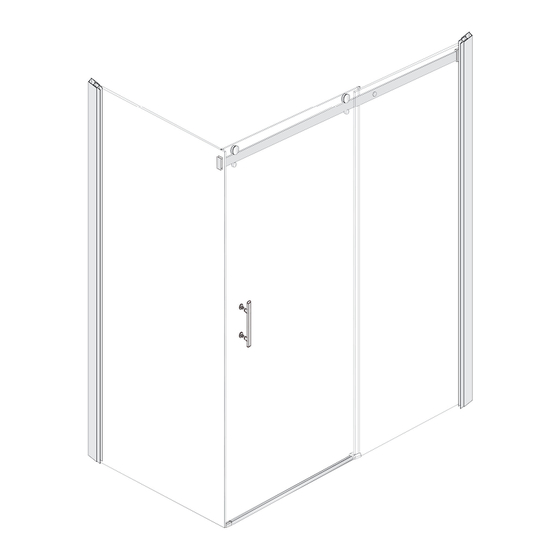
- Page 13 Install the handle set (6) with the locking screws on the inside of the shower. CHANNEL WALL FIXED GLASS PANEL FIXED PANEL PROFILE ENSURE GLASS PANELS REMAIN LEVEL DURING INSTALLATION PROCESS EMILIO SHOWER UNIT Acrylic and Tile - Installation Instructions...
- Page 14 The screen is designed to allow the water to return into the shower area, if any is present. SCREENS THAT ARE SEALED ON THE INSIDE WILL VOID WARRANTY. 113 Newton Street, Mount Maunganui Freephone 0800 002 299 Phone +64 7 928 9990 www.stein.co.nz...
Need help?
Do you have a question about the EMILIO and is the answer not in the manual?
Questions and answers