
Related Manuals for FeiYu Tech G6


Summary of Contents for FeiYu Tech G6
- Page 1 3-Axis Stabilized Handheld Gimbal Guilin Feiyu Technology Incorporated Company U s e r M a n u a l V 1 . 0...
-
Page 3: Product Overview
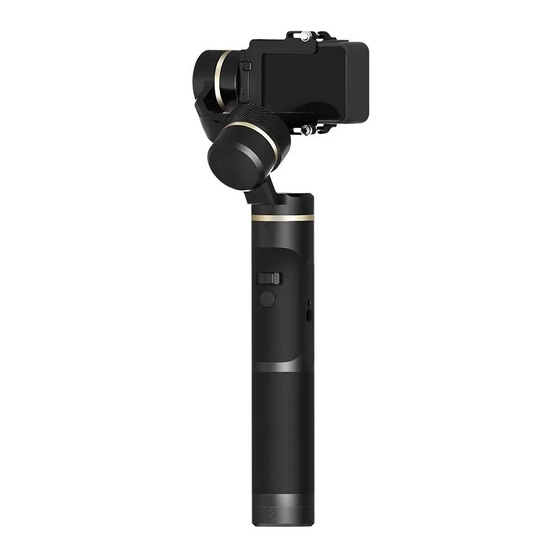
1. Product Overview The showing sports camera is only for reference Included items Thumb screw Retainer plate Tilt axis Cross arm Retainer bar Retaining ring Micro USB cable Roll axis Vertical arm Pan axis Display Screen capture button Trigger button Joystick Positioning pin Type C camera... -
Page 4: Quick Start Guide
2. Quick Start Guide Insert Camera Please install the camera before powering on the gimbal. Insert Battery When not in use, turn off the gimbal and then remove the camera. Take the Gopro HERO 5 camera for example. Please fully charge the battery before powering on the gimbal for Install the camera on retainer plate,then fix the camera with the first time. - Page 5 Balance the Gimbal If camera tilts to the left, loosen the retaining ring ,pull cross arm out to the right until camera is horizontal. Retaining ring Cross arm Best balance Left-tilting If camera tilts to the right, loosen the retaining ring ,push cross arm in to the left until camera is horizontal. Retaining ring Cross arm...
- Page 6 3. Charging Gimbal Charging Charging icons on display screen Charging Option 1: Charging with micro USB cable. Charging completes Micro port USB port Micro USB cable USB Port (Equipped by user) Input: 5V/2A Option 2: Remove the battery and charge the battery with charger(equipped by user). Camera power- Camera power- connect the camera with the gimbal via type c...
- Page 7 Functions Instructions of Button Function button Function Explanation Single tap Panning Mode / Lock Mode Single tap to switch between panning mode and lock mode Under follow mode, control the rolling axis by moving the joystick Double tap Follow mode to the left or right, and the control angle is -30 °~ +30°...
- Page 8 Screen capture button operation Display Description Single tap on the screen capture button can switch Display the shooting modes The current mode of the gimbal can be identified by the Screen capture Main interface of display status button Shooting mode the display screen Time-lapse Joystick...
- Page 9 Auto-rotation Mode The G6 gimbal can easily create constant speed moves by using the autorotation mode. This mode can be used for recording both regular video and timelapse photography. For better results, attach gimbal to the FeiyuTech tripod, or other tripod, to keep it completely still.
- Page 10 Tilting Function Panning button Function button ( 2 ) Enter auto-rotation mode by clicking the ( 3 ) Set rotation start position function button 4 times Record the first position (rotation start position) by manually moving camera to desired position. Hold in position for half a second.
- Page 11 5. Download and connect App Download and install “Feiyu ON” App (2) Android version: (1) iOS version: Feiyu ON Feiyu ON Feiyu ON Feiyu ON Download Download App Store GuiLin FeiYu Technology Incorporated Company GuiLin FeiYu Technology Incorporated Company Google play * Scan QR codes to automatically link to App download pages.
-
Page 12: Connecting To Camera
6. Connecting to camera 7. Firmware Upgrade Connect the gimbal to the Feiyu ON G6 gimbal can connect to the camera by Feiyu ON App. App, to upgrade the firmware though the App. Operations available after connecting to the camera:... -
Page 13: Gimbal Initialization
8. Gimbal Initialization Display You can initialize your gimbal when: Initing Success (1) When camera is not level (2) If not used for a long period of time (3) In case of extreme temperature variations Place the gimbal on the table unmoved, and the gimbal completes the automatic testing, and then its initializing will start automatically showing "Initing"... -
Page 14: Technical Specifications
9. Technical Specifications (Unit:mm) Max. Tilting Range 360° Max. Rolling Range 320° Max. Panning Range 360° Tilting speed Min: 2°/s - Max: 75°/s Panning speed Min: 3°/s - Max: 150°/s Operation time 12 Hours GoPro HERO6 / HERO5 and other cameras with the same size,replace the optional RX0 adapter Adaption camera and plate to be compatible with RX0 camera mobile camera width range... - Page 15 D I S C L A I M E R Prohibit any user for any illegal purpose. Users will be responsible for all behaviors of purchase and use products. The Company assumes no liability for any risks related to or resulting from the debug and use of this product (including the direct, indirect or third-party losses).
- Page 16 Guilin Feiyu Technology Incorporated Company Due to software and hardware improvements, your actual product might differ from the descriptions and pictures in this user manual. You can get the latest user manual from the official website. For more information, please visit our official website...
Need help?
Do you have a question about the G6 and is the answer not in the manual?
Questions and answers