Table of Contents
Advertisement
User Manual
C M V -7 0 M X (H o m e Io T)
• Thank you for purchasing COMMAX products.
• Please carefully read this User's Guide (in particular, precautions for safety) before using a product and follow
instructions to use a productexactly.
• The company is not responsible for any safety accidents caused by abnormaloperation of the product.
www.safemag.ru
www.safemag.ru
Advertisement
Table of Contents

Subscribe to Our Youtube Channel
Related Manuals for Commax CMV-70MX


Summary of Contents for Commax CMV-70MX
-
Page 1: User Manual
User Manual C M V -7 0 M X (H o m e Io T) • Thank you for purchasing COMMAX products. • Please carefully read this User’s Guide (in particular, precautions for safety) before using a product and follow instructions to use a productexactly. -
Page 2: Table Of Contents
www.safemag.ru Table of Contents Warnings and Cautions Start 1.1. Parts Name 1.2. Screen Composition 1.3. Button at Buttom of Home screen 1.4. Home Screen Composition (Set Contol Area) 1.5. Home Screen Composition (Value of Information Area) 1.6. Setting WIFI 1.7. Registration 1.8. - Page 3 www.safemag.ru www.safemag.ru...
-
Page 4: Warnings And Cautions
www.safemag.ru Warnings and caution Please follow the things described below in order to prevent any danger or property damage. Prohibition. No disassembly No touch Must follow strictly. Shows plugging out the power cord without an exception Shows the warning and caution for an electric shock. Shows the warning and caution for a fire. - Page 5 www.safemag.ru Warning Please don’ t If an abnormal sound, burning Please don’t insert any Please use only the designated disassemble, smell or smoke is coming out metallic or burnable materials batteries for the products of repair or rebuild this product of the product, please plug out into the ventilation hole.
-
Page 6: Start
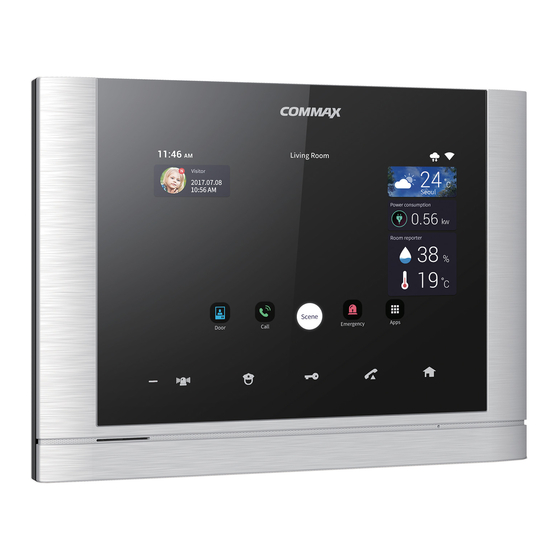
www.safemag.ru 1. Start 1.1. Parts Name CD Monitor Home Speaker ® Emergency ® Power On/Off switch ® Guard Station Connecting Terminal ® Door Release ® Calling www.safemag.ru... -
Page 7: Screen Composition
www.safemag.ru 1.2. Screen Composition Press Button Moving screen by touching 1.3. Button at Bottom of Home Screen Return Home Screen View of Running screen Back Alert Icon Icon shows according to each event. Detailed Information would be shown when dragging down while pushing information line on upper screen. Failure on System access Emergency Success on System access... -
Page 8: Home Screen Composition (Set Contol Area)
www.safemag.ru 1.4. Home Screen Composition (Set Contol Area) Setting away mode Away mode security sensor Setting Security Alert when emergency situation happens Emergency Setting wireless device Home IoT All Application ist All Apps www.safemag.ru... -
Page 9: Home Screen Composition (Value Of Information Area)
www.safemag.ru 1.5. Home Screen Composition (Value of Information Area) Value of Infomationain Area(Main) Value of Info.(sub) * Showing application can be different according to area. * Wireless Device shows when Wi-Fi connects. Value of Information Area Weather Information Clock 1) The current time and date is shown on display. 1) W eather condition is shown on display. - Page 10 www.safemag.ru Showing all value of information Touch this area 1) Touch area of Value of Information (sub). 2) You can check all information on viewer page by scrolling. 3) Setting information Can set the detail about value of information by clicking button. Setting information Setting area 1) You can set area about whether.
- Page 11 www.safemag.ru 1.6. Connecting wireless network When put 'setting’, proper screen is shown. 1) Press 'all APPs’ icon on Home screen. 2) Press 'setting’ button. 3) You can turn on/off by put 'Wi-Fi’ button. Turn on/off Wi-Fi Setting → Wireless or Network → Wi-Fi If you check in check-box, you can turn on/off Wi-Fi.
-
Page 12: Registration
www.safemag.ru Disconnect Wi-Fi You can stop automatic Wi-Fi connection. Select Wi-Fi and press 'non-save’. Wi-Fi is disconnected and all data will be initialized. 1.7. Registration Registration Join in 1) P ress 'Sign up’ button. 2) P ress 'ID’ and 'Duplication’ button. 3) P ress 'Registration’... - Page 13 www.safemag.ru 1.8. Smart Phone Usage Connect Smart phone 1) Run the ’HomeIot ' app. 3) Setting screen is shown when press button on the top of left screen. 2) Press ' og-in’ button after put 'ID’, 'Password’. 4) There are function of 'searching’, 'adding 5) Call history is provided when press 'searching’...
- Page 14 www.safemag.ru 6) Connect by clicking 'call' button. 8) It displayed image from Door camera during 7) Disconnect by clicking 'reject' button. connection. 9) Warning pop up when press 'Release door' and close when 'cancel'. 10) Door open when press 'confirm' after entering password.
-
Page 15: Set Control
www.safemag.ru 2. Set Control 2.1. Adding another device 1) Device list which installed is shown when pressing '+’. 2) Drag down while pressing adding device. 3) New device is showed on screen. Adding Device on Screen 2.2. Moving device or deleting 1) You can move position if pressing device long and stop pressing. -
Page 16: Calling
www.safemag.ru 3. Calling 3.1. Screen Composition Calling function Monitoring, Calling with visitor Robby Calling Guard station Guard Station Call log Call history www.safemag.ru... - Page 17 www.safemag.ru ② ① ③ ④ ⑤ ⑥ ⑦ ⑧ ⑪ ⑩ Screen during connection and communication screen ① Calling Activated ② Waiting call ③ Calling ④ Reject, Cancelation ⑤ End-Call ⑥ Saving image of visitor ⑦ Saving video of visitor ⑧...
-
Page 18: Front Door
www.safemag.ru 3.2. Front Door Monitoring front door Monitoring front door and Communication 1) Touch 'Front Door’ icon or press Front Door’ on dial screen. 2) Can monitor front door if press ''Front Door’’ button. 3) Press 'Cancel’ button to cancel monitoring. (call) button to communicate during monitoring. -
Page 19: Guard Station
www.safemag.ru Set up the front screen 1) Press 'Front Door' on call-screen. 2) Press 'video control' button. (left), (right) button after pressing (tint), 3) Adjust each value by using (saturation), (brightness), (contrast). 4) Press 'Initialization' button to return default. * It's possible to adjust during monitoring the front door only when setting front door. Answering call from the Front door/Lobby 1) Chiming and showing visitor's image on wall pad when receiving call. -
Page 20: Telephone Records
www.safemag.ru 3.4. Telephone records Telephone records Call type Calling Screen of telephone records Usage of telephone records button on phone records to call. 1) You can communicate when pressing button. 2) You can delete telephone records when pressing 3.5. Answering by Smart phone 1) Chiming and showing caller ID on smart phone. -
Page 21: Security
www.safemag.ru 4. Security 4.1. Emergency Emergency situation Emergency situation recognition Emergency situation occurs when press 'emergency’ button. It proceeds in 3step (Occurrence -> Cease -> Return) Emergency situation recognition 1) You can make 'Emergency situation’ by pressing icon or emergency button. Emergency type will be indicated and turn on a siren. -
Page 22: Away Mode
www.safemag.ru 4.2. Away mode Set away mode on/off Showing away mode You can set away-mode function like anti-crime sensor or recording visitor ’s image. Away mode 1) Set away mode by pressing 'away mode’ icon. 2) Away mode executes automatically after setting 'Away mode time’. 3) Press 'close’... - Page 23 www.safemag.ru Setting away mode 1) To set items to execute on away mode. 2) Away mode setting screen is shown if press 'Option’ button on away mode screen. 3) Check anti-crime sensor and item to use. You can use in one time by using all setting button and all clearing button. 4) Save the content by pressing 'confirm’.
-
Page 24: Anti-Crime Mode
Anti-crime mode on/off * This function is used when anti-crime sensor is installed. * You can set in setting mode [setting>Commax>Usage of sensor]. Setting anti-crime mode 1) Check anti-crime sensor to set. Anti-crime sensor operates when pressing 'anti-crime setting ①... -
Page 25: Cctv
www.safemag.ru 4.4. CCTV CCTV image check ② ③ ① ④ CCTV image CCTV Chanel list Cam list CCTV image check 1) Choose DVR , show the list of Camera. 2) Click the Cam number show the image on the device ① * CCTV image will be shown for 30 seconds. -
Page 26: Emergency Record
www.safemag.ru 4.5. Emergency Record Emergency record Emergency Record image on the device Delete lists Click and click “Delete lists” www.safemag.ru... -
Page 27: Visitor
www.safemag.ru 4.6. Visitor Check the saving image ⑤ ⑥ ③ ④ saving image list ① Image ④ Page information ② Image location ⑤ Previous page ③ Date and Time ⑥ Next Page www.safemag.ru... - Page 28 www.safemag.ru Select mode check. select all Select all image that be shown delete Delete selected image All visitor image Delete all image on the device delete close menu Close menu www.safemag.ru...
- Page 29 www.safemag.ru ocation check At your individual door Individual camera At you lobby obby camera Check the saving image You can check the place, date and time of missing visitor information. Delete the saving image CD Press(CD or press pic. That you want to delete for 2 seconds. Mode will be changed to “selecting mode”.
-
Page 30: Home Iot
Wireless device monitoring and controll Mode set up and control, /Reservation Control 5.1. Home IoT Log in 1) Put your ID/PW (you should join at COMMAX Home IoT through google play store to get ID/PW) 2) Press Log-in 5.2. Set up screen 1) Click the red circle 2) You can “registering, deleting and log-out “... -
Page 31: Wireless Device Monitoring And Control
www.safemag.ru 5.4. W ireless device monitoring and control 5.4.1. Light Switch Control 1) After add your lighting switch, you can monitoring the status on “item detail” section. 2) You can press image to control the light. 5.4.2. Gas lock Control 1) After add your Gas lock, you can monitoring the status on “item detail”... -
Page 32: Mode Set Up And Control(Mode)
www.safemag.ru 5.5. Mode set up and control(Mode) Some device can control at the same time by “mode control”. 5.5.1. Add mode list 1) Click 'mode control’ . 2) Press “+ button 3) Choose devices for batch control. 4) Click [v] on right above of screen. 5.5.2. -
Page 33: Reserved Control Set Up (If-Run)
www.safemag.ru 5.6. Reserved control set up (IF-RUN) Control device on special condition that user reserved. ex) Turn off the all light when away mode on. 5.6.1. Reserved control Add(If-run mode) Press 냐” at If-run mode Press IF” Set up If ” conditions Press 'Run’... -
Page 34: Convinient Function
www.safemag.ru 6. Convenient function 6.1 Calculator Calculator www.safemag.ru... -
Page 35: Voice Recorder
www.safemag.ru 6.2 Voice Recorder How to recode 1) Press ① 2) Press ② to save it 3) Press ③ to check it. ① ② ③ www.safemag.ru... -
Page 36: Setting
Connections, language, time set up. 1) Press 'set up’. 7.2. P/W change Set up → commax → user options → Pass words 1) Press 'Pass words’ 2) Put your new Pass words at screen. 3) Put your new Pass words at screen again. -
Page 37: Other Set Up
→ R i n g t o n e 1) Choose one bell sound 2) Click 'OK’ Touch sensitivity set up Set up → Commax → touch sensitivity * Caution : Do not touch any button during the set up. 7.4. Wi-fi connection Wi-Fi on/off Set up →... -
Page 38: Setting The Screen
www.safemag.ru Wi-Fi disconnect You can reset the network information that was previously connected or currently connected so that it is not automatically connected. Select the currently connected Wi-Fi and tap Do not save. The Wi-Fi connection is lost and the previous connection information is initialized. 7.5. -
Page 39: Setting The Date And Time
www.safemag.ru 7.7. Setting the date and time Settings → Date and Time Setting the date and time automatically 1) Check the date / time automatic setting. Setting the date and time manually 1) Uncheck the automatic setting of date / time. 2) The date and time setting items are activated. -
Page 40: Register / Disable Wireless Device
www.safemag.ru 8. Register / Disable Wireless Device Standby power disconnect switch Deleted Standby power disconnect switch 1) Press the red circle button on the smart socket for about 10-13 seconds, and when the LED is blinking, release it. 2) If the connection is successfully released, the LED will blink for about 5 seconds. - Page 41 www.safemag.ru Lighting switch Delete lighting switch 2) When the releasing is completed normally, the LED flashes for 4 seconds and a ”beep beep” sound is heard. Add lighting switch Shown ”ADD Device..” 1) Press’+' 3) Press the red circle button on the smart switch. 4) If the connection is normal, LED will be on for 4 seconds and ”beep”...
- Page 42 www.safemag.ru Batch off switch Delete Batch off switch 1) Press the red circle button on the batch off switch for about 10-13 seconds and release the beep sound. Press the red circle button once more. 2) When the releasing is completed normally, the LED flashes for 4 seconds and a ”beep beep”...
- Page 43 www.safemag.ru Gas valve controller Delete Gas valve controller 1) Turn off the gas valve. 2) Press the ”+” button for about 5 seconds to provide ”P” to the gas valve screen. 3) Upon successful completion, the message ”Device has been deleted” is displayed on the wall pad. Add Gas valve controller Press ’+' Shown ”ADD Device..”...
- Page 44 www.safemag.ru Gas detector Delete gas detector 1) Press the button for about 10-13 seconds (located on the top of the product) 2) Release the LED when it is blinking. 3) Upon successful completion, the message ”Device has been deleted” is displayed on the wall pad. Registering a gas leak alarm Shown ”ADD Device..”...
- Page 45 www.safemag.ru Door sensor Delete door sensor 1) Press the button for about 10 seconds. 2) Release the LED when it is blinking. 3) Upon successful completion, the message ”Device has been deleted” is displayed on the wall pad. Add door sensor Shown ”ADD Device..”...
- Page 46 www.safemag.ru PIR sensor Delete PIR 1) Press the button for about 5 seconds. 2) Upon successful completion, the message ”Device has been deleted” is displayed on the wall pad. Add PIR Shown ”ADD Device..” 1) Press '+' 3) When the PIR battery is installed, the red LED will blink for 30 seconds and try to connect.
-
Page 47: Installation
www.safemag.ru nstallation Monitor installation ※ Note Avoid installing the product in the area of direct sunlight. The position of the unit’s body should fit the standard height range (Recommended height range is 1450 ~ 1500 mm) Avoid installing the product exposed to gas exposure, magnetic force, In humid temperatures, as it may damage the condition and Performance of the product Camera installation... -
Page 48: Wiring Diagram And Components
www.safemag.ru 10. Wiring Diagram and components Precautions when wiring 1) When installing in the area where the high-voltage line passes around, use the coaxial wire to wire the metal pipe. 2) It may be short-circuited if internal wires are exposed due to scratches on the wire sheath, which may cause malfunction. -
Page 49: Specification
Components 11. Specification Model CMV-70MX Spec. Wiring Camera-4wire(Polarity)2EA, Modum-4Wire(Polarity), Interphone-4wire(Polarity) Power AC 100 ~ 240V , 50~60Hz Current standby :5W , Max :12W Communication HANDS FREE - Individual entrance : Electronic Chime with 3 Tones(for 2 consecutive times) - Lobby : Electronic Chime with 3 Tones(for 2 consecutive times) consecutive times. - Page 50 www.safemag.ru WI-FI spec. Spec. Receiver sensitivity IEEE802.11/b/g/n -79dBm @802.11b 11Mbps -67dBm @ 802.11g 54Mbps Transmit power 17 dBm @1~11Mbps As specified in IEEE 802.11 Frequency bands 2412 MHz ~ 2484MHz Supply voltage range 5V or 3V ZigBee spec. (ZigBee only zigbee device.) Spec 802.15.4 Section Receiver sensitivity...
- Page 51 513-11, Sangdaewon-dong, Jungwon-gu, Seongnam-si, Gyeonggi-do, Korea Int’l Business Dept. Tel. : +82-31-7393-540~550 Fax. : +82-31-745-2133 Web site : www.commax.com Printed In Korea / 2016.07.104 www.safemag.ru...
Need help?
Do you have a question about the CMV-70MX and is the answer not in the manual?
Questions and answers