Velux KLI 110 Instructions For Use Manual
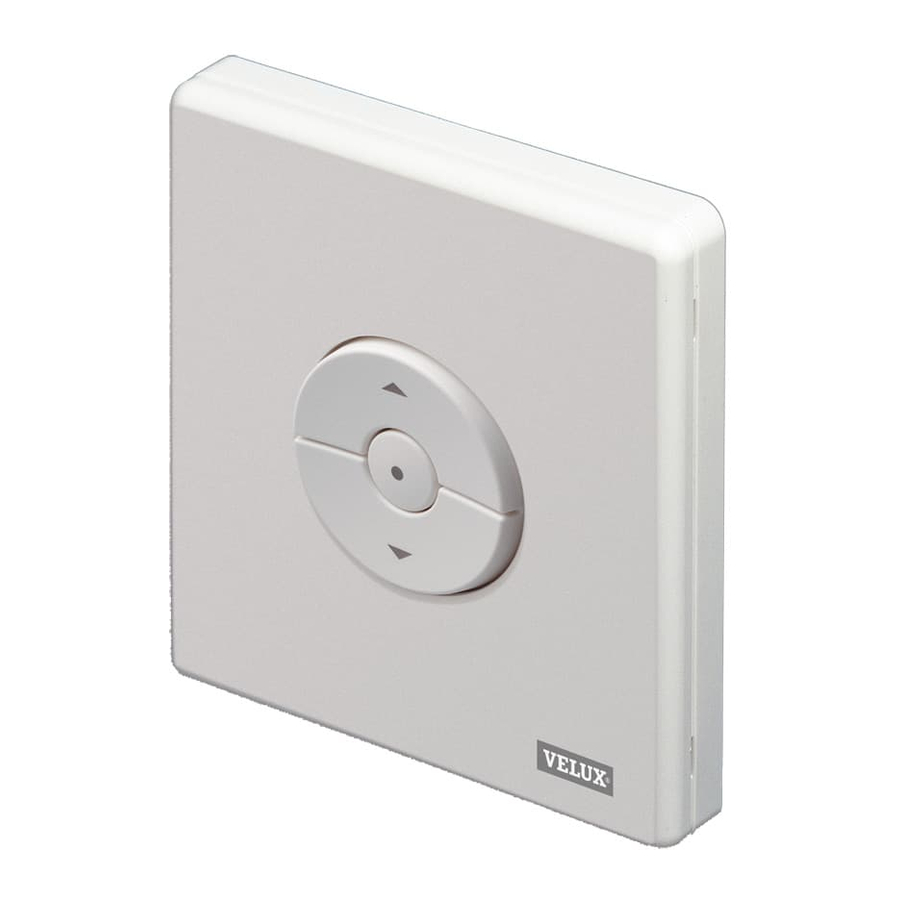
One-way wall switch
Hide thumbs
Also See for KLI 110:
- Instructions manual (48 pages) ,
- Manual (48 pages) ,
- Simple setup manual (37 pages)
Advertisement
Quick Links
Advertisement

Subscribe to Our Youtube Channel
Related Manuals for Velux KLI 110


Summary of Contents for Velux KLI 110
- Page 1 KLI 110 VAS 451976-2015-06...
-
Page 2: Table Of Contents
− Clavier supplémentaire une voie KLI 110 simultaneous operation ....................29 pour fonctionnement simultané ................30 − Additional one-way wall switch KLI 110 used with − Clavier supplémentaire une voie KLI 110 utilisé an existing KLI 110 ......................35 avec un KLI 110 ........................36 −... - Page 3 Operatività ..........................17 Utilizzo............................21 Installazione ..........................23 Più di una unità di attivazione − Pulsantiera aggiuntiva ad una via KLI 110 ............27 − Pulsantiera aggiuntiva ad una via KLI 110 per azionamenti simultanei..........................31 − Pulsantiera aggiuntiva ad una via KLI 110 utilizzata con un'altra KLI 110 ......................37...
-
Page 4: Important Information
Montage Product • Der Bedientaster ist nur für den Innenraum bestimmt. • The wall switch has been designed for use with genuine VELUX products. • Der Bedientaster sollte nicht hinter Metall montiert werden, da dies die Funktion ® • The wall switch is compatible with products with the io-homecontrol logo. -
Page 5: Installation
Produit betjene det relevante produkt fra den ønskede placering. • Le clavier a été conçu pour fonctionner avec des produits de marque VELUX. • Det anbefales at placere betjeningskontakten inden for synsvidde af det produkt, • Le clavier est compatible avec des produits portant le logo io-homecontrol ®... - Page 6 ® , kommunikerer med hinanden, hvilket giver worden met een zachte, vochtige doek. øget komfort, sikkerhed og energibesparelser. • Mocht u nog technische vragen hebben, neem dan contact op met uw VELUX www.io-homecontrol.com verkoopmaatschappij. Zie telefoonlijst of www.velux.com. NEDERLANDS: Belangrijke informatie...
- Page 7 • El pulsador requiere un mantenimiento mínimo. La superficie se puede limpiar www.io-homecontrol.com con un paño suave y húmedo. • Si tiene cualquier duda técnica, contacte con su compañía de ventas VELUX, por teléfono o en www.velux.com. ESPANÕL: Información importante Lea estas instrucciones atentamente antes de la instalación y puesta en marcha.
-
Page 8: Inhalt Der Verpackung
: Dos baterías (tipo AAA) : Vis, chevilles, adhésif : Tornillos, tacos de expansión, double face cinta adhesiva de dos caras DANSK: Pakkens indhold : Betjeningskontakt : To batterier (type AAA) : Skruer, rawlplugs, dobbelt- klæbende tape 14 VELUX VELUX ® ®... -
Page 9: Bedienung
Pulsación prolongada: El producto se detendrá al dejar de pulsar el botón. Pression longue sur la touche : le produit ira jusqu'à la position deman- Tecla parada dée lors du relâchement. Pulsación: El producto se detiene. Touche d'arrêt Pression sur la touche : le produit s'immobilise. 16 VELUX VELUX ® ®... -
Page 10: Ingebrauchnahme
: Entfernen Sie die Vorderseite des Bedientasters wie gezeigt. : Fügen Sie die Batterien in den Bedientaster ein. : Drücken Sie den RESET-Knopf kurz - maximal 1 Sekunde. Das Produkt kann jetzt bedient werden. 18 VELUX VELUX ® ®... - Page 11 Op de volgende pagina's is een elektrisch bediend rolluik als voorbeeld : Coloque las baterías en el pulsador. gebruikt voor de installatie. : Pulse brevemente – máximo 1 segundo – el botón RESET. El producto está listo para funcionar. 20 VELUX VELUX ® ®...
- Page 12 Solo successivamente fissarla al muro. ESPAÑOL: Instalación Nota: Antes de fijar el pulsador a la pared compruebe que hace funcio- nar los productos en cuestión desde ese emplazamiento. Fije el pulsador a la pared. 22 VELUX VELUX ® ®...
- Page 13 . The registration must be completed within 10 minutes. clavier supplémentaire Remove the front section of the additional wall switch KLI 110 , insert the batteries and press the RESET button briefly – max 1 second. Replace the front section.
- Page 14 Registrering af ekstra envejs betjeningskontakt KLI 110 Registrazione della pulsantiera aggiuntiva ad una via KLI 110 at betjene et eller flere produkter, der er tilsluttet samme styre- l'azionamento di uno o più prodotti connessi allo stesso sistema di system og som i forvejen kan betjenes af en anden type envejs controllo e già...
- Page 15 . The registration must be completed within 10 minutes. Remove the front section of the additional wall switch KLI 110 insert the batteries and press the RESET button briefly – max 1 second. Replace the front section.
-
Page 16: Fonctionnement
Enlever la façade du clavier supplémentaire KLI 110 , insérer les Verwijder de voorzijde van de aanvullende bedieningsschakelaar KLI 110 piles et presser brièvement – 1 seconde maximum – le bouton RESET. , plaats de batterijen en druk kort – maximaal 1 seconde – op de Remettre la façade du clavier. - Page 17 . El registro debe completarse en el plazo de 10 minutos. Quite la parte delantera del pulsador adicional KLI 110 , coloque las baterías y pulse brevemente – máximo 1 segundo – el botón RESET. Vuelva a colocar la parte delantera.
- Page 18 KLI 110 The products registered in a wall switch KLI 110 already in operation can be copied to an additional wall switch KLI 110. Afterwards both wall switches can operate the product(s) in question. The registration must be completed within 10 minutes.
-
Page 19: Clavier Supplémentaire Une Voie Kli
KLI 110 voor gebruik van één of meerdere producten die aange- Les produit déjà enregistrés dans le clavier KLI 110 peuvent être copiés sloten zijn op hetzelfde bedieningssysteem en al bedienbaar zijn via dans un autre clavier KLI 110. Ensuite les deux claviers peuvent actionner een éénrichtings bedieningsschakelaar KLI 110... - Page 20 Los productos registrados en un pulsador KLI 110 se pueden copiar a otro pulsador KLI 110. Después ambas pulsadores pueden hacer funcio- nar el o los producto(s) en cuestión. El registro debe completarse en el plazo de 10 minutos.
- Page 21 The registration must be completed within 10 minutes. deux voies Remove the front section of the additional wall switch KLI 110 Le ou les produits à actionner sont préparés pour l'enregistrement selon insert the batteries and press the RESET button briefly − max 1 second.
-
Page 22: En Tovejs Betjeningsenhed
Preparare il o i prodotti da azionare per la registrazione, come descritto sættes i, og der trykkes kortvarigt – højst 1 sekund – på RESET-knappen. nelle istruzioni per l'uso allegate al telecomando VELUX a due vie Fronten sættes på igen. - Page 23 El registro debe completarse en el plazo de 10 minutos. Quite la parte delantera del pulsador adicional KLI 110 , coloque las baterías y pulse brevemente – máximo 1 segundo – el botón RESET.
- Page 24 46 VELUX VELUX ® ®...
- Page 25 VELUX Company Ltd. 02245/32 3 50 01 848 8775 VELUX Australia Pty. Ltd. VELUX Italia s.p.a. 1300 859 856 045/6173666 VELUX Bosna i Hercegovina d.o.o. VELUX-Japan Ltd. 033/626 493, 626 494 0570-00-8145 VELUX Belgium VELUX Lietuva, UAB (010) 42.09.09 (85) 270 91 01 ВЕЛУКС...
Need help?
Do you have a question about the KLI 110 and is the answer not in the manual?
Questions and answers