Advertisement
Contents of packaging

- Wall switch
- Screws and wall anchors
QUICK START
Power on products
Turn on the power to the electric skylights at the mains and to the solar skylights by turning on the power switch.


Turn on the power to the solar blinds by turning on the power switch.
Operation
Remove the battery pull tab to start using the wall switch. A wall switch provided with a VELUX electric or solar product has been pre-paired with this product and needs no additional set-up to operate the product.
However, if the product is "buzzing" at initial operation, confirm the operation by pressing STOP (a) followed by DOWN (b).
See "Advanced set-up" for set-up of wall switch purchased separately.

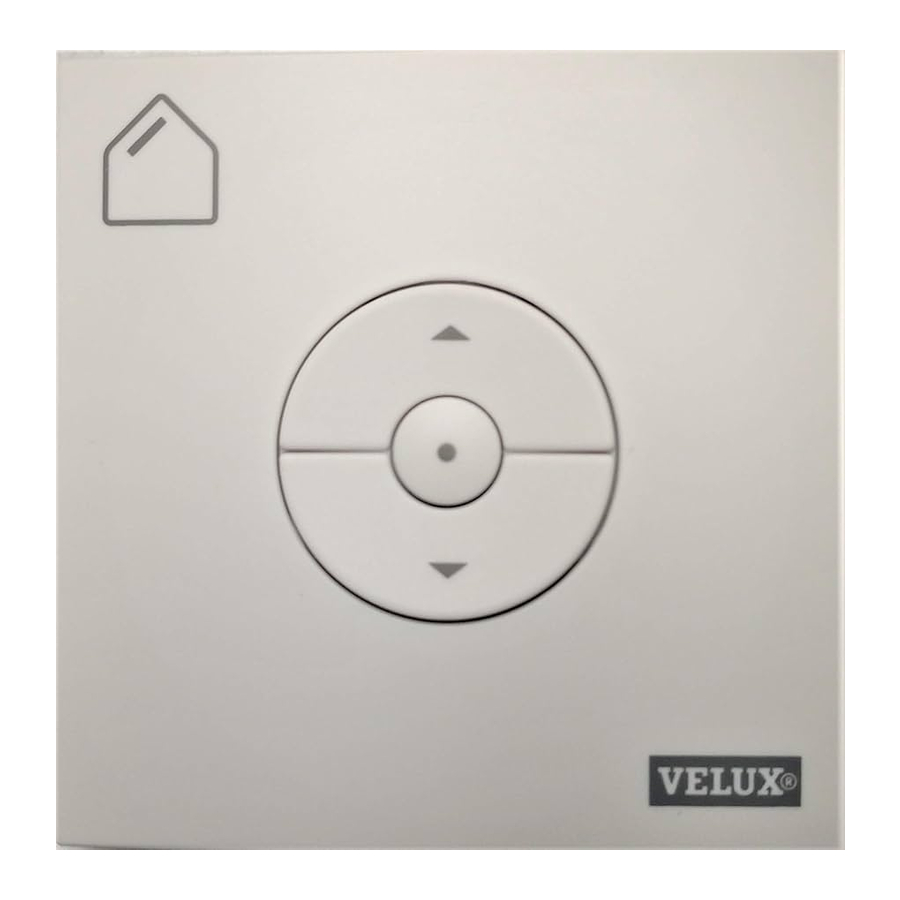
Keys for operating the product
 OPEN/UP or
 CLOSE/DOWN Short key pressure: The product will travel to top or bottom position.
Long key pressure: The product will travel only until the key is released.
Note: If several electrical products are connected to a control unit KLC 500, only one of the products (random) can be operated in this way.
Stop key
 The product stops.
Rain sensor
VELUX electric and solar skylights come with a rain sensor. If the rain sensor is activated, the skylight will close automatically within approximately 30 seconds and the rain sensor will not allow the skylight to open as long it is activated.

Wall switch not working?
Check if a remnant of the battery pull tab in the battery compartment prevents battery contact.

WALL INSTALLATION AND BATTERY REPLACEMENT
Opening of wall switch
Separate base and front of the wall switch as shown to install at wall and to replace batteries.

Wall installation of wall switch
Install the wall switch at a height of 4 to 6 ft (1.2 to 1.8 m). Do not fix the wall switch to the wall until it has been verified that the products can be operated from the proposed position.
- Fix base of wall switch to the wall with screws. Maintain clearance below the wall switch for access to open it and replace the batteries.

- Reassemble the wall switch.


Replacement of batteries
Insert batteries as shown (type AAA, 1.5 V).

Wall switch models
 | KLI 310 is universal for all VELUX electrical and solar products. |
 | KLI 311 is provided with all VELUX electric and solar skylights. The icon indicates which products it can operate. Note: KLI 311 for skylights cannot be set up with blinds. |
 | KLI 312 is provided with all VELUX electric and solar blinds. The icon indicates which products it can operate. Note: KLI 312 for blinds cannot be set up with skylights. |
A wall switch provided with a VELUX electrical or solar product has been pre-paired with/registered in this product and needs no additional set-up to operate the product.
The wall switch has two buttons used for advanced set-up

 | The Gear button "Open for registration". |
 | The Pair button "Register". |
To push the buttons, use a pointed tool.
Set-up of a new wall switch in addition to an existing wall switch

The new wall switch must be the universal KLI 310 or the same model as the existing wall switch.

- Existing wall switch
- New wall switch
- Prepare the product for registration by pressing the Gear button on the existing wall switch (A) for 1 second. The product will start running briefly back and forth.

- Press the Pair button on the new wall switch (B) for 1 second.


The product is now controlled by both wall switches.
Set-up of products for group control by one master wall switch (a)
All wall switches must be the same model or the universal KLI 310.
")
- Prepare each of the selected products for registration by pressing each of their wall switch Gear buttons for 1 second. The products will start running briefly back and forth.
- Press the Pair button on the master wall switch for 1 second.
All products are now controlled simultaneously by the master wall switch (a). Repeat the procedure for products failing set-up and for adding additional products.
Set-up of KLI 310/311/312 to operate products already registered in control pad KLR 200
The wall switch must be the universal KLI 310 or the model matching the product.

- Tap
![]()
![]()
- Tap "New product".
![]()
- Tap "Prepare one-way control".
![]()
- Tap "Choose products".
![]()
- Scroll down the display and choose product type
![]() .
.
Tap 2![]() .
.
![]()
- Scroll down the display and tap the product to be added
![]() .
.
Note: The individual products can be identified by tapping the icon.
Tap![]() .
.
You now have 10 minutes to execute step 7 with the wall switch.
![]()
- Press the Pair button on the wall switch for 1 second to register the product.
![]()
- Tap
![]() to finish.
to finish.
Note: To add more products, tap "Choose more" and repeat steps 5-8.
![]()


 .
.
 .
.

 to finish.
The products can now be operated by wall switch KLI 310/311 as well.
Set-up of KLI 310/311 to operate VELUX electric and solar skylights
The wall switch must be the universal KLI 310 or the model matching the product.
If a non-functional control must be replaced or if the wall switch cannot find certain products, you can make the products ready for registration by manually resetting them to initial factory settings.
Note: Reset products cannot be operated until they have been registered in the wall switch again.
- Make sure that the power to the skylight (VSS/VCS) is turned on.
![]()
- Close the sash by pressing the button closest to the center of the skylight (A).
![]()
- When the skylight is closed, reset the skylight by pressing and holding the button closest to the center of the skylight (A) for at least 10 seconds. The skylight operator will run briefly back and forth indicating that the skylight is ready to be registered.
Note: The skylight must now be registered in the wall switch within the next 10 minutes.
![]()
- Press the Pair button on the wall switch for 1 second.
![]()
- Press the stop key and then the DOWN key within 3 seconds. This is only necessary at the initial set-up after installing the skylight.
![]()


The skylight can now be operated by wall switch KLI 310/311.
Set-up of KLI 310/312 to operate VELUX electric and solar blinds
The wall switch must be the universal KLI 310 or the model matching the product.
If a non-functional control must be replaced or if the wall switch cannot find certain products, you can make the products ready for registration by manually resetting them to initial factory settings.
Note: Reset products cannot be operated until they have been registered in the wall switch again.
Reset the blind.
Note: Solar blinds can have three different designs:
-
- Solar-powered blind with button on the right, bottom side of motor unit: Press button for 10 seconds. The blind will run briefly back and forth indicating that it is ready to be registered.
- Solar-powered blind with sliding switch on the right, bottom side of motor unit: Slide switch to the right and hold for 10 seconds. The blind will run briefly back and forth indicating that it is ready to be registered.
- Solar-powered blind with button behind door at the bottom of motor unit: Open solar battery door, press button behind the door for 10 seconds and close solar battery door. The blind will run briefly back and forth indicating that it is ready to be registered.
Note: The blind must now be registered in the wall switch within the next 10 minutes.
![]()
- Press the Pair button on the wall switch for 1 second.
![]()
- Press the stop key and then the DOWN key within 3 seconds. This is only necessary at the initial set-up after installing the blind.
![]()


The blind can now be operated by wall switch KLI 310/312.
Set-up of KLI 310/311/312 to operate products connected to control unit KLC 500
The wall switch must be the universal KLI 310 or the model matching the product(s).
If a non-functional control must be replaced or if the wall switch cannot find certain products, you can make the products ready for registration by manually resetting them to initial factory settings.
Note: Reset products cannot be operated until they have been registered in the wall switch again.
- The control unit can be reset by removing the cover and pressing the test button for at least 10 seconds. The connected products will run briefly back and forth in random order to indicate that they are ready for registration.
- Press the Pair button on the wall switch for 1 second.
- Press the stop key and then the DOWN key within 3 seconds. This is only necessary at the initial set-up after installing the product.
The products can now be operated by wall switch KLI 310/311/312.
Deleting (resetting) products from wall switch KLI 310/311/312
Delete (reset) all products from a wall switch by pressing the Gear button for 1 second followed by pressing the Pair button for 1 second.
Now the products cannot be operated by this wall switch anymore.

 A product deleted in all controls will require access to the skylight for renewed registration of the product.
Important information

To reduce the risk of severe injury or death:
Read instructions carefully before installation and operation. Keep instructions for future reference and hand them over to any new user.
Safety
- VELUX wall switch KLI 310/311/312 can be used by persons (aged 8 years and above) with sufficient experience and knowledge if they have been given instruction concerning safe use and understand the hazards involved. Cleaning and user maintenance must not be done by unsupervised children.
- Children should be supervised to ensure that they do not play with the wall switch. It should be fitted out of reach of children at a minimum height of 4 ft (1.2 m).
- The wall switch must not be put into operation until it has been fitted according to these instructions.
- Before operating, ensure that the wall switch can be operated without risk of damage to property or injury to people or animals.
- The wall switch must be installed at a height below 6 ft (1.8 m) and it is recommended to place the wall switch in the same room as the window or skylight and its integral electrical products.
- The wall switch has been designed for use with genuine VELUX products.
- The wall switch is a Class 2 Low Voltage product (3 V d.c.).
Installation
- The wall switch is for indoor use only.
- Installation in rooms with a high level of humidity and with hidden wiring must comply with relevant regulations (contact a qualified electrician if necessary).
- Before fixing the wall switch to the wall, verify that it can operate the product in question from the proposed position.
Product
- The wall switch has a built-in RF (radio frequency) unit and will not be operative if placed in a metal cabinet.
- Electrical products must be disposed of in conformity with all local codes, ordinances, rules and regulations for electronic waste and not with household waste.
- Used batteries must not be disposed of together with household waste but have to be disposed of in conformity with the relevant national environmental regulations. Batteries contain substances that can be harmful if not handled and recycled correctly.
![]() Use local authority battery disposal point where available.
Use local authority battery disposal point where available.- The packaging can be disposed of with usual household waste.
- Radio frequency band: 2.4 GHz.
- Radio frequency range: 110 yd (100 m) free field. Depending on building construction, the indoor range is approx 30 ft (10 m). However, constructions with reinforced concrete, metal ceilings and plaster walls with steel members may reduce the range.
 Use local authority battery disposal point where available.
Maintenance and service
- The wall switch requires a minimal amount of maintenance. The surface may be cleaned with a soft, damp cloth using a small amount of household cleaner diluted in water.
- If you have any technical questions, please contact your VELUX sales company, see telephone list orwww.velux.com.
Documents / Resources
References
Download manual
Here you can download full pdf version of manual, it may contain additional safety instructions, warranty information, FCC rules, etc.
Advertisement


Need help?
Do you have a question about the KLI 310 and is the answer not in the manual?
Questions and answers