Advertisement
Table of Contents
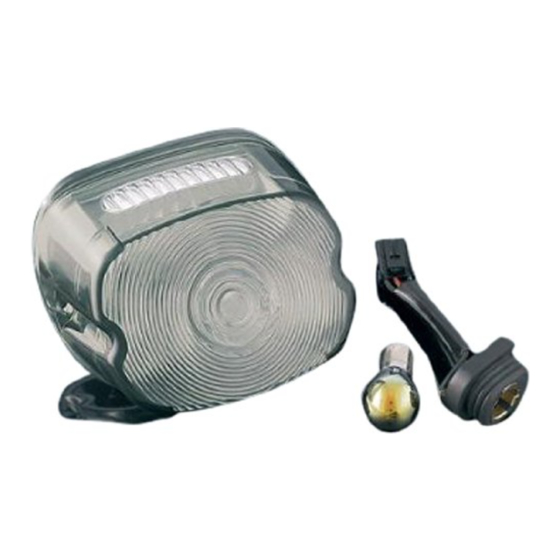
l ay d o w n t a I l l I g h t l e n s
f I ts : l ate '0 3 - u P d re s sers , road kI ngs , road g l Ide, s tre e t g lI d e (e x. '07
f l h r s e) ; l at e ' 0 3- uP dynas , l at e ' 03- uP s Po rt s ters an d l at e '03 - uP sof ta I ls
(e x . de u c e , d e l u x e , he rItag e sP rInger , sP rInger c l ass Ic)
Parts Included
1 Smoke Laydown Taillight Lens
1 Reflector
1 Iridium Coated Red Bulb
1 Bulb Socket with Connector
1 Gasket
1 Installation Instructions
Please read and understand entire instructions before starting installation.
thank you for choosIng küryakyn!
ATTENTION! It is the installer's responsibility to ensure all fasteners (including pre-assembled)
are tightened before operation of the motorcycle. Küryakyn will not warranty
components lost due to improper installation. Periodic maintenance may be
required.
note
Installation is shown on a 2005 Heritage Softail; while representative of typical
procedure, there may be minor differences when installed on other models.
tools suggested
Phillips head screwdriver
Procedure
steP 1 Park the motorcycle on a hard, level surface; turn off the ignition.
steP 2 Remove the two stock phillips head screws securing the taillight lens to the base.
See PIC.1A. Set the screws aside, they will be re-used.
steP 3 Unplug
the stock taillight
bulb connector
from the base.
See PIC.1B. Push
up on the tab on
the underside of
the connector and
pull it out of the
socket; set the
stock taillight bulb
connector aside, it
will not be re-used.
-cont.-
4767-11HD-0407
PIc.1
a
c
4 7 6 7
B
d
Advertisement
Table of Contents

Related Manuals for Kuryakyn 4767


Summary of Contents for Kuryakyn 4767
- Page 1 ATTENTION! It is the installer’s responsibility to ensure all fasteners (including pre-assembled) are tightened before operation of the motorcycle. Küryakyn will not warranty components lost due to improper installation. Periodic maintenance may be required. note Installation is shown on a 2005 Heritage Softail; while representative of typical procedure, there may be minor differences when installed on other models. tools suggested Phillips head screwdriver Procedure steP 1 Park the motorcycle on a hard, level surface; turn off the ignition. steP 2 Remove the two stock phillips head screws securing the taillight lens to the base. See PIC.1A. Set the screws aside, they will be re-used. PIc.1 steP 3 Unplug the stock taillight bulb connector from the base. See PIC.1B. Push up on the tab on the underside of the connector and pull it out of the socket; set the stock taillight bulb connector aside, it will not be re-used. -cont.- 4767-11HD-0407...
- Page 2 steP 4 Remove the adhesive backing from the included gasket; position the gasket as shown in PIC.1C and press into place. steP 5 Plug the included bulb socket connector into the socket in the base. See PIC.1D. steP 6 Push in and twist the included bulb clockwise into the new bulb socket. The included bulb only fits in the socket one way. steP 7 Position the bulb socket in the back of the included reflector; push the socket into the reflector. See PIC.2. PIc.2 B ulB so cke t re mov ed f rom steP 8 the B Ike f or cl a r It y Tuck the socket wires into the recess in the taillight base. steP 9 Place the included taillight lens over the reflector and secure it with the two screws removed in...
Need help?
Do you have a question about the 4767 and is the answer not in the manual?
Questions and answers