Yealink W56P Quick Start Manual
Ip dect
Hide thumbs
Also See for W56P:
- User manual (118 pages) ,
- Quick start manual (61 pages) ,
- Manual (60 pages)

Related Manuals for Yealink W56P


Summary of Contents for Yealink W56P
-
Page 1: Quick Start Guide
Cordless Hosted Phone Quick Start Guide Get the most out of our Hosted Phone service with these handy instructions for the Yealink W56P/W56H IP DECT cordless phone. -
Page 2: Table Of Contents
Contents Equipment ..............Base Station . - Page 3 Make the Right Connection Thanks for choosing Midco for your business hosted phone service! Your experience with this service matters to us. We hope you find this quick start guide is a helpful tool to get you going with this service. We have even more tips and tools at Midco.com/Business/Support, where you can learn more about different features, read common questions and answers, and get tips about your services.
-
Page 4: Equipment
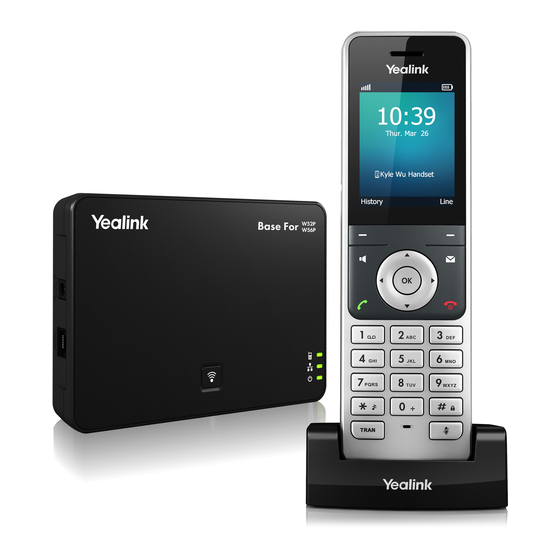
Equipment This phone is a full-featured mobile device, which provides reliable and convenient wireless voice communications. In addition, it provides many widely accepted benefits of the DECT standard, including high security, scalability and low power consumption. This phone comes with a base station, charger cradle and cordless handset. - Page 5 Base Station Description After the base station starts up successfully and the handset is registered to the base station, all LEDs on the base station illuminate green in sequence. Item Description • Locates a misplaced handset. Paging key • Toggles the registration mode. •...
- Page 6 To restart the base station via the handset: Press OK to enter the main menu. Select Settings, System Settings and then Base Restart. Enter the system PIN (default: 0000). Press Done. The registration LED and network status LED will turn off simultaneously. After a period of time, the LED indicators will illuminate solid green again, indicating the base station has restarted successfully.
-
Page 7: Handset And Charger Cradle
To set up the charger cradle and charge the handset: Connect the USB plug on the charger cradle to the DC5V port on the power adapter. Connect the power adapter into an electrical power outlet. Place the handset in the charger cradle. The handset batteries take about three hours to fully charge. - Page 8 Handset Overview The main hardware components of the W52P/W52H handset are the LCD screen and the keypad.
- Page 9 Item Description Earpiece Outputs audio during the earpiece call Indicates handset power and some feature statuses. • Receives an incoming call (fast flashing red) Power Indicator LED • Receives a voicemail or a missed call (slow flashing red) • Battery charging (solid red) Shows call information, handset status, LCD Screen icons and prompt messages.
- Page 10 The following icons may appear on the handset’s LCD screen. Icon Description Earpiece mode on Earpiece mode off Speakerphone mode on Keypad locked Voicemail present Silence mode on Call forward Contact Received calls Missed calls Placed calls Call on hold Call muted Conference call Do not disturb...
- Page 11 To turn the handset on: Press and hold the Power/Call (red phone) button until the screen lights up. Place the handset in the charger cradle. The handset will turn on automatically. To turn the handset off: When the handset is idle, press and hold the Power/End Call (red phone) button.
-
Page 12: Features
Features Physical Features In ideal, unobstructed conditions, the cordless phone includes these distance and time capabilities. Keep in mind that other wireless devices, concrete or brick walls, and competing wireless signals from neighbors can interfere with the phone’s range. • Indoors range: 65-165 feet •... - Page 13 Number Description Displays the selected menu item name. Displays the main menu icon Status: Displays the base, handset and line status. Intercom: Makes an internal call to another Yaelink cordless phone. Voicemail: Accesses voicemail. Call Features: Accesses call features for call forward, do not disturb (DND), call waiting, anonymous call rejection and anonymous call.
-
Page 14: Ringtones
Ringtones You can set different ringtones to distinguish the incoming lines from each other on your handset, or to distinguish an incoming intercom call. To configure ringtones: Press OK to enter the main menu. Select Settings, Audio, Ring Tones and then Melodies. Use the up or down navigation buttons to highlight the Intercom Call option or the desired phone line. -
Page 15: Calls
Calls To place a call: Use the keypad to enter the desired phone number. Press the Call (green phone) button or OK. To place a call if there are multiple lines assigned to your handset as outgoing lines: Press Line to select the desired line. (If you don’t select a line, the handset will use the default outgoing line.) Select OK or Dial. - Page 16 To place a call from the call history: When the handset is idle, press History. Use the up or down navigation buttons to highlight the desired list, and then press OK. Use the up or down navigation buttons to select a previously dialed number. Press the Call (green phone) button to place the call.
- Page 17 To answer a call: You can answer a call in three ways: • Using the handset: Press the Call (green phone) button or Accept. • Using the speakerphone: Press the speakerphone button. • Using the headset: With a headset connected, press Accept. To ignore an incoming call: Press Silence or the End Call (red phone) button.
- Page 18 When two calls are on hold: Use the up or down navigation buttons to select the appropriate call, and • press Resume • Select Swap to switch between the two calls. Call Park The call park feature allows you to put a call on hold on one phone and continue the conversation from another phone.
- Page 19 Use the up or down navigation buttons to highlight the desired speed dial key, and then press Assign. Select the desired contact from the directory. Press OK to assign the number to the selected speed dial key. • If more than one number is stored for the contact, use the up or down navigation buttons to select one phone number.
- Page 20 Call Forwarding With call forwarding, you can forward incoming calls to another phone. There are three forwarding types: • Always Forward: Incoming calls are immediately forwarded. • Busy Forward: Incoming calls are forwarded if the line is busy. • No Answer Forward: Incoming calls are forwarded if not answered after a period of time.
- Page 21 Call Transfer You can transfer a call to another party in three different ways: • Blind (Cold) Transfer: Transfer a call directly to another party without consulting or introducing the caller. • Semi-Attended Transfer: Transfer a call when receiving the ring-back. •...
- Page 22 Conference Calls The handset supports up to three parties (including yourself) in a conference call. You create a conference between an active call and a held call on the handset (on the same line or different lines). To set up a local conference call via the handset: Place a call to the first party.
-
Page 23: Contacts
Contacts Local Directory You can store frequently used contacts in the handset’s local directory. These can be added manually or from the call history. To add a contact to the Directory manually: Press OK to enter the main menu. Select Contacts. Press Options and then New Contact. - Page 24 To delete a contact: Press OK to enter the main menu. Select Directory. Press the up or down navigation buttons to highlight the desired contact. Select Options and then Delete. To search for and dial a contact: Press OK to enter the main menu. Select Contacts.
-
Page 25: Voicemail
Voicemail When you receive a new voicemail, the voicemail icon appears on the LCD screen. It also includes the number of unread voicemails, and the message key light flashes red. To access your voicemail: Press OK to enter the main menu. Select Voicemail and Play Message. Or press the Message button. - Page 26 Voicemail Setup Menu Options Press 1 for greeting options. • • Press 1 to listen to your greeting. • Press 2 to save your greeting and activate it. • Press 3 to delete your greeting. Press 4 to record your greeting. •...
-
Page 27: Online Resources
Online Resources Helpful Tools and Tips Your experience with Midco matters to us. We want to help you get the most out of your services. We offer many helpful tools and resources for you at Midco.com/Business. Check it out today! Midco.com/Business/Support —... - Page 28 © 2017 Midcontinent Communications. All rights reserved. Updated December 21, 2017.
Need help?
Do you have a question about the W56P and is the answer not in the manual?
Questions and answers