Yealink W56P User Manual
Ip
Hide thumbs
Also See for W56P:
- User manual (118 pages) ,
- Quick start manual (61 pages) ,
- Manual (60 pages)
Table of Contents
Advertisement
Quick Links
Advertisement
Table of Contents

Subscribe to Our Youtube Channel
Related Manuals for Yealink W56P


Summary of Contents for Yealink W56P
-
Page 2: Table Of Contents
............................4 ............................5 ................. 5 Displaying Information on LCD screen .................... 6 LED Instructions ..........................7 Icon Instructions ..........................8 ........................9 Turning handset On/Off ....................... 9 Locking/Unlocking Keypad ......................9 Backlight ............................9 Language ............................. 10 Time and Date ..........................10 .......................... - Page 3 ......................... 21 ..........................21 ..........................22 ..........................23 ......................23 ...................... 24 ........................... 24 ............................ 24 Busy Greetings ..........................24 No Answer Greetings ......................... 25 Extended Away Greetings ......................25...
- Page 4 If this is the first time you are using the iiNet BizPhone Cordless W56P handset, please refer first to the iiNet BizPhone W56P Quick Startup Guide to assemble and start up your handset. The BizPhone Quick Startup Guide is available on the BizPhone Resources page at www.iihelp.iinet.net.au/BizPhone_Support_Resources.
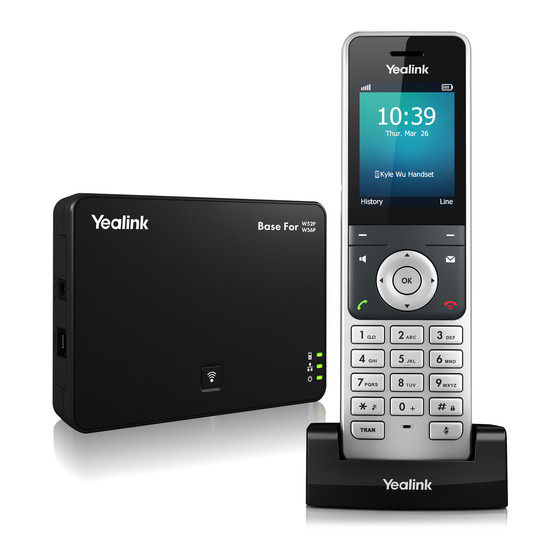
- Page 5 The image below shows the main hardware for the BizPhone Cordless W56 IP DECT Phone, including the LCD screen and the keypad. Hardware component instructions for the BizPhone Cordless W52P IP DECT phone are: Earpiece Outputs audio during the earpiece call. Indicates handset power and some feature statuses: ...
-
Page 6: Displaying Information On Lcd Screen
Answers an incoming call Places a call in speakerphone mode Moves the cursor Acts as shortcuts Scrolls through the displaying information Moves the cursor acts as shortcuts Adjusts the ringer volume Switches among the values Confirms actions or enters the main menu ... -
Page 7: Led Instructions
Idle screen description: This area shows signal strength: Weak to Strong: No reception: Eco Mode+ is on: This area shows feature status This area shows battery status: Low to Full: Need Charging: This area shows the time and date This area shows internal handset number and registered handset name This area shows the soft key labels. -
Page 8: Icon Instructions
Icon Instructions Below are descriptions of the icons that may appear on the LCD screen: Earpiece Mode on Earphone Mode on Speakerphone Mode on Keypad Lock Voice Mail Silent Mode on Call Forward Contact Icon Received Calls Missed Calls Placed Calls Call Hold Call Mute Conference Call... -
Page 9: Turning Handset On/Off
Turning handset On/Off To turn the handset on: Long press until the LCD screen lights up. Place the handset in the charger cradle. The handset can also be turned on automatically when inserting the battery to the handset. To turn the handset off: ... -
Page 10: Language
Language The default language of the handset is English. The handset supports up to 10 languages: English, French, Deutsch, Turkish, Portuguese, Spanish, Italian, Polski, Swedish and Russian. You can change the language according to your requirement. To change the language on your phone: 1. -
Page 11: Volume
To configure the date format on your phone: 1. Press to enter the main menu. 2. Press Settings → Display → Date Format. 3. Press to highlight the desired date format, and press the Change soft key. The radio box of the highlighted date format is marked. The date format displayed on the LCD screen will be changed accordingly. -
Page 12: Main Menu
Main Menu The handset menu has a number of levels. The main menu is the top level menu, which consists of seven menu items: Status, Intercom, Voice Mail, Call Features, Directory, Settings and History. Main menu Screen Description: Displays the selected menu item name Displays the main menu icon: : Status –... -
Page 13: Submenu
To enter the main menu: Press when the handset is idle. The seven menu items appear as a list of icons on the LCD screen. To access a main menu feature: 1. Press , , , or to scroll through the seven menus. The name of the selected menu item appears on the top of the LCD screen 2. - Page 14 available character under each key appears on the bottom left-hand corner of the screen. Wait one second, and enter the next character (or numbers). The default input methods are Abc, 123, ABC and abc. To enter or edit data by the default input mods, do one of the following as shown below: Press one or more times to switch among Switch among input modes...
-
Page 15: Blacklist
Adding Contacts from Call History To add a contact to a local directory from Call History: 1. Press the History soft key when the phone is idle. 2. Press to highlight the desired call history list, and press the OK soft key. 3. -
Page 16: Call History Management
The selected entry will be deleted successfully. Call History Management The W56P IP DECT phone maintains call history lists of Placed Calls, Received Calls, Missed Calls and Forwarded Calls. Call history lists support up to 400 entries. You can view call history, place a call, add a contact or delete an entry from the call history list. - Page 17 To delete all entries from the Call History list: 1. Press to enter the main menu. 2. Select History. The LCD screen displays 4 call history lists: All Calls, Outgoing Calls, Missed Calls and Accepted Calls. 3. Press or to highlight the desired list, and press the OK soft key. The LCD screen displays all entries of the selected list.
-
Page 18: Placing Calls From Call History
To place a call: 1. Enter the desired number using the keypad. 2. Press to dial out. To place a call during an active call: You can place at most two simultaneous calls on your handset. Do one of the following: 1. -
Page 19: Answering When Not In Another Call
You can answer a call in three ways when you are not in another call using your Cordless W56P IP DECT phone: Using the earpiece Using the speakerphone Using the earphone Note: You can ignore an incoming call by pressing the Silence soft key or reject an incoming call by pressing the on-hook key. -
Page 20: Two Calls On Hold
You can mute the microphone during an active call. When muting the microphone, you can hear the other party but he or she cannot hear you. For example, if you do not want the other party to listen in while you talk to someone in the room, you can mute the microphone temporarily. To mute a call: ... - Page 21 You can use DND to reject incoming calls automatically on the phone. All calls you receive while DND is enabled are logged to your missed calls list. To activate DND on your phone: 1. Press to enter the main menu. 2.
- Page 22 You can transfer a call to another party in one of three ways: Blind Transfer: Transfer a call directly to another party without consulting. Semi-Attended Transfer: Transfer a call when the target phone is ringing. Attended Transfer: Transfer a call with prior consulting. To perform a blind transfer: 1.
- Page 23 Note: Call Waiting is local to the phone, and may be overridden by the admin settings. For more information, contact your system administrator. The W56P IP DECT Phone supports up to three parties (including yourself) in a conference call. To set up a conference call: 1.
-
Page 24: Busy Greetings
Your Voice Mailbox is pre-configured and ready to use as soon as you receive your W56P handset. You can listen to voice mails that are stored in your voice mailbox. When receiving a new voice mail, the icon appears on the LCD screen with the number of unread voice mails, and message key LED flashes red. -
Page 25: No Answer Greetings
No Answer Greetings Busy Greetings are the greetings that callers will hear if you do not answer their calls. To record your No Answer Greetings: 1. Press the OK soft key to enter the main menu. 2. Select → Play Message. 3.
Need help?
Do you have a question about the W56P and is the answer not in the manual?
Questions and answers