Table of Contents
Advertisement
Quick Links
Advertisement
Table of Contents

Related Manuals for Sencore Impulse


Summary of Contents for Sencore Impulse
-
Page 2: About This Manual
V1.1 About This Manual This manual describes the detailed installation, setup and operation of the Sencore Impulse. Read carefully to make sure all steps are completed properly. For additional support assistance, visit www.sencore.com/support. Important To avoid injury or product damage, make sure to review and understand all safety instructions. -
Page 3: Important Safety Reminders
Do not use this device near water. Clean only with a dry cloth. Do not block any ventilation openings. Install in accordance with Sencore’s instructions. Do not install near any heat sources such as radiators, heat registers, stoves, or other devices (including amplifiers) that produce heat. -
Page 4: Installation Site
WARNING: Installation Site When selecting the installation site, comply with the following: Protective Ground - The protective ground lead of the building's electrical installation should comply with national and local requirements. Environmental Condition - The installation site should be dry, clean, and ventilated. -
Page 5: Table Of Contents
Content About This Manual ...................... 2 Important ........................2 Notices ........................2 Trademark Acknowledgments ..................2 Publication Disclaimer ....................2 Copyright ........................2 Important Safety Reminders..................3 Installation Site ......................4 Installation Requirements .................... 4 1 Overview ........................7 1.1 General ....................... 7 1.2 Architecture ...................... - Page 6 3.5 Using Manual RTMP Streaming ............... 18 3.6 Manual RTMPS Streaming ................20 3.7 Using Automatic YouTube Streaming ............... 23 3.8 Using Automatic Facebook Streaming.............. 24...
-
Page 7: Overview
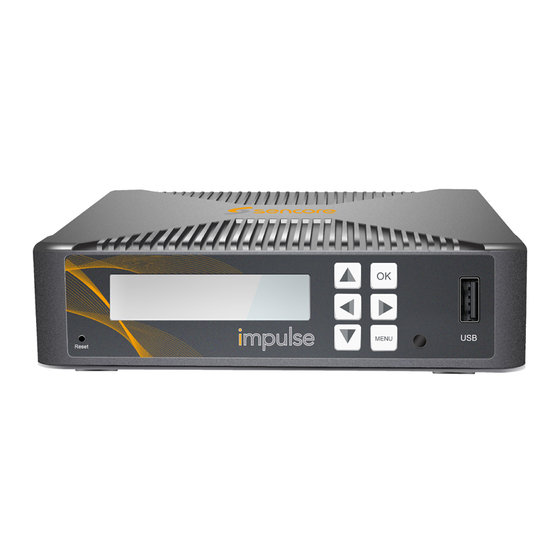
1) Display screen: This LCD screen displays the management IP address, operational mode, input stream standard, output protocol, running status and other items. 2) Power and status indicator: This LED will turn on when the Impulse is powered on and change colors based on operational status. -
Page 8: Installation
Left, Right, Up, and Down arrows can be used to navigate selections. 3.3 Operating the Web Interface 3.3.1 Access Interface PC Web-UI Impulse can be accessed and configured via web UI. The instructions are as follows: 1) Connect the Impulse to a management PC/server directly, or to a network switch. -
Page 9: Status
Impulse to ensure both are in the same subnet range. 3) Open a web browser and enter Impulse’s default IP address – the browser will connect to the device. Once the connection is established, a login page will appear. -
Page 10: Broadcast/Live Stream Settings
Live Stream / Record Stream – this section displays Information such as input/output status, resolution, bitrate of live/record stream. This page is a reference point for ensuring device is operating properly and can be used to quickly identify issues with incoming and outgoing content. - Page 11 b) HLS: the only new option that appears is HLS URL. c) RTSP: the only new option that appears is RTSP URL. d) RTMP/RTMPS: the most important part to choose first is the mode. Then more options appear. i) Facebook: automatic Facebook takes the user to a prompt for authorizing the account to stream with.
- Page 12 i) YouTube: automatic YouTube takes the user to a prompt for authorizing the account to stream with. Following the instructions given after clicking “Authorize Your Device”, the options “Title” and “Privacy Status” become available. 1) Input – selecting HDMI or SDI input source (SDI is an optional input chosen at time of purchase) a) Video Profile –...
- Page 13 Audio Bitrate (kbps): 32, 48, 56, 64, 80, 96, 112, 128, 160, 192, 224, 246, 256, 320, 384, 448 and BITRATE_MAX After finishing configuration on the Impulse, click the “Start Streaming” button at the bottom of the Live Service/Stream Settings page to start streaming.
-
Page 14: Record Settings
3.3.4 Record Settings Basic Settings: 1) USB/SD – provides status for installed storage media and file system. When USB is selected, USB File System will appear. 2) Storage Device – allows for destination of recorded file 3) Record File Format – user can choose to change the file type (ts, mp4, or mov) 4) Record Name - Input file name 5) Record Mode: Loop, Size and Time a) Loop –... -
Page 15: Play Back
After finishing configuration, click the “Apply” button to save these settings. Click “Start Recording” at the bottom “Basic Settings” on the recording page of the Impulse to begin recording the input stream to the USB or SD card. The “Easy to Use Mode” enables starting and stopping the stream through the front panel of the device and will log out of the GUI. -
Page 16: System Setting
a) RTMP: choosing this opens sub-parameter “Mode”. b) Mode: select either YouTube for automatic streaming or manual for any RTMP output. c) YouTube (automatic): when the stream is active, the “Live Status” transmit icon under “Output Settings” will turn green instead of red or gray. i) Manual: enables options “URL”, “Port”, “Uploading node”... - Page 17 4) Language: Impulse currently supports English and Chinese. 5) System Operation: a) Upgrade: Click Upload button to select file, then upgrade the software. Important Note* When updating any device from a version prior to 1.0.24 to a version of 1.0.24 or later, two software updates are required. First update with version “V0.0.0_20181207_M60WVUpgrade”.
-
Page 18: Using Udp Streaming
Log Clear – click to clear the unit log file. 3.4 Using UDP Streaming 1) Plug in an input (HDMI or SDI) and check that the impulse detects the input using the “Status” page within the device. 2) Using the menu in the web interface, navigate to “Live Service/Streaming Setting”... - Page 19 d) Click YouTube Studio (beta). e) On the left side of the page, scroll down and click Creator Studio Classic. (Under the “Dashboard”.) f) Click “Skip” to get past the survey. g) On the left side of the page (under “Dashboard”), click “Live Streaming”. h) Scroll down until “Encoder Setup”...
-
Page 20: Manual Rtmps Streaming
11) The stream is now live. 3.6 Manual RTMPS Streaming 1) Plug in an input (HDMI or SDI) and check that the impulse detects the input using the “Status” page within the device. 2) Using the menu in the web interface, navigate to “Live Service/Streaming Setting”... - Page 21 Click Here c) Click “Live Video” on the next option that appears. Click Here d) Click “Don’t Allow” on the popup that appears to collect user information about the camera and other features. It’s not necessary for streaming from the encoder.
- Page 22 Key” here 7) In the “Live Service/Stream Settings” page of the Impulse, under “Basic Settings” in the “Port” section, enter “443”. Setting the port to 443 will configure the Impulse to use RTMPS. 8) After choosing Authentication and Video Profile, click “Apply”.
-
Page 23: Using Automatic Youtube Streaming
5. Select “RTMP/RTMPS” from the “Output” section 6. Select “YouTube” from the “Mode” section. 7. At this time a long grey bar will pop up that says “Authorize Your Impulse” 8. Set the stream “Title” 9. Select your “Privacy Status” (Public, Private, or Unlisted). -
Page 24: Using Automatic Facebook Streaming
3.8 Using Automatic Facebook Streaming 1) Plug in an input (HDMI or SDI). 2) Verify the Impulse detects the input on the “Status” page of the device. Under “Live Stream”, the Input Status will read ‘Good’. 3) Using the menu in the web interface, navigate to “Live Service/Streaming Setting”...
Need help?
Do you have a question about the Impulse and is the answer not in the manual?
Questions and answers