Advertisement
Quick Links
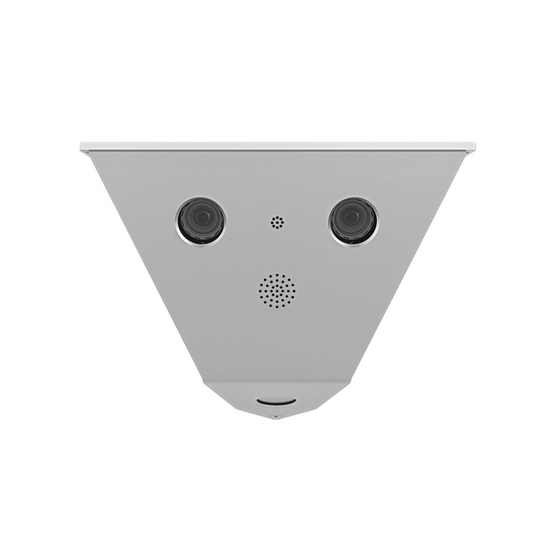
Variants
Mx-V16A/B* with two
Mx-V16A/B* with two
lenses (e.g., one pointing
lenses (e.g., one day, one
forward, one pointing
night lens)
*Variant Mx-V16B supports MOBOTIX MxBus modules
Checking the Delivered Parts
D.2
D.1
M.4
M.3
Unpacking the V16 and Removing the Front Plate
1. Take the V16 out of the box
Pull the top of the packaging and the V16 out of the box and place the V16
upside-down on a protected surface.
2. Remove security screw
Using the supplied screwdriver bit and a suitable bit holder (blue circle in
figure), remove the security screw.
3. Remove front plate
Pull the top end of the front plate upward and forward
entire front plate up and remove it from the housing
Next, place the front plate face-down on the protected surface.
Replacing the SD Card (optional)
1. Remove S16 camera module
Remove the three Allen screws (red arrows in the figure) using the supplied
2 mm Allen wrench (item M.1). When doing this, make sure that you are
not damaging the two-wire microphone cable.
2. Replace SD card
Place the S16 camera module on a suitable object. Next, replace the
installed SD card by a suitable MicroSD card (max. 64 GB), as described
in the S15 Camera Manual, in Section 2.2.9, «Replacing the MicroSD Card».
3. Install S16 Camera Module
Place the S16 camera module in its original position, insert the Allen screws
and tighten them (torque 0.85 Nm).
Installing the Housing
1. Mark the holes for drilling (if required)
Mark the holes for the dowels using the drilling template. To do so, fold the
template or cut it at the dashed line. Then mark the holes at the left-hand
side, turn the template over and mark the holes on the right-hand side.
If you do not want to use the drilling template, you can use the housing
itself to mark the holes for drilling.
If the cables are led to the camera from behind, make sure that you
place the cut-out over the spot where the cables are exiting.
2. Drill the holes for the dowels (if required)
Drill the holes for the dowels with a suitable drill bit. Next, fully push the
dowels into the holes you drilled.
3. Install the Housing
Make sure that you are guiding all cables to the camera module through
the cut-out at the back of the housing. Properly fasten the housing using
suitable screws and washers.
Make sure not to over-tighten the fastening screws since over-tight-
ening may warp the housing!
Connecting the Cables*
*For additional information on attaching a network installation cable
directly to an S16, see the S15 Camera Manual.
1. Replace the network cable (optional)
Turn the blue bayonet catch of the S16 to the left, then remove the catch
and the installed patch cable (item 1.6). Insert the new MOBOTIX patch cable
into the network socket and fasten the cable using the blue bayonet catch.
2. Connect the network cable
Guide the other end of the patch cable through the cut-out and then into
a weatherproof connector (e.g. the MX-Overvoltage-Protection-Box) or
into a switch.
For additional information on this topic, see the S15 Camera Manual in
Section 2.5.1, «Network Cabling for S15 With Patch Cables».
Mx-V16A/B* with one lens
downward)
1.1
1.2
1.5
M.1
M.2
1
, then lift the
2
.
V16 Vandalism
Quick Installation
Item
Count
1.1
1.2
1.3
1.4
1.5
1.6
Mounting Supplies
1.3
M.1
M.2
M.3
M.4
Documentation
1.4
D.1
D.2
261 mm/10.28 in
1.6
View from front
Part Name
1
Camera housing 3 mm stainless steel, top 5 mm stainless steel
1
Front plate 5 mm stainless steel (installed)
S16 (modified) with one or two sensor modules (B041/B079, day
1
or night), installed on front plate
Security screw stainless steel M5x12 (one installed, one supplied
2
additionally)
1
MicroSD card (SDHC, installed in S16)
1
Ethernet patch cable, 50 cm/19.7 in with sealings (installed)
1
Allen wrench 2 mm
1
Screwdriver bit for security screw M5x12
1
Multifunctional tool (lens, dome, filter insets)
1
Module wrench (for focusing the lenses)
1
V16 Drilling Template
1
V16 Quick Install (this document)
1
Do not damage micro-
phone and speaker cables!
View from top
261 mm/10.28 in
2
Cables from above
Advertisement

Related Manuals for Mobotix BeyondHumanVision V16 Vandalism


Summary of Contents for Mobotix BeyondHumanVision V16 Vandalism
-
Page 1: Installing The Housing
Turn the blue bayonet catch of the S16 to the left, then remove the catch and the installed patch cable (item 1.6). Insert the new MOBOTIX patch cable into the network socket and fasten the cable using the blue bayonet catch. -
Page 2: Important Notes
Connections and Initial Operation of the V16 You can find detailed information on the installation and connections of the V16 in the S15 Camera Manual (PDF, available on www.mobotix.com > Support > Download Center > Documentation > Manuals).
Need help?
Do you have a question about the BeyondHumanVision V16 Vandalism and is the answer not in the manual?
Questions and answers