Table of Contents
Advertisement
For replacement parts visit
WENPRODUCTS.COM
Your new tool has been engineered and manufactured to WEN's highest standards for dependability, ease
of operation, and operator safety. When properly cared for, this product will supply you years of rugged,
trouble-free performance. Pay close attention to the rules for safe operation, warnings, and cautions.
If you use your tool properly and for its intended purpose, you will enjoy years of safe, reliable service.
NOTICE: Please refer to wenproducts.com for the most up-to-date instruction manual.
1" X 30" BELT SANDER
WITH 5" SANDING DISC
IMPORTANT:
NEED HELP? CONTACT US!
Have product questions? Need technical support?
Please feel free to contact us at:
800-232-1195
techsupport@wenproducts.com
WENPRODUCTS.COM
MODEL 6515, 6515T
(M-F 8am-5pm CST)
Advertisement
Table of Contents

Related Manuals for Wen 6515


Summary of Contents for Wen 6515
- Page 1 WENPRODUCTS.COM IMPORTANT: Your new tool has been engineered and manufactured to WEN’s highest standards for dependability, ease of operation, and operator safety. When properly cared for, this product will supply you years of rugged, trouble-free performance. Pay close attention to the rules for safe operation, warnings, and cautions.
-
Page 2: Table Of Contents
Operation ..................15 Maintenance .................. 16 Troubleshooting Guide ..............18 Exploded View & Parts List ............19 Warranty Statement ............... 21 SPECIFICATIONS Model Numbers 6515, 6515T Motor 120V, 60Hz, 2.3A Disc Speed 3450 RPM (no load) Disc Diameter 5 inches... -
Page 3: Introduction
INTRODUCTION Thanks for purchasing the WEN Belt/Disc Sander. We know you are excited to put your tool to work, but first, please take a moment to read through the manual. Safe operation of this tool requires that you read and understand this operator’s manual and all the labels affixed to the tool. This manual provides informa- tion regarding potential safety concerns, as well as helpful assembly and operating instructions for your tool. -
Page 4: General Safety Rules
GENERAL SAFETY RULES Safety is a combination of common sense, staying alert and knowing how your item works. SAVE THESE SAFETY INSTRUCTIONS. WARNING: Read and understand all warnings, cautions and operating instructions before using this tool. Failure to follow all instructions listed below may result in personal injury and tool damage. WORK AREA SAFETY 1. - Page 5 GENERAL SAFETY RULES 4. Prevent unintentional starting. Ensure the switch is in the off-position before connecting to power source and/or battery pack, picking up or carrying the tool. Carrying power tools with your finger on the switch or energizing power tools that have the switch on invites accidents. 5.
-
Page 6: Specific Safety Rules For The Belt/Disc Sander
SPECIFIC RULES FOR THE BELT/DISC SANDER WARNING: Do not let comfort or familiarity with the product replace strict adherence to product safety rules. Failure to follow the safety instructions may result in serious personal injury. 1. TOOL PURPOSE. This sander is designed to sand wood or wood-like products only. Sanding or grinding other materials could result in fire, injury, or damage to the workpiece. - Page 7 SPECIFIC RULES FOR THE BELT/DISC SANDER 11. FEEDING THE WORKPIECE. • Allow the belt/disc to reach full speed before feeding the workpiece. Do not turn on the machine while the sanding belt/disc is contacting the workpiece. • Always sand on the downward side of the sanding disc when using the disc sander. Sanding on the upward side of the disc can cause the workpiece to fly out of position, resulting in injury.
-
Page 8: Electrical Information
ELECTRICAL INFORMATION GROUNDING INSTRUCTIONS IN THE EVENT OF A MALFUNCTION OR BREAKDOWN, grounding provides the path of least resistance for an electric current and reduces the risk of electric shock. This tool is equipped with an electric cord that has an equipment grounding conductor and a grounding plug. The plug MUST be plugged into a matching outlet that is properly installed and grounded in accordance with ALL local codes and ordinances. -
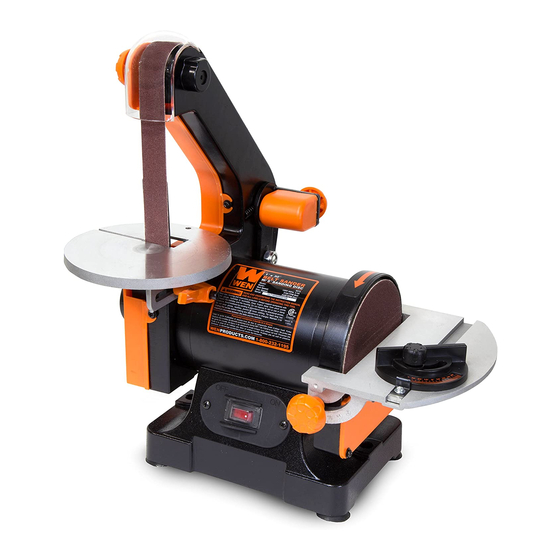
Page 9: Know Your Belt/Disc Sander
KNOW YOUR BELT/DISC SANDER TOOL PURPOSE Belt and disc sanders shape and finish wood and a variety of other materials. The belt and disc rotates to help smooth workpiece surfaces quickly and evenly. Refer to the diagram below to become familiarized with the parts and controls of your belt/disc sander. -
Page 10: Assembly & Adjustments
ASSEMBLY & ADJUSTMENTS UNPACKING With the help of a friend or trustworthy foe, carefully remove the belt/disc sander from the packaging. Make sure to take out all contents and accessories. Do not discard the packaging until the belt/disc sander is completely assembled. Before using the wood lathe, you must assemble the unit using the instructions in this section. - Page 11 ASSEMBLY & ADJUSTMENTS WARNING: Do not plug in or turn on the tool until it is fully assembled according to the instruc- tions. Failure to follow the safety instructions may result in serious personal injury. NOTE: Before making any adjustments check that the power switch is in the OFF position and that the plug is disconnected from the power source.
- Page 12 ASSEMBLY & ADJUSTMENTS WARNING: Do not plug in or turn on the tool until it is fully assembled according to the instruc- tions. Failure to follow the safety instructions may result in serious personal injury. WARNING: Sanding operations are dusty and can produce particles that are harmful to your health. Always wear a dust mask and use an adequate dust collection system.
- Page 13 ASSEMBLY & ADJUSTMENTS WARNING: Do not plug in or turn on the tool until it is fully assembled according to the instruc- tions. Failure to follow the safety instructions may result in serious personal injury. UPPER GUARD Install the upper guard (Fig. 8 - 2) onto the belt sanding arm using the upper guard locking knob (Fig.
- Page 14 ASSEMBLY & ADJUSTMENTS TESTING THE MACHINE Once you have properly assembled the machine, perform a test run to see that everything powers up and runs cor- rectly. All of the tools for assembly and adjustments should be removed and cleared away before turning on the machine. During the test run, make sure the ON/OFF switch along with all safety features are working properly before apply- ing a load.
-
Page 15: Operation
OPERATION ON/OFF SWITCH 1. To start the sander, push the switch to the ON position. 2. To stop the sander, push switch to the OFF position. SURFACE SANDING ON THE BELT Hold the workpiece firmly with both hands. Keep fingers away from sanding belt. Keep the workpiece flat against the belt table and move it slowly across the sanding belt. -
Page 16: Maintenance
Any attempt to repair or replace electrical parts on this tool may be hazardous. Servicing of the tool must be performed by a qualified technician. When servicing, use only iden- tical WEN replacement parts. Use of other parts may be hazardous or induce product failure. ROUTINE INSPECTION Before each use, inspect the general condition of the tool. - Page 17 Remove the disc dust port by removing the three screws and washers. See figures on p. 12. 3. Remove the used sanding disc. A WEN Heat Gun (model number 2020 or HG1022) can help to soften up the adhesive to make for an easier, cleaner removal. Wipe the sanding disc plate clean.
-
Page 18: Troubleshooting Guide
TROUBLESHOOTING GUIDE WARNING: Stop using the tool immediately if any of the following problems occur. Repairs and replacements should only be performed by an authorized technician. For any questions, please contact our customer service at (800) 232-1195, M-F 8-5 CST or email us at techsupport@wenproducts.com. PROBLEM CAUSE SOLUTION... -
Page 19: Exploded View & Parts List
EXPLODED VIEW & PARTS LIST... - Page 20 EXPLODED VIEW & PARTS LIST Part No. Description Qty. Part No. Description Qty. Phillips Screw and Washer 6515-036 Phillips Screw (M6x10) 6515-001 (M6x18) 6515-037 Hex Bolt (M10x25) 6515-002 Rubber feet 6515-038 Right Housing Phillips Screw and Washer 6515-039 Hex Set Screw (M6x20)
-
Page 21: Warranty Statement
(2) years from date of purchase or 500 hours of use; whichever comes first. Ninety days for all WEN products if the tool is used for professional or commercial use. - Page 22 NOTES...
- Page 23 NOTES...
- Page 24 THANKS FOR REMEMBERING...
Need help?
Do you have a question about the 6515 and is the answer not in the manual?
Questions and answers
wen 6515t belt sander 1x30 part number 39 need to replace it