Advertisement
Table of Contents
Your new tool has been engineered and manufactured to WEN's highest standards for dependability,
ease of operation, and operator safety. When properly cared for, this product will supply you years
of rugged, trouble-free performance. Pay close attention to the rules for safe operation, warnings,
and cautions. If you use your tool properly and for intended purpose, you will enjoy years of safe,
reliable service.
SPINDLE SANDER
IMPORTANT:
NEED HELP? CONTACT US!
Have product questions? Need technical support?
Please feel free to contact us at:
800-232-1195
techsupport@wenproducts.com
WENPRODUCTS.COM
OSCILLATING
(M-F 8AM-5PM CST)
Model # 6510
bit.ly/wenvideo
Advertisement
Table of Contents

Related Manuals for Wen 6510


Summary of Contents for Wen 6510
- Page 1 IMPORTANT: Your new tool has been engineered and manufactured to WEN’s highest standards for dependability, ease of operation, and operator safety. When properly cared for, this product will supply you years of rugged, trouble-free performance. Pay close attention to the rules for safe operation, warnings, and cautions.
-
Page 2: Table Of Contents
Know Your Spindle Sander Assembly and Adjustments Operation Maintenance Troubleshooting Exploded View and Parts List Warranty TECHNICAL DATA 6510 Model Number: 120 V AC, 60 Hz, 3.5 A, 7/16 HP Motor: 2000 RPM (no load) Speed: 58 OPM with 5/8” of travel Oscillations: Spindle Size: 1/2”... -
Page 3: General Safety Rules
GENERAL SAFETY RULES Safety is a combination of common sense, staying alert and knowing how your item works. SAVE THESE SAFETY INSTRUCTIONS. WARNING: To avoid mistakes and serious injury, do not plug in your tool until the following steps have been read and understood. 1. -
Page 4: Specific Safety Rules For Spindle Sander
GENERAL SAFETY RULES 14. NEVER STAND ON A TOOL. Serious injury could result if the tool tips or is accidentally hit. DO NOT store anything above or near the tool. 15. DO NOT OVERREACH. Keep proper footing and balance at all times. Wear oil-resistant rubber-soled foot- wear. -
Page 5: Electrical Information
SPECIFIC RULES FOR THE SPINDLE SANDER 8. Do not use the spindle sander for wet sanding. Failure to comply may cause electric shock leading to injury or death. 9. Use only identical replacement parts when servicing the sander. 10. Wait until the spindle comes to a complete stop before touching the workpiece. 11. -
Page 6: Know Your Spindle Sander
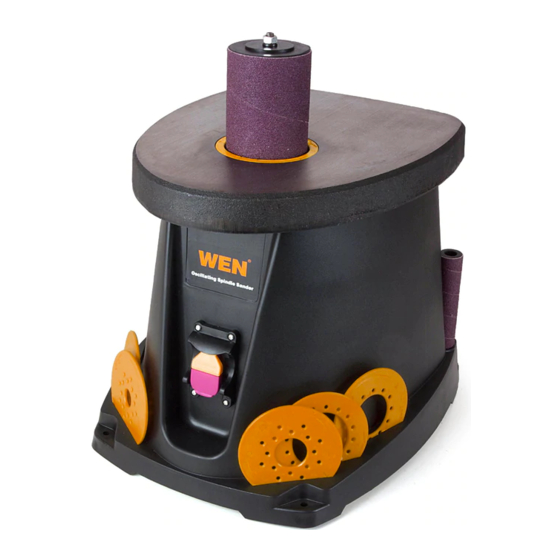
KNOW YOUR OSCILLATING SPINDLE SANDER Spindle Sanding Sleeve (6 included) Throat Plate (6 included) Upper Spindle Washer/Hex Nut Sanding Table Rubber Sanding Drums (5 included) Sanding Drum Storage Peg Dust Port ON/OFF Switch... -
Page 7: Assembly And Adjustments
(Fig. 1). Do not discard the carton or any packag- ing until the spindle sander is completely assembled. If any parts are missing or damaged, contact the WEN customer support line. This spindle sander requires some assembly. For your safety, completely assemble the oscillating spindle sander before connecting it to the power or switching it on. - Page 8 ASSEMBLY AND ADJUSTMENTS Fig. 4 Fig. 3 SPINDLE SANDER MOUNTING (Figs. 3 and 4) To mount the spindle sander permanently, choose a solid benchtop. If the sander is to be used portably, mount the sander to a mobile mounting board and use clamps to secure it to a solid surface (Fig. 4). When mounting the sander on either a board or a benchtop, use the corner holes as guides (Fig.
- Page 9 ASSEMBLY AND ADJUSTMENTS INSTALLING A SANDING SLEEVE (Fig. 6) All sleeves with the exception of the 1/2” sleeve fit over a rubber sanding drum. To install a sleeve: 1. Place the lower spindle washer (2) over the spindle (1) with the fin side facing down. 2.
-
Page 10: Operation
OPERATION ON/OFF SWITCH (Fig. 8) The keyed switch is intended to prevent unauthorized use of the sander. WARNING: Remove the safety key whenever the sander is not in use. Place the key in a safe place and out of the reach of children. 1. -
Page 11: Maintenance
WARNING: Never use flammable or combustible solvents around power tools. When servicing, use only identical WEN replacement parts. Use of other parts may be hazardous or induce product failure. -
Page 12: Exploded View And Parts List
EXPLODED VIEW AND PARTS LIST... - Page 13 EXPLODED VIEW AND PARTS LIST...
- Page 14 EXPLODED VIEW AND PARTS LIST Part# Stock # Description Part# Stock # Description Hex nut 10 Bearing Cover 90225-‐001 90225-‐042 Upper spindle washer Felt 90225-‐002 90225-‐043 Sander sleeve Rubber washer 90225-‐003 90225-‐044 Rubber spindle Bearing 6203zz 90225-‐004 ...
- Page 15 EXPLODED VIEW AND PARTS LIST Part# Stock # Description Part# Stock # Description Warning label(Ⅰ) 2”Throat plate 90225-‐084 90225-‐100 Cord clamp 3” Throat plate 90225-‐085 90225-‐101 Screw 4.2x15 1/2”Sanding sleeve(80 grit) 90225-‐086 90225-‐102 Thread 3/4”...
-
Page 16: Warranty
LIMITED TWO YEAR WARRANTY WEN Products is committed to building tools that are dependable for years. Our warranties are consistent with this commitment and our dedication to quality. LIMITED WARRANTY OF WEN CONSUMER POWER TOOLS PRODUCTS FOR HOME USE GREAT LAKES TECHNOLOGIES, LLC (“Seller”) warrants to the original purchaser only, that all WEN con- sumer power tools will be free from defects in material or workmanship for a period of two (2) years from date of purchase.
Need help?
Do you have a question about the 6510 and is the answer not in the manual?
Questions and answers