Table of Contents
Advertisement
Advertisement
Table of Contents

Related Manuals for Key Automation CT1RD


Summary of Contents for Key Automation CT1RD
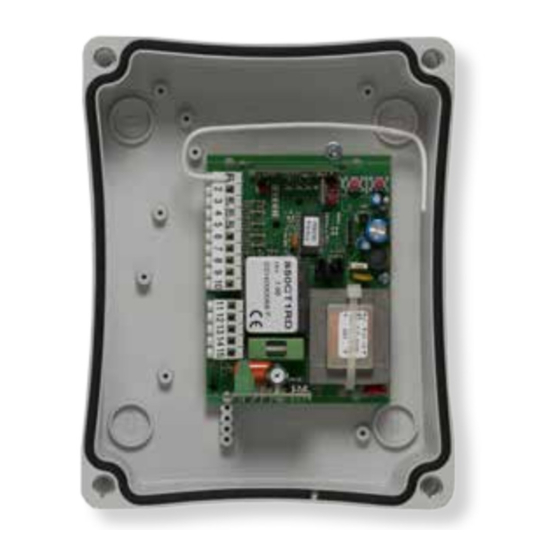
- Page 1 Instructions and warnings for installation and use Programowanie centrali CT1RD SELECTION MODE MEMORY FUSE 6,3 A CT1RD Control unit for a 230 Vac motor, for a rolling shutter or sliding gate Management System ISO 9001:2008 www.tuv.com ID 9105043769...
-
Page 2: Table Of Contents
TABLE OF CONTENTS Safety warnings pag. 13 Product Introduction pag. 14 Description of the control unit pag. 14 Description of the connections pag. 14 Models and technical characteristics pag. 14 List of cables required pag. 15 Preliminary Checks pag. 15 Installing the Product pag. -
Page 3: Safety Warnings
Read the instructions carefully before proceeding with installation. should this occur, disconnect the power supply immediately and contact a Key Automation Service Centre. Use of the automation The design and manufacture of the devices making up the system in these conditions may cause hazards;... -
Page 4: Description Of The Control Unit
2 - INTRODUCING THE PRODUCT 2.1 - Description of the control unit memory extractable. This control unit has been designed for the auto- Control unit for a motor in alternatine current with torque adjuster, output mation of rolling shutters, shutters and sliding doors. contact for limit switch or open/close bottons, selectable, output contact for photo dispositive, stop button, step-by-step, with radio modular and SELECTION... -
Page 5: List Of Cables Required
TECHNICAL SPECIFICATIONS: Power supply 230 Vac (+10% - 15%) 50-60 Hz Max motor load 600 W Output for accessories power 24 Vac 1,5 W MAX Flashing light output 230 Vac 40 W Pause time da 4 a 120 sec. Work time da 1 a 180 sec. -
Page 6: Electric Connections
4 - PRODUCT INSTALLATION 4.1 - Electrical connections WARNING - Before making the connections, ensure that the control unit is not powered up. MOTOR / POWER SUPPLY CONNECTIONS Power supply connection terminal board Motor close Motor open Motor common Power supply 230 Vac 50-60 Hz Power supply 230 Vac 50-60 Hz SELECTION MODE... -
Page 7: Remote Control Setting
SAFETY AND CONTROL DEVICE CONNECTIONS SIGNAL Antenna - signal - SHIELD Antenna - shield - Photocells (closing), NC contact between PH1 and COM. The photocell is tripped at any time during closing of the automation system, halting operation immediately and reversing the travel direction STOP STOP safety device, NC contact between STOP and COM. -
Page 8: Setting The Gate
4.4 - Setting the gate Programming work time from 1 sec to 3 min. The control box is supplied with a work time of 3 min. Work time setting: PRESS 2 TIMES SELECTION 1) Make sure the GATE/ROLLING SHUTTER is CLOSED. 2) Press 2 times the SELECTION key. -
Page 9: Exit From The Programming
4.7 - Exit from the programming Every time that you alter the parameters the control box exits from the programming phase. the menu of this parameter. The time availble to act on the settings Skipping the programming phase the 7th time that you press SE- is 10 seconds. -
Page 10: Further Details
7 - FURTHER DETAILS FUNCTIONS SELECTION SELECTION MODE By operating on the jumpers present on the central control panel it is possible to personalize the automation. MEMORY The table describes the working and the effect that the action on each single jumper has on the central control panel. FUSE 6,3 A N. -
Page 11: Instructions And Warnings For The
Thank you for choosing Key Automation S.r.l.; please visit our Inter- net site www.keyautomation.it for further information. supplied with the system. In the event of safety devices out of servi- ce arrange for repairs to the automation immediately;... - Page 12 TABLE DES MATIÈRES Consignes de sécurité page. 23 Présentation du produit page. 24 Description de la logique de commande page. 24 Description des branchements page. 24 Modèles et caractéristiques techniques page. 24 Liste des câbles nécessaires page. 25 Vérifications préalables page.
- Page 13 PROGRAMOWANIE CENTRALI CT 1RD PKT 4.3 Ustawienie pilota zdalnego sterowania NAUKA: 1. Naciśnij klawisz SELECTION na płycie. Dioda CD miga 2. Naciśnij przycisk "1" pilota. Sterownik automatycznie zapamięta kod 3. Automatycznie zostanie zapamiętany przycisk „2” pilota i może on zostać wykorzystany do uruchomienia funkcji furtki.
- Page 14 PKT 4.6 Ustawianie funkcji furtki (częściowe otwarcie) Centrala sterująca standardowo ma wyłączoną funkcję furtki W celu korzystania z tej funkcji niezbędne jest korzystanie z drugiego przycisku pilota. Aktywacja i ustawianie szerokości otwarcia częściowego 1. Naciśnij klawisz SELECTION 4 razy. Diody CD oraz W.T świecą 2.
- Page 15 Il sottoscritto Nicola Michelin, Amministratore Delegato dell’azienda The undersigned Nicola Michelin, General Manager of the company Key Automation srl, Via Alessandro Volta, 30 - 30020 Noventa di Piave (VE) – ITALIA dichiara che il prodotto tipo: declares that the product type:...
- Page 16 Key Automation S.r.l. Via A. Volta 30 - 30020 Noventa di Piave (VE) T. +39 0421.307.456 - F. +39 0421.656.98 Instruction version info@keyautomation.it - www.keyautomation.it 580ISCT1RD REV.02...
Need help?
Do you have a question about the CT1RD and is the answer not in the manual?
Questions and answers