Advertisement
Available languages
Available languages
Quick Links
Advertisement

Related Manuals for Össur Icelock Clutch 211


Summary of Contents for Össur Icelock Clutch 211
- Page 1 I n s t r u c t i o n s f o r u s e Icelock Clutch 211 ®...
- Page 2 ..............3 Instructions for use..........Gebrauchsanweisung..........Guide de fabrication..........Instrucciones para el uso........Istruzioni per l’uso..........Brugsanvisning............Bruksanvisning............Gebruiksaanwijzing..........Instruções de Utilização......... 取扱説明書............
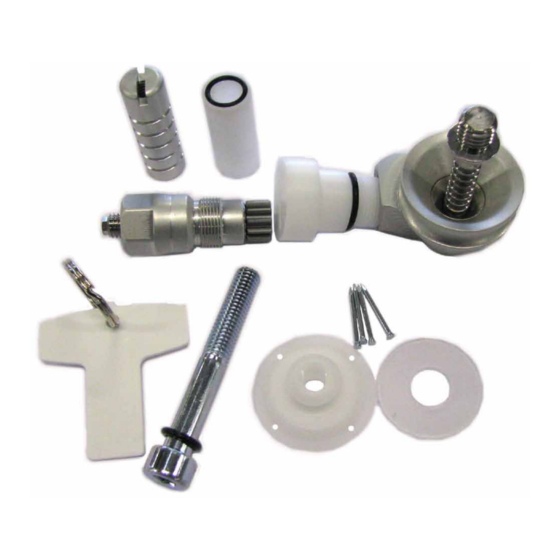
- Page 4 ENGLISH CONTENT L-292015 Lock Body with guide (w/o Dummy Screw) (Figur 3). L-292122 Dummy Screw (Figur. 4). L-292020 Clutch Mechanism (Figur. 7) and push button L-292131 (Figur. 8). L-293060 T-wrench (Figur. 10). L-292000 Attachment Pin clutch, standard (Figur. 11). L-292126 Delrin Guide (Figur. 6). L-293045 Silicone Sealing (Figur.
- Page 5 NOTE: Push Button (8) may be shortened by unscrewing from lock body and cutting it with hacksaw. Attachment Pin: Apply Loctite 410 or 411 onto threads (F) on Attachment Pin (11) and screw it into Locking Liner. Torque Attachment Pin to 4Nm (3ft.lb). Also available: L-292003 Attachment Pin clutch, short (7 notches).
- Page 6 DEUTSCH INHALT L-292015 Bodenstück mit Führung (ohne Dummy-Schraube) (3). L-292122 Dummy-Schraube (4). L-292020 Clutch-Mechanik (7) und Druckknopf L-292131 (8). L-293060 T-Schlüssel (10). L-292000 Anschluss-Pin, Clutch, Standard (fig.11). L-292126 Befestigungsdummy-Führung (6). L-293045 Silikondichtung (5). L-292121 Pingang, mit O-Ring (Dichtung) (L-293046 O-Ring 10x1,5) (2). L-292032 Pyramidenbolzen, lang, mit O-Ring (Dichtung) (L-693127 O-Ring 8x2) (1).
- Page 7 Nach Abkühlung das Material am Pingang (2) und an der Dummy- Schraube beschneiden. WICHTIG: Vor der Herstellung des Außenschaftes immer erst prüfen, ob der Montierbolzen (1) abgenommen und der Stiftgang (2) wieder versiegelt wurde. VI. Nach Fertigstellung des Außenschaftes Dummyschraube (4) freilegen und abnehmen.
- Page 8 FRANÇAIS SOMMAIRE L-292015 Coque de verrouillage avec guide (avec vis avec embout) (fig. 3). L-292122 Vis avec embout (fig. 4). L-292020 Mécanisme à crémaillère (fig.7) avec le bouton de désengagement L-292131(fig.8) L-293060 Clé en croix (fig. 10). L-292000 Broche de fixation de la crémaillère modèle standard standard (fig. 11). L-292126 Guide Delrin (fig.
- Page 9 MÉTHODES DE THERMOPLASTIFICATION Aplanir l’extrémité distale du moulage en plâtre (9) jusqu’au centre du guide spécial Delrin (6). Fixez à l’aides clous fournis ou d’adhésif double face tout en maintenant l’alignement original de la broche. Placez la coque de verrouillage (3) sur le guide spécial Delrin (6) tout en vous assurant que sa rotation permet de positionner correctement le mécanisme à...
- Page 10 ESPAÑOL CONTENIDOS L-292015 Cuerpo de Cierre con guía (sin Tornillo Postizo) (fig. 3). L-292122 Tornillo Postizo (fig. 4). L-292020 Mecanismo de embrague (fig. 7) y el Botón para Apretar L-292131 (fig. 8). L-293060 Llave de tuerca en T (fig. 10). L-292000 Embrague para el Vástago de Conexión, standard (fig.
- Page 11 IV. Moldee el termoplástico al vacío, asegurándose que el plástico se adapte bien al Cuerpo de Cierre (3) y al Tubo del Vástago (2). Una vez que el plástico se haya enfriado, recorte el material excedente alrededor del Tubo del Vástago (2) y del Tornillo Postizo (4). IMPORTANTE: Antes de fabricar el encaje exterior, asegúrese siempre que el perno de montaje (1) haya sido removido y el Tubo del Vástago (2) haya sido sellado de nuevo.
- Page 12 ITALIANO CONTENUTO L-292015 Unità di Chiusura con guida (senza Falsa Vite) (fig. 3). L-292122 Falsa Vite (Dummy Screw) (fig. 4). L-292020 Meccanismo di Innesto (fig. 7) e Il Bottone di Spinta L-292131(fig. 8). L-293060 T-wrench (fig. 10). L-292000 Innesto per Perno di Attacco, standard (fig. 11). L-292126 Guida Delrin (fig.
- Page 13 IMPORTANTE: Prima di plasmare il manicotti esterno, assicuratevi sempre che il bullone di assemblaggio (1) sia stato rimosso e che il Tunnel di Perno (2) sia risigillato. VI. Dopo la manifattura del manicotto esterno, esponete e rimuovete la Falsa Vite (4). VII.
- Page 14 DANSK INDHOLD L-292015 Låselegeme med guide (m/u attrapskrue) (fig. 3). L-292122 Attrapskrue (fig. 4). L-292020 Koblingsmekanisme (fig. 7) og Trykknappen L-292131 (fig. 8). L-293060 T-nøgle (fig. 10). L-292000 Kobling til pindekobling, standard (fig. 11). L-292126 Delrin-styring (fig. 6). L-293045 Silikonepakning (fig. 5). L-292121 Pindetunnel m/ o-ring (L-293046 o-ring 10x1,5) (fig.
- Page 15 VI. Når det yderste hylster er færdigt, afdækkes attrapskruen (4) og fjernes VII. Til sidst indsættes og tilspændes koblingsmekanismen (7) til 15 Nm (MEGET VIGTIGT). BEMÆRK: Trykknappen (8) kan afkortes ved hjælp af en nedstryger Koblingspind: Der smøres Loctite 410 eller 411 på gevindet på koblingspinden (11) og den skrues ind i låse-lineren.
- Page 16 SVENSKA INNEHÅLL L-292015 Kopplingshus (utan tryckknappsdummy) (fig. 3). L-292122 Tryckknappsdummy (fig. 4). L-292020 Kopplingsmekanism (fig. 7) och tryckknappen L-292131 (fig. 8). L-293060 T-nyckel (fig. 10). L-292000 Låstapp, standard (fig.11). L-292126 Fixtur (fig. 6). L-293045 Silikonring (fig. 5). L-292121 Låstappsdummy med o-ring (L-293046 o-ring 10x1,5) (fig. 2). L-292032 Pyramidbult, lång med o-ring (L-693127 o-ring 8x2) (fig.
- Page 17 OBS: Tryckknappen (8) kan kortas till önskad längd. Låstapp: Applicera Loctite 410 eller 411 på gängorna (F) på låstappen (11) och skruva fast den I silikonhylsan. Dra fast låstappen till 4Nm. Tillgängligt finns även: L-292003 Låstapp kort. L-292005 Låstapp lång. OBS: Använd dessa låstappar endast till Icelock 200-serien.
- Page 18 NEDERLANDS INBEGREPEN L-292015 slot romp met geleider (zonder dummy schroef) (fig. 3). L-292122 dummy schroef (fig. 4). L-292020 koppenlingsmechanisme (fig. 7) en de drukknop L-292131 (fig. 8). L-293060 T-moersleutel (fig. 10). L-292000 koppeling voor bevestigingspen, standaard (fig. 11). L-292126 Delrin geleider (fig. 6). L-293045 siliconen afsluiting (fig.
- Page 19 BELANGRIJK: Verzeker u er altijd van, voordat u de buitenste koker vervaardigt, dat de bevestigingsbout (1) verwijderd is en de pen tunnel (2) opnieuw is afgesloten. VI. Leg na de productie van de buitenste socket de dummy schroef (4) bloot en verwijder deze.
- Page 20 PORTUGUÊS CONTEÚDO L-292015 Dispositivo de Fixação com guia (sem Desbloqueador de Teste) (fig. 3). L-292122 Desbloqueador de Teste (fig. 4). L-292020 Mecanismo de Engate (fig. 7) e Botão de Pressão L-292131 (fig. 8) L-293060 Chave em T (fig. 10). L-292000 Engate do Pino de Fixação, normal (fig.11). L-292126 Guia Delrin (fig.
- Page 21 IV. Molde o termoplástico a vácuo. Assegure-se de que o plástico se molda correctamente ao Dispositivo de Fixação(3) e ao Tubo de Passagem do Pino (2). Depois de arrefecido o plástico, apare-o à volta do Tubo de Passagem do Pino (2) e do Desbloqueador de Teste (4).
- Page 22 日本語 内容 L-292015 ロック本体 (図3) L-292122 クラッチ機構ダミー (図4) L-292020 クラッチ機構 (T レンチ付) ( 図7) *L-292131 : 解除ボタン (図8) L-293060 T-レンチ(図10) L-292000 クラッチピン 標準 (図11) L-292126 陽性モデル取付ダミー (図6) L-293045 シリコーンリング (図5) L-292121 ピン用ダミー (O リング付) *L-293046 : O リング 10x1.5 (図2) L-292032 ロック固定ボルト (O リング付) *L-693127 : O リング 8x2 (図1) シングルラミネーシ ョン (樹脂注型 : 1 回) 専用ピラミッ ド L-273000 アイスロック ステンレスピラミッ...
- Page 23 重要 : 外ソケッ トを製作する前には、 必ず、 取り付けボルト (1) を取り外し、 ピン用ダミー (2) を再び塞いで下さい。 6. 外 ソケッ トの製作後、 クラッチ機構ダミー (4) を外に出し、 取り外してください。 7. < 重要>クラッチ機構ボタン (7) を 15Nm で締め付けます。 締め付けトルク値は必ず 守って下さい。 注 : 解除ボタン (8) は糸鋸で短く カッ トできます。 アタッチメン トピン ロックタイト410 または411 をアタッチメントピン (11) のネジ山 (F) に塗布し、 ロッキン グライナーに取り付けて下さい。...
- Page 24 EN - Caution: Össur products and components are designed and tested to ISO 10328. Compatibility and compliance with this standard is achieved only when Össur products and components are used with other recommended Össur or authorized components. If un-usual movement or product wear is detected in a structural part of a prosthesis at any time, the patient should be instructed to immediately discontinue use of the device and consult his/her clinical specialist.
- Page 26 Össur Americas Össur Nordic P.O. Box 67 27051 Towne Centre Drive 751 03 Uppsala, Sweden Foothill Ranch, CA 92610 Tel: +46 1818 2200 Fax: +46 1818 2218 Tel: +1 (949) 382 3883 info@ossur.com Tel: +1 800 233 6263 Fax: +1 800 831 3160 Össur UK ossurusa@ossur.com Building 3000...
Need help?
Do you have a question about the Icelock Clutch 211 and is the answer not in the manual?
Questions and answers