
Related Manuals for Borg & Overstrom b4


Summary of Contents for Borg & Overstrom b4
-
Page 1: Table Of Contents
Quick Start Guide Dispense Options Chilled & Ambient Chilled & Hot Chilled & Sparkling Chilled Ambient Chilled, Hot & Sparkling Contents Page No Description Major Components Water & CO2 Connection CO2 Bottle Installation Level Sensor Assembly Cold Water Connection & Operation Functions &... -
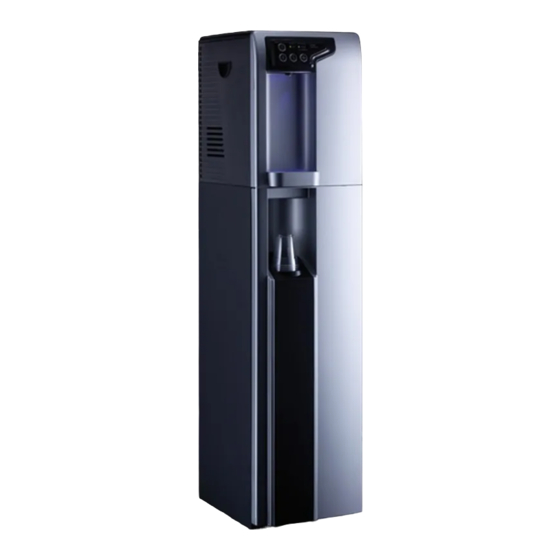
Page 2: Major Components
Installation Major Components Sparkling Water Tank Cold Water Tank Hot Water Tank Control Panel Water & CO2 Connection Carbonation Switch On/Off Switch IEC Power Socket CO2 Connector (1/4”) Inlet Water (1/4”) Drain Port © Copyright Borg & Overström. This manual is printed by Borg & Overström and shall not be reproduced or copied in anyway. Borg &... -
Page 3: Co2 Bottle Installation
CO2 Bottle Installation (Sparkling Versions Only) IMPORTANT! ALWAYS ENSURE SECURITY CLIPS ARE USED ON ALL WATER AND CO2 CONNECTIONS. C O L D Attach the regulator to the After completing the water disposable CO2 bottle, ensuring installation, turn on the soda the regulator is closed. -
Page 4: Level Sensor Assembly
Level Sensor Assembly (floor standing unit only) PANASONIC CR 2032 PANASONIC CR 2032 Unpack all contents. Unscrew lid, fit both batteries and refit lid. Exchange the drip tray. Connect the drainage tubing that is pre-fitted down the front left hand side of the cabinet. - Page 5 Operation Water Connection & Operation Connect and turn on the water All hot & non-sparkling cold supply. Then connect the power tanks must be purged of air supply ( N.B. sparkling variants by holding the corresponding will fill automatically). button. C O L D heating cold...
- Page 6 Water Connection & Operation (continued) C O L D heating cold chilling sparkling Flush through 10 litres of water When the cold water switch is turned on, the cold water and before use. chilling LED will be on. 10 c hour heating cold...
-
Page 7: Functions & Controls
Functions & Controls Hot Water Lock Button heating cold chilling sparkling Hot Water Sparkling Water Chilled Water Ambient Water Button (selected models) Button Button Button General Safety • Leave a space no less than 15cm between the wall and dispenser. •... -
Page 8: Isolation & Removal
Maintenance & Cleaning Isolation & Removal Please make sure the machine Turn off the water supply. is completely disconnected from electricity before carrying out any maintenance work. Cold water drain To drain the Direct Chill tank, remove the cap on the back of the machine. We recommend it is refitted immediately upon draining being completed. -
Page 9: Sanitisation Guide
Sanitisation Guide NOTE: Before beginning the sanitation process please ensure that water is turned off at the mains and refer to the MSDS document for further information. Use bioguard hand gel and ensure gloves are worn. cold chilling Add 25 ml of Bioguard Briefly press cold/ambient dispense button to release Internal Sanitisation fluid to... - Page 10 Sanitisation Guide (continued) When the external cleaning Remember to include the drip (minimum 5 minutes) is tray. If a Waste Overflow completed, flush the machine System is fitted, empty this using the cold button with and flush through with a small clean water until the dispense amount of sanitisation fluid if water runs clear.
-
Page 11: Leak Detection
Leak Detection (power cut off) -Sparkling Variants Only - Enhanced leak Detection (flood prevention) -Available as Optional Extra on all variants) NOTE: If this machine is equipped with a leak detection device. When leaking is detected the dispense operation will be cut off automatically. To reset: Unplug the machine. -
Page 12: Emptying The Carbonation Tank
Emptying the Carbonation Tank (if applicable). C O L D heating cold chilling sparkling Switch off the Carbonation Press and hold the Sparkling System switch on the back of water dispense button until all the unit. water is expelled The tank is empty of sparking Ensure to release the Sparkling water when only CO2 is being water button and take care to... -
Page 13: Troubleshooting
Troubleshooting Fault Diagnosis: Water Dispensing Issues Problem/Report Possible Cause Suggested Action No Water From Water Supply turned off. Check all Taps/valves/ filters on Ambient Valve incoming supply are fitted and are turned on. No Electricity/Power Check power cord connected and Supply. - Page 14 Water Dispensing Issues Continued Problem/Report Possible Cause Suggested Action Cold Water not Cold Fan not working. Check and replace, as required. Hot Water not Hot Heating cycle incomplete. Wait for heating LED to stop showing. High hot water usage. Advise user/s. Thermostat not working.
- Page 15 Fault Diagnosis: Miscellaneous Problem/Report Possible Cause Suggested Action Bleeping Noise Level Sensor fitted and Empty Level Sensor tank. tank full. No LED Control Lights No electricity to Machine. Check power supply and reconnect as necessary. Check Fuse in IEC Socket. Replace if necessary.
- Page 16 Borg & Overström Quick Start Guide...
Need help?
Do you have a question about the b4 and is the answer not in the manual?
Questions and answers