Advertisement
Available languages
Available languages
Quick Links
Advertisement

Related Manuals for Lionelo LUNA


Summary of Contents for Lionelo LUNA
- Page 1 User manual LUNA Stroller 3 in 1 EN PL RO HU...
- Page 2 Do not mount this safety seat on a car seat equipped with an active airbag! Note: Before using the product, please read the included user manual carefully. The user manual is an integral element of the product. Therefore, keep it with the packaging for future reference. Before using the product, please ensure that all the parts have been properly installed, tightened and secured.
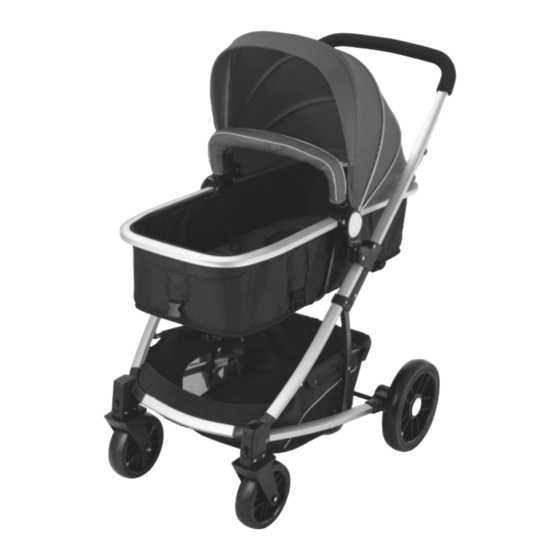
- Page 3 Main parts: Front wheel - 2 pieces Carrier Rear wheel - 2 pieces Main frame Installation guide: Unlock the side lock and lift the handle up. This way you will unfold the base of the stroller. The “click” sound indicates that the unfolded frame has been properly secured.
- Page 4 Installing rear wheels: Slide the stem of the back wheel into the guide. Push the wheel until you hear the “click” sound indicating that the stem has been properly locked by the trigger. Installing front protection bar: Slide the ends of the protection bar into the guides until they are locked by the triggers.
- Page 5 Front wheel turning locking: Press the lock at the front side of the front wheels in order to prevent them from turning. Move the lock up so that the wheels can be turned again. Brake: To engage the brake, press it with your foot. It is located next to the right rear wheel.
- Page 6 Disassembling the carrier: To remove the carrier from the main frame press the lock buttons located in the middle of the both sides of the carrier (please look at the pictures below): Lock button Installing the carrier on the main frame: Slide the carrier’s stem into the main frame.
- Page 7 Safety harness usage: To fasten the safety harness, insert the male end into the female one. To unfasten it, press the lock buttons on both sides of the male end and separate the ends: Folding the main frame In order to fold the main frame, move the locks on the bottom right and left side of the handle.
- Page 8 USING THE CARRIER: Car safety belt guide Hood Lock connector Car safety belt guide Removable padding Handle Carrier Car safety belt guide Removable padding base Handle adjustment: Press and hold the two side buttons located on the underside of the middle part of the handle. Then tilt the handle to the most suitable position.
- Page 9 Position 1 Handle adjustment button 3 positions of the carrier: Static • Position 1 Position 2 Swinging • Position 3 Carrying • Hood adjustment: Unfolding - folding 5-point safety harness: Place the connectors of the side safety belts in a way so that the left one is on the right one. Then, slide them into the buckle of the lower belt.
- Page 10 Installing the carrier in a car: a) Place the carrier on a car seat in a rear-facing position. Then, run the car safety belt through the upper guide: b) Run the safety belt through the rear guides, as shown in the picture below: c) Position the carrier.
- Page 11 All the pictures and information in the manual have been submitted for illustrative purposes only and are subject to change without prior notice.
-
Page 12: Instrukcja Obsługi
Instrukcja obsługi LUNA Wózek dziecięcy 3 w 1... - Page 13 Ten fotelik nie może być używany na siedzeniach samochodowych z włączoną poduszką powietrzną! Uwaga: Prosimy o uważne zapoznanie się z instrukcją obsługi prze użyciem zakupionego towaru. Instrukcja jest stałym elementem produktu. Dlatego też należy ją zachować wraz z opakowaniem tak, aby móc do niej powrócić.
- Page 14 Części podstawowe: Przednie koło - 2 sztuki Nosidełko/gondola Koło tylne – 2 sztuki Platforma wózka Instrukcja instalacji: Odbolkuj boczne zabezpiecznie i podnieś uchwyt do góry. Podstawa wózka rozłoży się. Kliknięcie będzie oznaczało prawidłowe zabezpieczenie przed złożeniem. Instalacja przednich kół. Włóż trzpień przedniego koła w prowadnice. Dociśnij koło do momentu zatrzaśnięcia trzpienia przez zapadkę, usłyszysz charakterystyczny dźwięk kliknięcia.
- Page 15 Instalacja tylnych kół. Włóż trzpień tylnego koła w prowadnice. Dociśnij koło do momentu zatrzaśnięcia trzpienia przez zapadkę, usłyszysz charakterystyczny dźwięk kliknięcia. Instalacja przedniego zabezpieczenia. Wsuń końcówki zabezpieczenia w prowadniki, do momentu zatrzaśnięcia zabezpieczeń. Używanie: Regulacja daszka. Aby rozłożyć daszek, pociągnij go do góry. Aby złożyć...
- Page 16 Blokowanie skrętu przednich kół. Wciśnij blokadę znajdującą się z przodu przednich, kół, aby zablokować skręt. Aby odblokować skręt kół, przesuń zabezpieczenie do góry. Hamulec. Aby użyć hamulca, wciśnij go nogą. Hamulec znajduje się przy prawym tylnym kole. Aby zwolnić hamulec, podnieś do góry. Zmiana wózka w spacerówkę.
- Page 17 Demontaż gondoli. Aby zdjąć gondolę z platformy wózka, wciśnij zabezpieczenia znajdujące się po obu stronach gondoli na środku (patrz zdjęcie): Przycisk zabezpieczający Montaż nosidełka na platformę wózka. Wsuń uchwyt nosidełka do platformy wózka. Sprawdź czy nie ma luzów i czy nie można zdjąć nosidełka.
- Page 18 Użycie pasów bezpieczeństwa. Aby zapiąć pasy, wsuń męską końcówkę w żeńską, aby rozłączyć wciśnij zabezpieczenia z obu stron na końcówce męskiej i rozsuń końcówki: Składanie platformy wózka. Aby złożyć platformę, przesuń oba zabezpieczenia znajdujące się po prawej i lewej dolnej stronie uchwytu.
- Page 19 UŻYWANIE NOSIDEŁKA: Prowadnica pasa bezpieczeństwa Baldachim samochodowego Zaczep blokady Prowadnica pasa bezpieczeństwa samochodowego Pokrowiec Uchwyt Obudowa Prowadnica pasa bezpieczeństwa Pokrowiec można nosidełka samochodowego zdjąć Regulacja uchwytu. Wciśnij jednocześnie oba przyciski znajdujące się z obu stron, na spodniej środkowej części uchwytu i przestaw kąt pochylenia uchwytu.
- Page 20 Pozycja 3 Przenoszenie • Regulacja baldachimu: Rozkładanie – Składanie Pięciopunktowe pasy bezpieczeństwa. Ustaw zaczepy pasów lewy na prawym i wsuń je w prowadnice dolnego zaczepu. Usłyszysz charakterystyczne kliknięcie, oznaczające poprawne zapięcie pasów. Aby rozpiąć pasy, naciśnij przycisk znajdujący się na środku dolnego zaczepu.
- Page 21 b) Przepuść pas przez prowadnice tylne, patrz zdjęcie: c) Ustaw nosidełko na miejscu, następnie natęż i zapnij pas. Użyte w instrukcji obsługi zdjęcia oraz informacje są poglądowe i mogą ulec zmianie bez wcześniejszego informowania o tym klienta.
-
Page 22: Manual De Utilizare
Manual de utilizare LUNA Carucior 3 in 1... - Page 23 Do not mount this safety seat on a car seat equipped with an active airbag! Nota: Inainte de utilizarea produsului, va rugam sa cititi cu atentie manualul de utilizare inclus. Manualul de utilizare este un element integral al produsului. Prin urmare, pastrati-l cu ambalajul pentru referinte ulterioare.
- Page 24 Partile principale: Roata frontala - 2 bucati Purtator Roata din spate - 2 bucati Cadru principal Ghid de instalare: Deblocati lateralele si ridicati manerul in sus. In acest fel veti elibera baza caruciorului. Sunetul de “click” va indica eliberarea cadrului, fiind securizat in mod corect.
- Page 25 Instalarea rotilor din spate: Glisati tija rotii din spate in ghidaj. Apasati roata pana cand auziti un sunet de “click”, indicand faptul ca tija a fost blocata in mod corespunzator de catre declansator. Istalati bara frontala de protectie: Glisati capetele barei de protectie in ghidaje pana cand sunt blocate de catre declansatoare.
- Page 26 Blocarea rotilor frontale: Apasati dispozitivul de blocare la partea din fata a rotilor frontale, pentru a le impiedica sa se roteasca. Mutati dispozitivul de blocare in sus, astfel incat rotile sa se poata roti din nou. Frana: Pentru a cupla frana, apasati cu piciorul. Este localizata chiar langa roata dreapta din spate.
- Page 27 Dezasamblaraea purtatorului: Pentru a detasa purtatorul de la cadrul principal, apasati butoanele de blocare situate in mijlocul ambelor parti ale purtatorului (va rugam sa priviti imaginile de mai jos): Buton de blocare Instalarea purtatorului pe cadru principal: Glisati tija purtatorului in cadrul principal.
- Page 28 Utilizarea hamului de siguranta: Pentru a fixa cablajul de siguranta, introduceti capatul tata in cel feminin. Pentru a-l dezlega, apasati butoanele de blocare de pe ambele parti ale capatului tata si se separa capetele: Plierea cadrului principal: Pentru a plia cadrul principal, mutati incuietorile in partea dreapta si stanga-jos a menerului.
- Page 29 UTILIZAREA PURTATORULUI: Ghid de centura de siguranta auto Conector de Capison blocare Ghid de centura de siguranta auto Captuseala detasabila Handle Baza Ghid de centura de siguranta auto Captuseala detasabila purtator Ghidaj de redare: Apasati și tineti apasat cele doua butoane laterale situate pe partea inferioara a partii de mijloc a manerului.
- Page 30 Pozitia 1 Buton de ajustare 3 pozitii ale purtatorului: Static • Pozitia 1 Pozitia 2 Leganat • Pozitia 3 Purtator • Ajustare copertina: Despachetare - pliere 5 puncte ale hamului de siguranta: Se pun conectorii centurilor de siguranta laterale intr-un mod, astfel incat cea din stanga este peste cea dreapta. Apoi, glisati-le in catarama centurii inferioare.
- Page 31 Instalarea purtatorului in masina: a) Se plaseaza purtatorul pe un scaun al masinii intr-o pozitie orientata spre spate. Apoi, rulati centura de siguranta auto prin ghidajul superior. b) Rulati centura de siguranta prin ghidajele din spate, precum in imaginea de mai jos: c) Pozitionati purtatorul.
- Page 32 Toate imaginile si informatiile din manual au fost prezentate doar pentru motive ilustrative si pot fi modificate fara o notificare prealabila.
-
Page 33: Használati Útmutató
Használati útmutató LUNA Babakocsi 3 az 1-ben... - Page 34 Do not mount this safety seat on a car seat equipped with an active airbag! Megjegyzés: Figyelmesen olvassa el a mellékelt használati útmutató a termék használata előtt. A használati útmutató szerves része a terméknek, ezért kérjük tartsa meg a csomagolással együtt. Használat előtt, győződjön meg róla, hogy az összes alkatrész megfelelően lett rögzítve.
- Page 35 Főbb elemek: Elülső kerék - 2 elem Hordozó Hátulsó kerék - 2 elem Főelem Telepítési útmutató: Oljda ki az oldalsó zárat és húzza felfelé a fogantyút. Így a babakocsi váza szétnyílik. Amikor egy „klikk” hangot hall, az jelzi a biztonságos rögzítést.
- Page 36 Hátsó kerék rögzítése: Csúsztassa az elülső kerék szárát a lyukba, majd nyomja a kereket, míg nem hall egy „klikk” hangot, ami jelzi, hogy a szár megfelelően rögzült. Elülső védőkar rögzítése: Csúsztassa a védőkar végeit a vázhoz, majd rögzítse őket. Használat: Tető...
- Page 37 Első kerék fordulásának zárása: Nyomja meg az első kerék felett található zárat a kerék forgásának zárásához. Nyomja fel a zárat és a kerék újra fordul. Fék: A fék működtetéséhez, nyomja meg a lábával azt. A fék a jobb hátsó kerék mellett található. A fék feloldásához szintén használja a lábát.
- Page 38 Hordozó szétszedése: A hordozó a főrésztől való elválasztásához nyomja meg a hordozó közepén mindkét oldalt található gombokat (lásd a képek alább): Zár gomb Hordozó rögzítése a főrészhez: Csúsztassa a hordozó szárát a főrészbe. Győződjön meg róla, hogy nem laza és a hordozó megfelelően van rögzítve.
- Page 39 Biztonsági heveder használata: A biztonsági heveder rögzítéséhez a két véget helyezze össze a szokott módon. A kioldáshoz nyomja meg az oldalán található gombokat és húzza szét őket: Váz/Főrész összecsukása: a váz összecsukásához a jobb és a bal oldalon található zárat oldja ki. Majd az összecsukja össze a vázat, ahogy a képen is látható.
- Page 40 HORDOZÓ HASZNÁLATA: Autós biztonsági őv vezetése Tető Zár csatlakozó Autós biztonsági őv vezetése Eltávolítható párna Markolat Hordozó Autós biztonsági őv vezetése Eltávolítható párna váz Tető beállítása: Tartsa nyomja a középrész alján mindkettő oldalán található gombot, majd döntse a kívánt pozícióba. Három pozíció érhető...
- Page 41 Hordozó 3 pozíciója: Alaphelyzet • 1. pozíció 2. pozíció Ringató • 3. pozíció Hordozó • Tető beállítása: Nyitott - összecsukott 5-pontos biztonsági öv: Helyezze az oldalsó biztonsági övek csatlakozóit úgy, hogy egy a jobb és egy a bal oldalon legyen. Majd csúsztassa őket a csatig, amikor meghallja a „klikk”...
- Page 42 Hordozó autóba történő behelyezése: a) Helyezze a hordozó az ülésre hátrafelé néző pozícióba. Majd a gépjármű biztonsági övét húzza át ahogy a képen látható: b) Húzza át a biztonsági övet a hátsó részen is, ahol a képen látható: c) Helyezze el a hordozót, majd csatolja be az autó biztonsági övét.
- Page 43 Polska Declare the following apparatus: Products name: Baby stroller 3in1 Brand and Model name: LO-Luna Below standards were tested and passed: R 44 2008+CORRI2009+ CORRI2O1O+CORRI2O1 1 Release date: 21.09.2015 May be sold in: BE CZ DK DE EE IE EL ES FR HR IT LV LT HU MT NL AT PL PT RO SI SK FI SE UK The original document is located in the headquarter BrandLine Group Sp.
Need help?
Do you have a question about the LUNA and is the answer not in the manual?
Questions and answers