The Splash Lab TSL.R.010 Series Installation & Maintenance
Ribbon soap dispenser
Hide thumbs
Also See for TSL.R.010 Series:
- Installation & maintenance (21 pages) ,
- Installation & maintenance (20 pages)
Table of Contents
Advertisement
Advertisement
Table of Contents

Related Manuals for The Splash Lab TSL.R.010 Series


Summary of Contents for The Splash Lab TSL.R.010 Series
- Page 1 TSL.R.010 ribbon soap dispenser...
-
Page 2: Table Of Contents
contents Safety and Warnings Box Contents Technical Data Before You Install How to Install Commissioning Operation Maintenance Cleaning Troubleshooting Diagram Warranty Back Cover Contact Details TSL.R.010 RIBBON SOAP DISPENSER MANUAL... - Page 3 TSL.R.010 ribbon soap dispenser Read and save these instructions WARNING To reduce the risk of fire, electric shock or injury to persons, observe the following: Use this unit only in the manner intended by the manufacturer. If you have any questions, contact the manufacturer (see back page for details) This equipment should be installed in a way that ensures all electrical parts are kept dry.
-
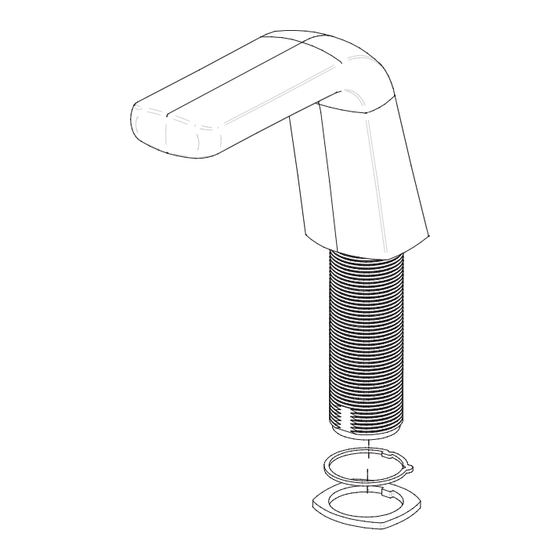
Page 4: Box Contents
box contents Dispenser head assembly Anti-rotation collar (already installed) Gasket Anti-rotation washer Fixing nut Soap foaming chamber pipe-set Soap supply pipe – 3 metres Soap reservoir – 1 litre Hex wrench Soap foamer pump unit Power supply unit TSL.R.010 RIBBON SOAP DISPENSER MANUAL... -
Page 5: Technical Data
technical data Finishes TSL.R.010.C Bright Polished Stainless steel TSL.R.010.CS Brushed Stainless steel TSL.R.010.CP Brushed Copper TSL.R.010.BK Brushed Black TSL.R.010.BR Brushed Brass TSL.R.010.BZ Brushed Bronze Voltage 220 - 240V ac; 50/60Hz Power consumption Standby power 0.3A Weight 2lb 3oz Material AISI 304 stainless steel Sensor range Min range 2 3/8”... -
Page 6: Before You Install
Basins with other units from the Ribbon range, these should be fitted at 140mm centres Use of a The Splash Lab Monolith basin is recommended for use with the Ribbon range of products. If an alternative basin is used, then... - Page 7 before you install FRONT SIDE 6-3/4" 4-15/32" Default S ensor R ange Ø 1-11/32" 2-3/4" 3/8" MIN THR OUGH HOLE 1-3/8" MAX Ø 1-1/4" 2-23/32" TUBE LE NGTH Power S upply TSL.R.010 RIBBON SOAP DISPENSER MANUAL...
-
Page 8: How To Install
how to install Drill hole 1 5/16” diameter in vanity top, if Fit anti-rotation washer from below basin not already cut. TSL.R.010 RIBBON SOAP DISPENSER MANUAL... - Page 9 Fit fixing nut, and secure using spanner. Mark wall in desired location for pump mounting bracket . TSL.R.010 RIBBON SOAP DISPENSER MANUAL...
- Page 10 how to install Fit the pump bracket using appropriate Fit the soap foamer pump unit to the fixings. bracket TSL.R.010 RIBBON SOAP DISPENSER MANUAL...
- Page 11 Connect the sensor cables from the Connect the soap foamer pipeset to the dispenser head to the corresponding dispenser head, and the two inlet pipes cables from the soap foamer pump, and to 2 pipe fittings on the top of the soap the power supply cables.
- Page 12 how to install Connect the soap pick-up pie to the bttom of the soap foamer unit, and fit the opposite end of the pipe to the soap reservoir. TSL.R.010 RIBBON SOAP DISPENSER MANUAL...
-
Page 13: Commissioning
commissioning Before powering on, remove the label covering the sensor. Switch on the power supply at the fused spur or socket. Turn on the pump by turning the Duration dial clockwise. Depress and hold the ‘Prime’ button until soap is dispensed. Activate the dispenser by placing your hand underneath the sensor to check the volume of soap that is dispensed from the nozzle. - Page 14 Resetting the sensor can lead to errors in the system with unnecessary activations or poor sensitivity. If you are considering altering the pre-set sensor settings, we recommend calling The Splash Lab for assistance (see back page). TSL.R.010 RIBBON SOAP DISPENSER MANUAL...
-
Page 15: Operation
operation The user is to place their hands under the sensor to activate the dispenser. The user then places their hands within the detection range of the sensor to activate the hand dryer. The motor will start and soap is dispensed onto the user’s hands. The motor will stop when the user’s hands are removed from the detection range. -
Page 16: Cleaning
If further information is required, contact The Splash Lab technical team for more detailed stainless-steel care guidelines. TSL.R.010 RIBBON SOAP DISPENSER MANUAL... -
Page 17: Troubleshooting
troubleshooting Corrective Actions for Initial Installation Failures If the dispenser will not run Ensure that there is power to the dispenser and that the PSU is connected correctly to the pump motor. Check that the sensor cables are fully connected to the corresponding cables from the foam pump unit If the dispenser can be heard to operate, but soap is not dispensed Check that the soap pick-up pipe is fully immersed in the soap in the reservoir. -
Page 18: Diagram
diagram Dispenser head assembly Soap foaming chamber pipe-set Soap supply pipe - 10 feet Soap reservoir - 1 litre Soap foamer pump unit Power supply unit TSL.R.010 RIBBON SOAP DISPENSER MANUAL... -
Page 19: Warranty
Ribbon Collection 3 years’ parts & labour If a defect is found in normal use, The Splash Lab will, at their discretion, repair, provide a replacement part or product, or make appropriate adjustments. Damage caused by accident, misuse, or abuse is not covered by this warranty. Improper care and cleaning will void the warranty. - Page 20 contact General information +1 310 410 5008 5450 W 83rd St, Los Angeles CA90045 500 7th Ave, New York NY10018 Technical support technical@thesplashlab.com For further contact information visit: www.thesplashlab.com...
Need help?
Do you have a question about the TSL.R.010 Series and is the answer not in the manual?
Questions and answers