Table of Contents
Advertisement
Available languages
Available languages
Quick Links
Advertisement
Chapters
Table of Contents

Related Manuals for PRESIDIUM Synthetic Ruby Identifier


Summary of Contents for PRESIDIUM Synthetic Ruby Identifier
- Page 2 Language Contents Language 1. English 2. Chinese 3. French 4. German 5. Italian 6. Russian 7. Spanish...
- Page 3 Synthetic Ruby Identifier by Presidium User Handbook (English)
-
Page 4: Table Of Contents
Ruby Identifer V. Important Notice 1. GETTING STARTED with your Synthetic Ruby Identifier 2. PERFORMING A TEST with your Synthetic Ruby Identifier 3. READING TEST RESULTS on your Synthetic Ruby Identifier 4. OVERVIEW OF INDICATORS on your Synthetic Ruby Identifier... -
Page 5: Disclaimers, Exclusions And Limitations Of Liability
Users are advised to check Presidium’s website from time to time http://www.presidium.com.sg/ Presidium shall not be responsible for any damage or loss resulting from the use of this product or handbook. -
Page 6: About This Book
Presidium in collaboration with the renowned Gem and Jewelry Institute of Thailand (GIT) near the traditional source hub of rubies, the Synthetic Ruby Identifier is a breakthrough in the development of gemological instruments, as it is the world’s first and only tool, aside from expensive laboratory equipment, that identifies certain common synthetic rubies. - Page 7 The Synthetic Ruby Identifier features a deep-wave UV light that is activated to pass through the ruby towards the photo-detector on the base platform. Bars of coloured light on the front of the lid will provide an easy reading that indicates if the UV light transmittance ability of the tested ruby is high or low.
- Page 8 The capabilities of the Synthetic Ruby Identifier are as follows: • Help to identify most synthetic flame fusion rubies • Tests on rubies within a range in dimension from 3 mm in width and up to 6mm in height (approx. 0.1 to 6 carat size) •...
- Page 9 • UV-sensitive Photo-detector in the centre of base platform to detect the amount of light that passes through the stone The connectivity functions of the Synthetic Ruby Identifier include: • Exterior USB port at back of unit for connecting to external power source or computer •...
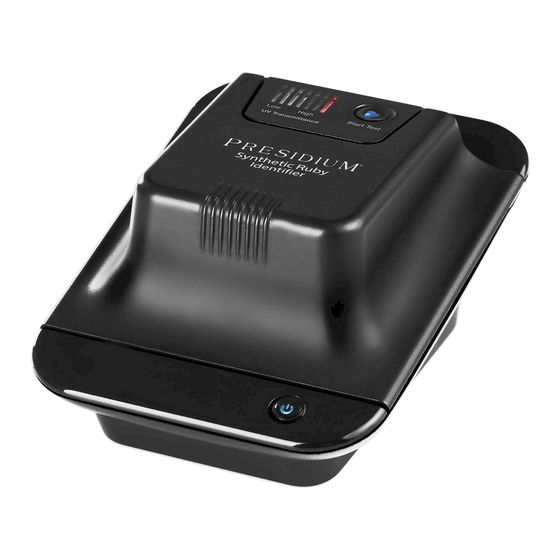
- Page 10 Fig.A Synthetic Ruby Identifier Unit Features/Functions (Fig.A) 1. Power button (On/Off, Low Battery Indicator and Bluetooth Connectivity Indicator) 2. Lid Base platform with concentric markings 4. Photo-detector 5. Interior LED Light Source with Ring Guide embossed on top 6. Light Source Lever to adjust Light Source 7.
-
Page 11: Background And Development Of Presidium Synthetic
With the knowledge of this, Presidium set out to work on researching more about synthetic rubies and developing a device that can aid in... -
Page 12: Important Notice
Working closely with researchers at GIT who readily shared their gemmological knowledge, testing trials for the Synthetic Ruby Identifier were also conducted by GIT for Presidium. V. Important notice • Keep the device dry. Precipitation and all types of liquids or moisture can contain minerals that will corrode electronic circuits. - Page 13 If the device is not working properly, kindly contact Presidium Customer Service at service@presidium.com.sg or: Presidium Instruments Pte Ltd Unit 7, 207 Henderson Road Singapore 159550 Attn: Customer Service Executive...
-
Page 14: Getting Started With Your Synthetic Ruby Identifier
Synthetic Ruby Identifier 1.1 Powering up your device The Synthetic Ruby Identifier can be powered either by the use of batteries or through the USB cable connected to the Presidium Universal Power Adaptor that are both included with your product, or to an external power source. - Page 15 You may also connect the other end of the USB cable directly to an external power source (e.g. computer, laptop, etc). It is recommended you use only the USB cable and the Presidium Universal Power Adaptor provided with your product.
- Page 16 1.2 Switching on your device To switch on your Synthetic Ruby Identifier, press and hold the Power button located at the front of the unit. A blue light will blink for approximately 20 seconds to allow the product to warm up. (Fig 1.3).
- Page 17 1.3 Switching off your device and Power-Saving Auto-Off To switch off your Synthetic Ruby Identifier, press and hold the Power button for approximately 2 seconds until the light goes off. To ensure that your Synthetic Ruby Identifier conserves power, the unit will automatically switch off 10 minutes after the last activity.
- Page 18 It is recommended that batteries should be removed when the device is expected to be stored for an extended period of time. Batteries do not have to be removed from the unit when the Presidium Power Universal Adaptor is used through the USB cable.
-
Page 19: Performing A Test With Your Synthetic Ruby Identifier
Once you know your stone is a ruby, you can proceed to use the Synthetic Ruby Identifier to check if it is a synthetic flame fusion ruby. The “Start Test” button located at the top right corner of the device indicates when the device is ready for testing and activates the interior LED light source to begin the identifying procedure. - Page 20 Once the device is ready for testing, use the finger grips on the front of the lid to lift the lid and access the interior testing area. (Fig 2.2) Fig.2.2 Lift the lid of the device using the finger grips on the front...
- Page 21 The testing is performed under the lid of the Synthetic Ruby Identifier where a testing area is marked by a concentric-circled base platform with a Photo-detector in the centre and a protruding overhead LED light source (Fig 2.3). Fig.2.3 The interior testing area inside the device The following instructions will guide you through testing loose gemstones and mounted jewelry.
- Page 22 2.1 For testing on loose gemstones Ensure your loose gemstone is wide enough to cover the Photo- detector. It should be approximately 3mm in width. Your loose gemstone should also not exceed 6mm in height to ensure that the UV wavelength transmitted by the LED light source can be accurately measured.
- Page 23 Always place the flattest face of the stone on the Photo-detector. To understand your test results, refer to Section 3 in this book – “Reading test results on your Synthetic Ruby Identifier”.
- Page 24 2.2 For mounted jewelry or gemstones Ensure that the stone is set with an open-back setting, meaning you can still see a clear view and colour of the stone when you view the back of it and it is not obscured by the jewelry metal or other stones. (Fig 2.6).
- Page 25 With the ring hung within the Ring Guide area, use the lever to lower the LED light source to secure the stone over the Photo-detector (Fig 2.7). Fig.2.7 Place open-back ring jewelry on the Ring Guide on the LED light source and push the LED light source down to secure the stone against the Photo-detector If your gemstone is mounted with open-back setting in other types of jewelry that cannot be placed over the Ring Guide, place the jewelry...
- Page 26 7 Indicator Lights. You should see your results within 2 seconds. To understand your test results, refer to Section 3 in this book – “Reading test results on your Synthetic Ruby Identifier”. 2.3 Important Notes about Performing a test •...
-
Page 27: Reading Test Results On Your Synthetic Ruby Identifier
3. Reading Test Results with your Synthetic Ruby Identifier The Synthetic Ruby Identifier measures the UV transmittance ability of the stone and this measurement is communicated as a low or high reading displayed through the 7 Indicator Light bars on the front of the device. - Page 28 Low Reading The first 4 bars from the left fall within the Low reading range and if any measurements within this range is recorded, a blue light will light up within these 4 bars (Fig 3.2). High High Start Test UV Transmittance UV Transmittance Fig.3.2 Low Reading...
- Page 29 The tested ruby is hence likely to be a synthetic flame fusion ruby. You can use the Synthetic Ruby Identifier to quickly sort through a parcel of ruby stones and identify which ones are synthetic flame...
-
Page 30: Overview Of Indicators On Your Synthetic Ruby Identifier
4. Overview of Indicators on your Synthetic Ruby Identifier The table below summarizes the functions and representations of the buttons and lights on the Synthetic Ruby Identifier device. Power Button Description Light Function Power Button is Blinking blue Device is being switched on pressed and held and will start warming up. - Page 31 Start Test Button Description Light Function Ready for testing Steady blue Device lid is closed and ready for testing with the interior LED light source switched off. Note: The Start Test button will not light up when the device lid is open. Testing is underway Blinking white Device is conducting the test...
-
Page 32: Taking Care Of Your Synthetic Ruby Identifier
5. Taking care of your Synthetic Ruby Identifier The Synthetic Ruby Identifier should be handled with care. Always cover it or place it securely in its custom carrying case when the device is not in use. Caution should be taken so as not to damage the device. - Page 33 Presidium 合成红宝石鉴定仪 用户手册(中文版本)
- Page 34 目录 中文版本 页数 I. 免责声明、例外情形以及责任范围 II. 关于本手册 III. 关于PRESIDIUM合成红宝石鉴定仪 IV. PRESIDIUM合成红宝石鉴定仪的背景及开发 V. 重要须知 1. 合成红宝石鉴定仪使用入门 2. 使用合成红宝石鉴定仪执行测试 3. 读取合成红宝石鉴定仪的测试结果 4. 合成红宝石鉴定仪指示灯概述 5. 合成红宝石鉴定仪的维护...
-
Page 35: 免责声明、例外情形以及责任范围
I. 免责声明、例外情形以及责任范围 请查阅并注意保修卡中说明的PRESIDIUM保修条款和条件。 Presidium对其设备的保修承诺仅适用于用户按照相关用户手册中 所注明的所有条款和条件正确使用的情况,并且只涵盖制造缺陷。 由于产品的不断改进,Presidium保留对所有文件进行修改的权利, 包括对本手册进行修改的权利,恕不另行通知,亦不承担通知任何人 此类修改或变更的义务。建议用户不定期查阅Presidium的官方网站: http://www.presidium.com.sg/ Presidium对因使用本产品或本手册而导致的任何损害或损失概不负责。 对于任何因使用本设备而导致的直接或间接的损失,Presidium、其制造 商或其任何附属公司、授权人、分销商、经销商、雇员和/或代理人在任 何情况下概不承担任何责任。 在适用法律允许的最大范围内,对于任何原因导致的任何特殊、偶然、 附带或间接损失,Presidium、其制造商或其任何附属公司、授权人、 分销商、经销商、雇员和/或代理人在任何情况下概不承担任何责任。 本手册中的Presidium合成红宝石鉴定仪(Synthetic Ruby Identifier;“SRI”)是在“原样”的基础上提供和/或出售。除了按照适 用法律要求之外,不提供任何形式的明示或暗示的保证,包括但不限于 针对特定用途的适销性和适用性的默示保证。... -
Page 36: 关于本手册
II. 关于本手册 感谢您购买Presidium出品的全球首款而且也是唯一的一款合成红宝石 鉴定仪(以下简称“设备”)。 本手册旨在帮助您设置设备,并介绍了所有您需要了解的信息,如怎样 正确使用该宝石测试设备以及如何按照要求进行维护。请仔细阅读这些 说明,并妥善保管以备日后参考。 本手册还包括与使用该设备有关的条款及条件,包括上文第一节中所述 的免责声明、例外情形以及责任范围。 III. 关于Presidium合成红宝石鉴定仪 Presidium合成红宝石鉴定仪(“SRI”)是一种用于帮助鉴定红宝 石中的合成红宝石(通过火焰熔融法制造)而开发的革命性设备。由 Presidium与著名的泰国宝石首饰学院(Gem and Jewelry Institute of Thailand; GIT)合作研发的合成红宝石鉴定仪,是宝石学仪器发展中的 一次重大突破,因为它是全球首款、也是唯一的一款除了昂贵的实验室 设备之外,可用于鉴定某些常见的合成红宝石的工具。 合成红宝石鉴定仪设计用于测试已知的红宝石以及从天然或其他形式的 合成红宝石中区分出采用火焰熔融法合成的红宝石。确定宝石是否是红 宝石的方法之一,是测量宝石的导热率。如果宝石是红宝石,合成红宝 石鉴定仪可用于进一步检查它是否是火焰熔融法合成的红宝石。 当宝石在深波紫外线照射下时,其光透射率存在显著的差异。利用这一 知识,可帮助我们区分已知的红宝石。合成红宝石鉴定仪测量红宝石的 紫外线光透射能力,因为研究 发现,火焰熔融法合成的红宝石在深波 紫外线照射下始终更加通透。 该合成红宝石鉴定仪拥有一个深波紫外线灯。该灯启动后,紫外线穿过 红宝石射向基座平台上的光检测器。盖子前方的彩色发光条将提供一个 简单的读数,表明所测试的红宝石的紫外线光透射能力是高还是低。通 常情况下,天然红宝石由于内部含有可吸收深波紫外光的微量元素,因 而紫外线透射率较低。其他类型的合成红宝石(如那些通过助熔剂法 和水热法合成的红宝石)则视形成过程中是否存在过渡金属离子而定, 紫外线透射能力可高可低,因此该设备无法准确地识别出这些合成红宝 石。采用火焰熔融法合成的红宝石是合成红宝石中最常见的类型。由 于这种合成红宝石相对而言拥有比较“纯”的熔体形成过程,因此通... - Page 37 以用户为导向开发的合成红宝石鉴定仪,其设计允许对单个镶嵌红宝石 (采用开背设置)和未镶嵌的红宝石进行非常快速的甄别,以确定它们 是否是火焰熔融法合成的红宝石。鉴定器重量轻、携带方便、坚固耐用 且配有防滑设计,可通过4节AAA电池或其USB接口连接至外部电源来 供电。 合成红宝石鉴定仪已经通过同泰国宝石首饰学院合作进行的、彻底而广 泛的实验室测试,而且对用于测试的红宝石通常都会给出明确且可靠的 读数。该设备仅限于帮助鉴定特定类型的合成红宝石;如需进一步确定 所测试的红宝石是天然的还是其他形式的合成红宝石,建议您进行进一 步的支持测试。 设备的设计目标如下: • 帮助用户从已知的红宝石中进一步快速的鉴定出一种类型的常见合成 红宝石— 火焰熔融法合成的红宝石 • 通过筛选出一种类型的合成红宝石,帮助进一步鉴定出天然红宝石 • 在正确使用并理解其功能的条件下,提供一致且可靠的测试结果 • 采用符合用户安全性的材料和人性化的人体工程学设计,提供清晰可 见的结果、最佳的坚固性和抓取力、易用性和便携性 合成红宝石鉴定仪的功能如下: • 帮助鉴定大多数采用火焰熔融法的合成红宝石 • 可对宽3毫米、高6毫米以内的红宝石(大约0.1-6克拉大小)进行测试 • 对打磨为常见形状的红宝石进行测试,如圆形切割、椭圆形切割、公 主方形切割、圆钻型切割、祖母绿形切割、长阶梯形切割、方形明亮 切割、阶梯式切割及混合切割 • 能够用于未镶嵌的红宝石和已经镶嵌在珠宝上的红宝石(采用开背设 置) • 可在瞬间完成测试 警告:用户不可在以下情况下使用合成红宝石鉴定仪,因为这样可能会 影响读数的准确性: × 未知的宝石(用户应只对已知的红宝石进行测试) ×...
- Page 38 • 10分钟无操作后自动断电节能装置 • 内部LED光源和测试区 • 当设备的盖子处于打开状态或是未启动“开始测试” 按钮时,内部 LED光源会自动关闭电源以节省电力 内部LED光源和测试区特点: • 紫外线光源预先设定在最佳波长,以精确的测量红宝石的光透射能力 • 光源插销确保光源能够在日后进行拆卸/更换/变更 • 简单易用的控制杆,可确保宝石在基座上定位 • 位于光源上的环状指导位置标记 • 同心圆标记出测试区中用于放置宝石的基座 • 在基座中心的紫外线敏感的光检测器,用于测试透过宝石的紫外光 的量 合成红宝石鉴定仪的连接功能包括: • 位于设备背面的外部USB接口用于连接至外部供电或电脑 • 兼容国际电压 包装内包括: • Presidium合成红宝石鉴定仪 • 带内部配件袋的保护套 • USB连接线 • Presidium通用电源适配器 • 包含7种语言的用户手册 • 保修卡...
- Page 39 图A:合成红宝石鉴定仪 特色/功能(图 A) 1. 电源按钮(开启/关闭、电池低电量指示灯和蓝牙连接指示灯) 2. 盖子 3. 带有同心圆标记的基座 4. 光检测器 5. 顶部带有环状指导压纹的内部LED光源 6. 用于调整光源的光源控制杆 7. LED光源更换插销 8. “开始测试”按钮 9. 从低到高测量紫外光透射率的7个指示灯条 10. 微型USB接口...
-
Page 40: Presidium合成红宝石鉴定仪的背景及开发
规格 长 130毫米 宽 100毫米 高 65毫米 不含电池的重量 210克 包含电池的重量 250克 电源 4节AAA电池 或通过USB线缆连接至外 部电源供电 IV. Presidium合成红宝石鉴定仪的背景及开发 有色宝石的世界是一个璀璨夺目但又具有一些神秘感的世界。不像钻石 那样有一个基于颜色、切工、净度和颜色的既定分级系统,有色宝石没 有类似的通用评估体系。此外,宝石的可见颜色范围可能跨越宝石及半 宝石两个范畴,让一些人很容易将两者混淆。而同样丰富多彩的合成材 料的发现可能也削弱了珍贵有色宝石的升值空间和真实性,特别是刚玉 宝石 — 蓝宝石和红宝石。 自古以来,红宝石以其令人惊叹的红色身影让很多人深深为之痴迷。随 着对红宝石推崇的流行,红宝石早在19世纪就已经采用维尔纳叶工艺进 行了人工合成,创造出一种被称为火焰熔融的合成红宝石。凭借其简单 的工艺、低成本和令人信服的成果, 即便在现在, 它仍然是使用最为 广泛的人工红宝石合成工艺,并且火焰熔融合成红宝石如今仍然是市场 上最常见的合成红宝石。 这些年来,随着合成方法和技术愈发成熟,其他的晶体形成过程,如助 溶剂法或水热法又被陆续发现。市场上现有开发出的用于鉴定这些合成 宝石的方法往往只局限于训练有素的宝石学专家,或是昂贵实验室设备 的使用,因而大多数的购买者难以确定在市场上推出、销售的红宝石是 否是合成红宝石或是混了合成宝石的天然红宝石。 依据这一认识,Presidium着手开展更多关于合成红宝石的研究以及开 发能够帮助用户快速识别出此类红宝石的设备。... -
Page 41: 重要须知
众所周知,由于天然红宝石中通常会存在杂质或过渡金属离子,所以这 些宝石能够吸收深波紫外光。因此,天然红宝石的紫外线透射能力较 低。而对于火焰熔融合成的红宝石则通常不含这些微量元素或杂质。 因此,火焰熔融合成的红宝石的紫外线透射能力较高,能够使紫外线波 长穿过宝石。 在与泰国宝石首饰学院 (GIT) 分享该知识后,学院认可并同意利用 UV- VIS-NIR 光谱仪测量透射的方法来鉴定合成红宝石和天然红宝石。 由于相信这是一种用于识别特定宝石的全新方法,泰国宝石首饰学院 (GIT) 还借给Presidium充足式样及数量的天然红宝石和合成红宝石,用 于测试和鉴定实验。Presidium 得以使用合成红宝石鉴定仪测试这些宝 石,并使用GIT先进的实验室设备对已测试的宝石进行确认。Presidium 同GIT的研究人员紧密合作,分享他们的宝石学知识,并且对合成红宝 石鉴定仪的测试试验也由GIT为Presidium进行 。 对于泰国宝石首饰学院(GIT)在科研方面的协作以及Presidium之后 用于设计和开发本产品的测试技术方面的改进,Presidium谨此向表示 感谢。 V. 重要须知 • 保持设备干燥。降水和各种液体或水分都可能含有矿物质,会腐蚀 电路。如果设备被打湿,请取出电池,并在重新装上电池前让设备 完全干燥。 • 切勿在有灰尘或肮脏的环境中使用、储存本设备、或是将本设备暴露 于此类环境中。设备的可拆卸部件和电子元件可能会损坏。 • 切勿在过热的环境中使用、储存本设备、或是将本设备暴露于此类 环境中。高温会损坏或缩短设备的寿命、损坏电池、弄弯或熔化某 些塑料。 • 切勿在寒冷环境中使用、储存本设备、或是将本设备暴露于此类环 境中。当设备返回到其正常温度时,设备内部会形成潮气,进而损 坏电路板。... - Page 42 如果设备无法正常工作,请发送电邮至service@presidium.com.sg 联络Presidium客户服务中心,或联络 Presidium Instruments Pte Ltd Unit 7, 207 Henderson Road Singapore 159550 Attn: Customer Service Executive...
-
Page 43: 合成红宝石鉴定仪使用入门
1. 合成红宝石鉴定仪使用入门 1.1 启动设备 合成红宝石鉴定仪可以使用电池、或通过USB线缆连接至Presidium通 用电源适配器(包含在该产品中),或是通过USB线缆连接至外部电 源供电。 如果使用电池供电,您可以在设备底部安装电池。松开电池盖上的两个 锁扣,取下电池盖,露出电池槽。(图1.1) 设备需要4节AAA电池供电。将电池插入设备时,请注意电池的正极 (+) 和负极 (-) 方向。推荐使用碱性电池,因为碱性电池通常可以连续工作 大约2.5小时,进行大约900次测试。 图1.1:取下电池盖,露出电池槽... - Page 44 如果使用外部电源,请将提供的微型USB线缆连接至位于设备背面的接 口(图1.2),线缆另一端连接至所提供的Presidium通用电源适配器, 该电源适配器则连接至外部电源插座。 图1.2:将微型USB线缆插入位于设备背面的接口 您也可以将USB线缆的另一端直接连接到外部电源(如电脑、笔记本 电脑等)。 我们建议您仅使用本产品随附的USB线缆和Presidium通用电源适配 器。...
- Page 45 1.2 开启设备 长按位于设备正面的电源按钮,以开启合成钻石筛选器。其蓝色指示灯 将闪烁大约20秒,以提示产品正在预热(图1.3) 一旦蓝色指示灯停止闪烁并保持稳定,设备就可以使用了。 High Start Test UV Transmittance 图1.3:使用电源按钮启动合成红宝石鉴定仪...
- Page 46 1.3 关闭设备和节能自动关闭 按住电源按钮大约2秒,直至指示灯熄灭,即可关闭合成红宝石鉴定 仪。 为了节约合成红宝石鉴定仪的电量,设备将在最后一次活动操作10分 钟后自动关闭。 1.4 电池低电量指示灯 当电池电量过低,不足以维持设备执行功能操作时,电源按钮指示灯 会变成红色。 High Start Test UV Transmittance 图1.4:电量过低时电源按钮指示灯变为红色...
- Page 47 当电池低电量指示灯呈红色时,该设备将不能进行任何更多的测试,并 且设备内部的LED光源也将无法开启。 必要时,更换电池或切换为外部电源供电。 电池信息 切勿将电量耗尽的电池留在电池仓内,因为电量耗尽的电池可能会腐蚀 或漏液,进而损坏设备的电路。当设备预计将被存放较长时间时,建议 应将电池移除。 当通过USB线缆使用Presidium 通用电源适配器时,电池不必从设备 中取出。 1.5 电源按钮概述 关于电源按钮及其功能的完整概述,请参阅本手册第5节 - “合成红宝 石鉴定仪上指示灯的概述”。...
-
Page 48: 使用合成红宝石鉴定仪执行测试
2. 使用合成红宝石鉴定仪执行测试 合成红宝石鉴定仪只能对已知的红宝石进行准确的测试,并从已知的红 宝石中鉴定出常见的火焰熔融合成红宝石。 在开始测试前,请首先确定您正在测试的红色宝石的类型是已知的红宝 石。有许多方法可依据红宝石的固有特性检查该红色宝石是否为红宝 石。您可以选择的方法之一是使用Presidium 宝石测试仪(Presidium Gem Tester)/有色宝石评估仪(Colored Stone Estimator),针对宝 石的热传导特性进行测试。如果该红色宝石测试结果在红宝石-蓝宝石 的范围内,那么这块宝石很可能是红宝石。 一旦您确认该宝石是红宝石,就可以使用合成红宝石鉴定仪继续检查它 是否是人工合成的火焰熔融合成红宝石。 请确保您的红宝石是洁净的,尤其是如果它被镶嵌在首饰上作为珠宝使 用时,通常这块红宝石都会有油或粉末微粒。红宝石亭面上的这种颗粒 可能会影响测试的准确性。 位于设备右上角的“开始测试”按钮指示设备准备进行测试,并在启动 内部的LED光源后可开始鉴定程序。 按下“开始测试”按钮,该按钮将变为蓝色。这表示该设备已经为开始 测试做好了准备。(图2.1) 只有在“开始测试”按钮亮起稳定的蓝色时,方可使用设备进行测试。 High Start Test UV Transmittance 图2.1:按下“开始测试”按钮以进行测试... - Page 49 一旦设备已为测试做好准备,利用盖子前部的指状夹抬起盖子以使用内 部的测试区。(图2.2) 图2.2:利用前部的指状夹抬起设备的盖子...
- Page 50 在合成红宝石鉴定仪下方标记出的测试区,通过在中央的配有光检测器 带同心圆的基座和一个突出的顶部LED光源进行测试(图2.3)。 图2.3:设备内部的内部测试区 下列说明将指导您完成对未镶嵌宝石和镶嵌宝石的测试。...
- Page 51 2.1 对于未镶嵌的宝石 请确保该未镶嵌的宝石的宽度足以覆盖光检测器。它的宽度应大约3毫 米。该未镶嵌的宝石的高度不能超过6毫米,以确保LED光源发射的紫 外线波长可以被精确测量。 请将未镶嵌的宝石放置于光检测器上(图2.4)。 图2.4:将未镶嵌的宝石放置在光检测器上 宝石平坦的侧面应面朝下放置在光检测器上。请确保光检测器被宝石完 全覆盖,以使所发射的波长能通过石材。 倘若宝石不能完全覆盖光检测器,则所发射的紫外线光将不能穿过宝 石,而是到达光检测器,从而给出的该宝石材料紫外光投射能力的读数 将会不准确。...
- Page 52 调节控制杆以降低LED光源高度并将宝石在光检测器上固定就位,以便 进行测试(图2.5)。 图2.5:向下调节LED光源,以便将宝石在光检测器上固定就位 合上盖子,并按下 “开始测试” 按钮。 在运行测试时,该按钮将会闪烁白色光。当测试完成后,该按钮会亮起 稳定的白色光,并将用7个指示灯显示测试结果。您应在2秒钟以内就可 看到测试的结果。 建议用户将每颗红宝石放在至少4个不同的位置上进行测试,因为测试 的结果可能会受到红宝石位置的影响。请始终将宝石的平坦面朝向光 检测器。 如欲了解您的测试结果,请参阅本手册第3节 - “读取合成红宝石鉴定 仪的测试结果”。...
- Page 53 2.2 对于镶嵌首饰或宝石 请确保宝石使用开背设置,这意味着当您查看它的背面时,您仍然可 以清楚地看到宝石和它的颜色,而不是被金属饰品或其他宝石挡住。 (图2.6) 图2.6:一个采用开背设置的首饰范例 如果您的宝石是采用开背式样镶嵌在戒指中,请将戒指放置于LED光源 上方的环状指导压纹上十字标记的中心处。镶嵌宝石的正面应直接朝 向光检测器。...
- Page 54 将戒指挂在环状指导区域内,使用控制杆来降低LED光源高度以固定宝 石,并将其覆盖在光检测器上(图2.7)。 图2.7:将开背式环状首饰置于LED光源上方环状指导区, 并调下LED光源以固定宝石对准光检测器 如果宝石镶嵌在采用开背设置但不能放置在环状指导区的其他类型首饰 上,请将首饰放置于基座上,用宝石覆盖光检测器,然后调低LED光源 以确保首饰就位,可供测试。 请确保光检测器被宝石完全覆盖,以使所发射的波长能够穿透石材。 倘若宝石不能完全覆盖光检测器,则所发射的紫外线光将不能穿过宝 石,而是到达光检测器,从而给出的该宝石材料紫外光投射能力的读数 将会不准确。 合上盖子,按下 “开始测试” 按钮。 在运行测试时,该按钮将会闪烁白色光。当测试完成后,该按钮会亮起 稳定的白色光,并将用7个指示灯显示测试结果。您应在2秒钟以内就可 看到测试的结果。...
- Page 55 如欲了解您的测试结果,请参阅本手册第3节 - “读取合成红宝石鉴定 仪的测试结果”。 2.3 关于执行测试的重要注意事项 • 请确保用于测试的宝石高度不超过6毫米,并且其宽度完全覆盖光检 测器。宝石相当于大约0.1至6克拉。 • 事先进行配套的测试,以确定用于的测试的红色宝石的类型。 • 只有采用开背设置的宝石镶嵌首饰才能用于测试。 • 粗糙、未经雕琢的宝石的测试结果可能并不准确。 • 不透明或半透明的宝石,以及暗红色色调的宝石可能无法获得准确的 测试结果。 • 需要通过将光源调节到直接照射在测试的宝石或首饰上,并将测试的 宝石或首饰固定并对准光检测器。 • 为了提高准确性,建议将红宝石放置在光检测器上至少4个不同的位 置,并检查读数是否一致。 • 为了防止结果不准确的情况出现,当电源按钮变成红色(表示电池电 量不足)时切勿进行任何测试。 • 只有当按下“开始测试”按钮并且指示灯亮起蓝色时,才能进行测 试。 • 当“开始测试”按钮停止闪烁并稳定的亮起白光时,测试便已完成。 • 如欲重置设备并开始一次新的测试,请按下“开始测试”按钮,使其 重新亮起蓝光。...
-
Page 56: 读取合成红宝石鉴定仪的测试结果
3. 读取合成红宝石鉴定仪的测试结果 合成红宝石鉴定仪测量宝石的紫外线透射能力,并且该测量值由设备前 部上方的7个指示灯条显示高或低。 按下 “开始测试”按钮后,该按钮将在测试正在进行时闪烁白色光。 当测试完成时, “开始测试”将停止闪烁并保持亮起稳定的白色光, 以此表示测试已经完成。7个指示灯条的其中一条也会亮起,显示紫外 线透射能力的结果是高还是低(图3.1)。 High High Start Test UV Transmittance UV Transmittance 图3.1:从7个指示灯读取结果 要开始一个新的测试,再次按下“开始测试”按钮,将其返回到就绪模 式。按钮指示灯应返回为亮起蓝色光。 只有当“开始测试”按钮亮起蓝色光时,方可执行测试。... - Page 57 低读数 左手起前4个指示灯条为低读数范围,如果记录的测量值在此范围内, 则这4个指示灯条的一个会亮起蓝色的灯(图3.2)。 High High Start Test UV Transmittance UV Transmittance 图 3.2:低读数 代表低读数的灯条亮起蓝色灯意味着,被测试的宝石的紫外光透射能力 较低,这可能是由于在天然红宝石形成过程中或是通过助熔剂法和水热 法人工合成红宝石的形成过程中产生的微量元素导致的。 建议您进行进一步的配套检验,以确定测试的宝石是否是天然红宝石。...
- Page 58 高读数 后 3 个指示灯条为高读数范围,如果记录的测量值在此范围内,则这3 个指示灯条的一个会亮起红色的灯(图3.3)。 High High Start Test UV Transmittance UV Transmittance 图3.3: 高读数 代表高读数的灯条亮起红色灯意味着,被测试的宝石的紫外光透射能力 较高,紫外光可以轻易的通过测试的宝石传递至光检测器。这可能意味 着,该宝石具有很高的紫外线透明性,是常见的火焰熔融法人工合成宝 石工艺的结果。因此,该测试的红宝石很可能是一个人工合成的火焰 熔融红宝石。 您可以使用合成红宝石鉴定仪对一包红宝石进行快速排序检测,并确定 哪些是人工合成的火焰熔融红宝石。...
-
Page 59: 合成红宝石鉴定仪指示灯概述
4. 合成红宝石鉴定仪指示灯概述 下表总结了合成红宝石鉴定仪上的按钮和指示灯的功能及说明。 电源按钮 描述 灯光 作用 当设备处于关闭状态 闪烁的蓝光 设备正在开启并将开始预 时,请按住电源按钮 热。 设备已准备就绪 稳定的蓝光 设备已接通电源并可开始 测试。 电池低电量指示灯 稳定的红色 设备不能在电池低电量情况 下运行。 操作时,请按下并压 无灯光 设备正在关闭。 住电源按钮2秒... - Page 60 “开始测试”按钮 描述 灯光 作用 准备进行测试 稳定的蓝光 设备盖子关闭,并且内部LED 光源关闭准备进行测试。 请注意:当设备盖子打开 时,“开始测试”按钮不会 亮起。 测试正在进行 闪烁的白光 设备在内部LED光源启动的状 态下正在进行测试。 测试完成 稳定的白光 设备已经完成测试,并且 测试结果应在7个指示灯中 显示。 请注意:要进行下一个测试 时,您需要再一次按下“开 始测试”按钮,将设备重置 到“准备进行测试”状态, 并呈现稳定的蓝光。 7个指示灯显示 描述 灯光 作用 7个指示灯中的红色指 稳定的红光 测试完成并且测试的宝石被 示灯条 记录为拥有较高的紫外光投 射能力,这表明它很可能 是人工合成的火焰熔融红 宝石。 7个指示灯中的蓝色指 稳定的蓝光 测试完成并且测试的宝石被 示灯条...
-
Page 61: 合成红宝石鉴定仪的维护
5. 合成红宝石鉴定仪的维护 合成红宝石鉴定仪应小心轻放。当不使用设备时,应将其遮盖起来或是 放置在定制的便携包中。应小心使用和保管,以免损坏设备。 切勿将电量耗尽的电池留在电池仓内,因为电量耗尽的电池可能会腐蚀 或漏液,进而损坏设备的电路。当设备预计将被存放较长时间时,建议 应将电池移除。 此测试仪是精心设计且做工精细的产品,请小心使用。 感谢您抽时间翻阅本用户手册,帮助您更好地了解所购买的设备。 Presidium也建议您将随附的保修注册卡寄送给我们或是在 http://www.presidium.com.sg/ 网上注册,为您的保修进行注册。 注:Presidium不提供金属宝石底座。... - Page 62 Testeur de rubis synthétiques Presidium Guide de l’utilisateur (Français)
- Page 63 Table des matières Version française I. Avertissements, exclusions et limites de responsabilité II. À propos de ce guide III. À propos de votre testeur de rubis synthétiques IV. Contexte et développement du testeur de rubis synthétiques V. Avis important 1. POUR COMMENCER avec votre testeur de rubis synthétiques 2.
-
Page 64: Avertissements, Exclusions Et Limites De Responsabilité
Il est conseillé aux utilisateurs de visiter de temps à autre le site Web de Presidium http://www.presidium.com.sg/ Presidium n’assumera aucune responsabilité en cas de dommage ou de perte résultant de l’utilisation de ce produit ou de ce guide. -
Page 65: À Propos De Ce Guide
II. À propos de ce guide Nous vous remercions d’avoir acheté le premier et le seul testeur de rubis synthétiques au monde (« SRI » ou « appareil ») de Presidium. Ce guide est conçu pour vous aider à configurer votre appareil et décrit tout ce que vous devez savoir sur la façon d’utiliser votre testeur... - Page 66 ultraviolette dans les rubis, la recherche ayant constaté que les rubis synthétisés par fusion à la flamme étaient toujours plus transparents à la lumière UV profonde. Le testeur de rubis synthétiques comporte une lumière ultraviolette à forte longueur d’onde qui est activée pour traverser le rubis vers le détecteur photosensible situé...
- Page 67 L’appareil a été conçu en fonction des objectifs suivants : • Aider à différencier rapidement un type courant de rubis synthétique, le rubis synthétisé par fusion à la flamme, d’autres types de rubis connus • Aider à mieux identifier les rubis naturels en détectant un type de rubis synthétique •...
- Page 68 Les caractéristiques du testeur de rubis synthétiques sont les suivantes : • Première et seule technologie au monde qui mesure la capacité de transmission de la lumière ultraviolette d’une pierre précieuse au moyen d’une lumière UV profonde spécifique à forte longueur d’onde pour permettre d’identifier les rubis synthétisés par fusion à...
- Page 69 Vous trouverez dans la boîte : • Testeur de rubis synthétiques Presidium • Étui de transport protecteur avec poche intérieure pour les accessoires • Câble USB • Adaptateur secteur universel Presidium • Guide de l’utilisateur complet en 7 langues • Carte de garantie...
- Page 70 Fig.A Testeur de rubis synthétiques Caractéristiques/fonctions (Figure A) 1. Bouton d’alimentation (Marche/arrêt, indicateur de piles faibles et indicateur de connectivité Bluetooth) 2. Couvercle 3. Base avec cercles concentriques 4. Détecteur photosensible 5. Source lumineuse intérieure à DEL avec anneau-guide en relief sur le dessus 6.
-
Page 71: Contexte Et Développement Du Testeur De Rubis Synthétiques
Caractéristiques techniques Longueur 130 mm Largeur 100 mm Hauteur 65 mm Poids sans les piles 210 grammes Poids avec les piles 250 grammes Alimentation 4 piles AAA ou via le câble USB connecté à une source externe IV. Contexte et développement du testeur de rubis synthétiques Le monde des pierres précieuses de couleur est étincelant mais quelque peu mystique. - Page 72 être commercialisés, vendues et mélangées avec des rubis naturels. Sachant cela, Presidium s’est mis au travail pour étudier de plus près les rubis synthétiques et pour élaborer un dispositif pouvant aider à l’identification rapide de ces rubis.
-
Page 73: Avis Important
• N’essayez pas de peindre l’appareil La peinture peut bloquer les pièces mobiles et perturber le fonctionnement de l’appareil. Si l’appareil ne fonctionne pas correctement, veuillez contacter le service à la clientèle de Presidium à service@presidium.com.sg ou : Presidium Instruments Pte Ltd Unit 7, 207 Henderson Road... -
Page 74: Pour Commencer Avec Votre Testeur De Rubis Synthétiques
Le testeur de rubis synthétiques peut être alimenté soit par des piles, soit au moyen du câble USB connecté à l’adaptateur secteur universel Presidium (les deux étant fournis avec l’appareil), soit en le raccordant à une source externe. Si vous utilisez des piles, vous trouverez le logement des piles sous l’appareil. - Page 75 Si vous utilisez une source d’alimentation externe, branchez le câble micro USB fourni au port situé à l’arrière de l’appareil (Figure 1.2) et l’autre extrémité à l’adaptateur secteur universel Presidium, puis branchez l’adaptateur à une prise secteur. Fig.1.2 Branchez la prise micro USB au port situé...
- Page 76 1.2 Mise en marche de votre appareil Pour mettre votre détecteur de diamants synthétiques sous tension, appuyez longuement sur le bouton d’alimentation situé à l’avant de l’appareil. Un voyant bleu clignote pendant environ 20 secondes, afin de permettre à l’appareil de chauffer. (Figure 1.3). Lorsque le voyant bleu cesse de clignoter, l’appareil est prêt à...
- Page 77 1.3 Éteindre votre appareil et économiseur d’énergie Pour éteindre votre testeur de rubis synthétiques, maintenez le bouton d’alimentation enfoncé pendant environ 2 secondes jusqu’à ce que le voyant s’éteigne. Pour économiser l’énergie, votre testeur de rubis synthétiques s’éteint automatiquement au bout de 10 minutes d’inactivité. 1.4 Indicateur de piles faibles Lorsque les piles sont trop faibles pour que l’appareil continue de fonctionner, le voyant du bouton d’alimentation devient rouge.
- Page 78 Lorsque vous n’utilisez pas l’appareil pendant une période prolongée, nous vous recommandons de retirer les piles. Il n’est pas nécessaire de retirer les piles lorsque vous utilisez l’adaptateur secteur universel Presidium avec le câble USB. 1.5 Vue d’ensemble du bouton d’alimentation Pour une description complète du bouton d’alimentation et de ses...
-
Page 79: Effectuer Un Test Avec Votre Testeur De Rubis Synthétiques
Un moyen de vérifier consiste à utiliser le testeur de gemmes/ évaluateur de pierres colorées Presidium qui teste la conductivité thermique des pierres précieuses. Si votre pierre rouge tombe dans la gamme des rubis et saphirs, il s’agit très probablement d’un rubis. - Page 80 High Start Test UV Transmittance Fig.2.1 Appuyez sur le bouton « Démarrer le Test » pour effectuer un test Lorsque l’appareil est prêt pour le test, soulevez le couvercle à l’aide des petites poignées situées à l’avant du couvercle pour accéder à la zone de test à...
- Page 81 Le test est effectué sous le couvercle du testeur de rubis synthétiques, où la zone de test est marquée par des cercles concentriques, avec un détecteur photosensible au centre, surplombé par une source lumineuse à DEL (Figure 2.3). Fig.2.3 Zone de test à l’intérieur de l’appareil Les instructions suivantes vous guideront pour le test des rubis non montés et des rubis montés en bijoux.
- Page 82 2.1 Test des rubis non montés Vérifiez que votre rubis est assez large pour recouvrir le détecteur photosensible. Sa largeur devrait être d’environ 3 mm. De plus, la hauteur de votre rubis ne devrait pas être supérieure à 6 mm, pour être sûr que la lumière UV transmise par la source lumineuse à...
- Page 83 À l’aide du levier, abaissez la source lumineuse à DEL pour maintenir le rubis en place sur le détecteur photosensible et le tester (Figure 2.5). Fig.2.5 Abaissez la source lumineuse à DEL pour maintenir le rubis en place sur le détecteur photosensible Fermez le couvercle et appuyez sur le bouton «...
- Page 84 2.2 Test des rubis montés en bijoux Vérifiez que le rubis est monté en serti griffes, ce qui signifie que vous pouvez voir clairement la face inférieure et la couleur de la pierre et que celle-ci n’est pas masquée par le métal du bijou ou par d’autres pierres.
- Page 85 La bague étant accrochée à l’anneau-guide, abaissez la source lumineuse à DEL à l’aide du levier pour maintenir le rubis en place sur le détecteur photosensible (Figure 2.7). Fig.2.7 Placez le bijou sur l’anneau-guide de la source lumineuse à DEL et abaissez celle-ci pour maintenir le rubis en place sur le détecteur photosensible Si votre rubis est monté...
- Page 86 Fermez le couvercle et appuyez sur le bouton « Démarrer le Test ». Le voyant du bouton clignote en blanc pendant le test. Lorsque le test est terminé, la lumière blanche du voyant est fixe et le résultat de votre test s’affiche sur l’indicateur à 7 barres lumineuses. Le résultat devrait apparaître au bout de 2 secondes.
-
Page 87: Lire Les Résultats Du Test Sur Votre Testeur De Rubis Synthétiques
3. Lire les résultats du test sur votre testeur de rubis synthétiques Le testeur de rubis synthétiques mesure la capacité de transmission de la lumière UV du rubis et cette mesure se matérialise sous la forme d’une valeur faible ou élevée représentée par les 7 barres lumineuses situés à... - Page 88 Lecture faible Les 4 barres de gauche de l’indicateur représentent la gamme de lecture faible et lorsque la mesure se trouve dans cette gamme, une ou plusieurs de ces barres s’allume en bleu (Figure 3.2). High High Start Test UV Transmittance UV Transmittance Fig.3.2 Lecture faible Une lecture faible, représentée par la lumière bleue, indique que...
- Page 89 Lecture élevée Les 3 barres de droite de l’indicateur représentent la gamme de lecture élevée et lorsque la mesure se trouve dans cette gamme, une ou plusieurs de ces barres s’allume en rouge (Figure 3.3). High High Start Test UV Transmittance UV Transmittance Fig.3.3 Lecture élevée Une lecture élevée, représentée par la lumière rouge, indique que...
-
Page 90: Vue D'ensemble Des Indicateurs De Votre Testeur De
4. Vue d’ensemble des indicateurs de votre testeur de rubis synthétiques Le tableau ci-dessous résume les fonctions et les états des boutons et des voyants du testeur de rubis synthétiques. Bouton d’alimentation Description Voyant Fonction Le bouton Bleu clignotant L’appareil s’allume et d’alimentation est commence à... - Page 91 Bouton « Démarrer le Test » Description Voyant Fonction Prêt pour un test Bleu fixe Le couvercle de l’appareil est fermé et l’appareil est prêt pour un test avec la source lumineuse interne à DEL éteinte. Remarque: le voyant du bouton «...
- Page 92 Indicateur à 7 barres lumineuses Description Voyant Fonction Barres rouges sur Rouge fixe Le test est terminé et le rubis l’indicateur à 7 barres testé a une capacité élevée de transmission de la lumière UV ; il s’agit probablement d’un rubis synthétisé par fusion à...
-
Page 93: Prendre Soin De Votre Testeur De Rubis Synthétiques
Nous vous remercions d’avoir pris le temps de lire ce guide, pour mieux comprendre le produit que vous venez d’acheter. Presidium vous recommande aussi de valider votre garantie en nous retournant la carte de garantie fournie ou en enregistrant votre produit... - Page 94 Identifizierungsgerät für synthetische Rubine von Presidium Benutzerhandbuch (Deutsch)
- Page 95 II. Über dieses Buch III. Über das Identifizierungsgerät für synthetische Rubine von Presidium IV. Hintergrund und Entwicklung des Identifizierungsgeräts für synthetische Rubine von Presidium V. Wichtiger Hinweis 1. ERSTE SCHRITTE mit dem Identifizierungsgerät für synthetische Rubine 2. DURCHFÜHRUNG EINES TESTS mit dem Identifizierungsgerät für synthetische Rubine...
-
Page 96: Haftungsausschlüsse, Ausschlüsse Und Haftungsbeschränkungen
BITTE LESEN SIE DIE GARANTIEBEDINGUNGEN VON PRESID- IUM, die auf der Garantiekarte angegeben sind. Die Garantie von Presidium für dieses Gerät gilt nur bei ordnungsgemäßer Verwend- ung durch die Benutzer in Übereinstimmung mit allen Bedingungen, die im Benutzerhandbuch angegeben sind. Die Garantie deckt nur Fertigungsfehler ab. -
Page 97: Über Dieses Buch
(„SRI”) ist ein revolutionäres neues Gerät, das entwickelt wurde, um synthetische Rubine, die mithilfe des Flammenschmelzverfahrens hergestellt werden, zu unterscheiden. Das Identifizierungsgerät für synthetische Rubine, das von Presidium in Zusammenarbeit mit dem renommierten Edelstein-und Schmuck-Institut für Thailand (Gem and Jewelry Institute of Thailand; GIT) in der Nähe der traditionellen... - Page 98 Auf Basis des Wissens, dass bei Edelsteinen, die tiefer UV- Strahlung ausgesetzt werden, die Lichtdurchlässigkeit groß genug ist, um bekannte Rubine zu unterscheiden zu können, misst das Identifizierungsgerät für synthetische Rubine die UV- Lichtdurchlässigkeit bei Rubinsteinen, da Forschungen ergeben haben, dass synthetische, flammengeschmolzene Rubine konsistent mehr tiefes UV-Licht durchlassen.
- Page 99 Das Identifizierungsgerät für synthetische Rubine wurde gründlichen und umfangreichen Labortests in Zusammenarbeit mit dem Edelstein- und Schmuck-Institut für Thailand (GIT) unterzogen und liefert im Allgemeinen ein klares und zuverlässiges Ergebnis des getesteten Rubins. Dieses Gerät hilft nur bei der Identifizierung bestimmter Arten synthetischer Rubine.
- Page 100 × Schmutzige Steine, auf denen sich möglicherweise Mikropartikel Öl, Schweiß oder Pulver befinden, sowie Mikropartikel auf dem Pavillon des Rubinsteins können die Genauigkeit des Test beeinflussen × Tests, ob der Stein einer Behandlung wie Wärmestrahlung und Glasfüllung ausgesetzt war × Tests, um andere Formen synthetisch hergestellter Rubine zu identifizieren, zum Beispiel synthetische hydrothermale oder synthetische Schmelzsteine ×...
- Page 101 • USB-Anschluss an der Rückseite der Geräts für das Anschließen einer externen Stromquelle oder eines Computers • Internationale Spannungskompatibilität Packungsinhalt: • Identifizierungsgerät für synthetische Rubine von Presidium • Transportkoffer mit Zubehörtasche im Inneren • USB-Kabel • Presidium Universalnetzteil • Umfassendes Benutzerhandbuch in 7 Sprachen...
- Page 102 Abb. A Identifizierungsgerät für synthetische Rubine Merkmale/Funktionen (Abb. A) 1. Netztaste (Ein/Aus, Anzeige für schwache Batterien und Bluetooth-Verbindungsanzeige) 2. Deckel 3. Basisplattform mit konzentrischen Markierungen 4. Fotodetektor 5. LED-Lichtquelle im Inneren mit auf der Oberseite eingeprägter Ringführung 6. Lichtquellenhebel zum Einstellen der Lichtquelle 7.
-
Page 103: Hintergrund Und Entwicklung Des Identifizierungsgeräts Für Synthetische Rubine Von Presidium
IV. Hintergrund und Entwicklung des Identifizierungsgeräts für synthetische Rubine von Presidium Die Welt der farbigen Edelstahl funkelt, ist aber auch etwas rätselhaft. Anders als Diamanten, für die ein Bewertungssystem festgelegt wurde, mit dem ein Diamanten auf Basis der Farbe, des Schliffs, der Klarheit und der Farbe beurteilt werden kann, gibt es für... - Page 104 Mit diesem Wissen hat sich Presidium daran gemacht, mehr über synthetische Rubine zu erforschen und ein Gerät zu entwickeln, das bei der schnellen Identifizierung solcher Rubine helfen kann. Es ist bekannt, dass aufgrund von Unreinheiten oder Übergangsmetallionen, die normalerweise in natürlichen Rubinen zu...
-
Page 105: Wichtiger Hinweis
• Lackieren Sie das Gerät nicht. Lack kann die beweglichen Teile verstopfen und den ordnungsgemäßen Betrieb verhindern. Wenn das Gerät nicht richtig funktioniert, wenden Sie sich bitte an den Presidium Kundenservice unter service@presidium.com.sg oder: Presidium Instruments Pte Ltd Unit 7, 207 Henderson Road... -
Page 106: Erste Schritte Mit Dem Identifizierungsgerät Für Synthetische Rubine
Rubine 1.1 Einschalten des Geräts Das Identifizierungsgerät für synthetische Rubine kann entweder durch Batterien oder über das USB-Kabel, das an das Presidium Universal-Netzteil angeschlossen wird (beides im Lieferumfang enthalten), oder eine externe Stromquelle mit Strom versorgt werden. Die Batterien befinden sich an der Unterseite des Geräts. Lösen Sie die zwei Riegel an der Batteriefachabdeckung und nehmen Sie die Batteriefachabdeckung ab, um zu den Batterien zu gelangen. - Page 107 Wenn eine externe Stromquelle verwendet wird, schließen Sie das mitgelieferte Micro-USB-Kabel an den Anschluss an der Rückseite des Geräts (Abb. 1.2) und das andere Ende an das mitgelieferte Presidium Universal-Netzteil zum Anschließen an eine externe Netzsteckdose an. Abb. 1.2 Anschließen des Micro-USB-Kabels an den Anschluss an der Rückseite des Geräts...
- Page 108 1.2 Einschalten des Geräts Um das Prüfgerät für synthetische Diamanten einzuschalten, drücken Sie die Netztaste an der Vorderseite des Geräts. Ein blaues Lämpchen blinkt ca. 20 Sekunden lang, solange sich das Gerät aufwärmt. (Abb. 1.3). Sobald das blaue Lämpchen nicht mehr blinkt, sondern leuchtet, ist das Gerät betriebsbereit.
- Page 109 1.3 Ausschalten des Geräts und automatische Abschaltung zum Energiesparen Um das Identifizierungsgerät für synthetische Rubine auszuschalten, halten Sie die Netztaste ca. 2 Sekunden lang gedrückt, bis das Lämpchen erlischt. Um sicherzustellen, dass das Identifizierungsgerät für synthetische Rubine Energie spart, schaltet sich das Gerät 10 Minuten nach der letzten Aktivität automatisch ab.
- Page 110 Batterien korrodieren oder auslaufen und den Schaltkreis des Geräts beschädigen können. Die Batterien sollten auch herausgenommen werden, wenn das Gerät längere Zeit aufbewahrt wird. Bei Verwendung des Presidium Universal-Netzteils und des USB- Kabels müssen die Batterien nicht aus dem Gerät herausgenommen werden.
-
Page 111: Durchführung Eines Tests Mit Dem Identifizierungsgerät Für Synthetische Rubine
Steins, den Sie testen wollen, ein bekannter Rubin ist. Es gibt viele Möglichkeiten, dies auf Basis der inhärenten Eigenschaften von Rubinen zu prüfen. Ein Möglichkeit ist das Presidium Edelsteintestgerät/Prüfgerät für farbige Steine, das die thermische Leitfähigkeit des Edelsteins testet. Wenn Ihr roter Stein in den Rubin/ Saphir-Bereich fällt, haben Sie wahrscheinlich einen bekannten Rubin. - Page 112 High Start Test UV Transmittance Abb. 2.1 Drücken der Taste zum Starten des Tests, um einen Test durchzuführen Sobald das Gerät für das Testen bereit ist, verwenden Sie die Fingergriffe, um den Deckel zu heben und zum Testbereich im Inneren zu gelangen.
- Page 113 Der Test wird unter dem Deckel des Identifizierungsgeräts für synthetische Rubine durchgeführt, wo ein Testbereich durch eine Basisplattform mit konzentrischen Kreisen markiert ist. Dort befinden sich ein Fotodetektor in der Mitte und eine hervorstehenden LED- Lichtquelle darüber (Abb. 2.3). Abb. 2.3 Testbereich im Inneren des Geräts Die folgende Anleitung erklärt das Testen loser Edelsteine und montierten Schmucks.
- Page 114 2.1 Testen loser Edelsteine Vergewissern Sie sich, dass der lose Edelstein breit genug ist, um den Fotodetektor abzudecken. Er sollte ca. 3 mm breit sein. Der lose Edelstein sollte außerdem nicht höher als 6 mm sein, um sicherzustellen, dass die von der LED-Lichtquelle übertragene UV- Wellenlänge genau gemessen werden kann.
- Page 115 Senken Sie die LED-Lichtquelle mit dem Hebel ab und halten Sie so den Edelstein auf dem Fotodetektor zum Testen fest (Abb. 2.5). Abb. 2.5 Absenken der LED-Lichtquelle nach unten, um den Edelstein auf dem Fotodetektor fest zu halten Schließen Sie den Deckel und drücken Sie die Taste zum Starten des Tests.
- Page 116 2.2 Montierter Schmuck oder montierte Edelsteine Vergewissern Sie sich, dass die Rückseite des Steins offen ist, das heißt, Sie haben eine klare Sicht und sehen Farbe des Steins, wenn Sie ihn von hinten betrachten, und er wird nicht durch das Schmuckmaterial oder andere Steine verdeckt.
- Page 117 Während der Ring im Ringführungsbereich hängt, verwenden Sie den Hebel, um die LED-Lichtquelle abzusenken und so den Stein über dem Fotodetektor fest zu halten (Abb. 2.7). Abb. 2.7 Legen des Ringschmucks mit offener Rückseite auf die Ringführung an der LED-Lichtquelle, und Drücken der LED-Lichtquelle nach unten, um den Stein auf dem Fotodetektor fest zu halten Wenn der Edelstein mit offener Rückseite in anderen Arten von Schmuck montiert ist und nicht über die Ringführung gelegt werden...
- Page 118 Schließen Sie den Deckel und drücken Sie die Taste zum Starten des Tests. Die Taste beginnt weiß zu blinken, während der Test durchgeführt wird. Wenn der Test abgeschlossen ist, leuchtet die Taste weiß und Ihr Testergebnis wird von den 7 Anzeigelämpchen angezeigt. Sie sollten das Ergebnis innerhalb von 2 Sekunden sehen.
-
Page 119: Ablesen Von Testergebnissen Am Identifizierungsgerät Für Synthetische Rubine
3. Ablesen von Testergebnissen am Identifizierungsgerät für synthetische Rubine Das Identifizierungsgerät für synthetische Rubine misst die UV- Lichtdurchlässigkeit des Steins und diese Messung wird über die 7 Lichtanzeigebalken an der Vorderseite als gering oder hoch angezeigt. Nach Drücken der Taste zum Starten des Tests beginnt die Taste weiß... - Page 120 Geringe Lichtdurchlässigkeit Die ersten 4 Balken von links zeigen eine geringe Lichtdurchlässigkeit an. Wenn eine Messung in diesem Bereich aufgezeichnet wird, leuchtet ein blaues Licht auf diesen 4 Balken (Abb. 3.2). High High Start Test UV Transmittance UV Transmittance Abb. 3.2 Geringe Lichtdurchlässigkeit Diese Anzeige mit einem blauen Licht bedeutet, dass die UV- Lichtdurchlässigkeit des getesteten Edelsteins gering ist.
- Page 121 Hohe Lichtdurchlässigkeit Die letzten 3 Balken zeigen eine hohe Lichtdurchlässigkeit an. Wenn eine Messung in diesem Bereich aufgezeichnet wird, leuchtet ein rotes Licht auf diesen 3 Balken (Abb. 3.3). High High Start Test UV Transmittance UV Transmittance Abb. 3.3 Hohe Lichtdurchlässigkeit Diese Anzeige mit rotem Licht bedeutet, dass die UV- Lichtdurchlässigkeit des getesteten Edelsteins hoch ist und das UV-Licht problemlos durch den getesteten Edelstein zum...
-
Page 122: Überblick Über Die Anzeigen Am Identifizierungsgerät Für Synthetische Rubine
4. Überblick über die Anzeigen am Identifizierungsgerät für synthetische Rubine In der folgenden Tabelle sind die Funktionen und Darstellungen der Tasten und Lampen am Identifizierungsgerät für synthetische Rubine zusammengefasst. Netztaste Beschreibung Lampe Funktion Die Netztaste wird Blaues Blinken Gerät wird eingeschaltet und zum Ausschalten beginnt mit dem Aufwärmen. - Page 123 Taste zum Starten des Tests Beschreibung Lampe Funktion Für das Testen bereit. Blaues Der Gerätedeckel ist Leuchten geschlossen und das Gerät ist für das Testen bereit und die LED-Lichtquelle im Inneren ist ausgeschaltet. Hinweis: Die Taste zum Starten des Tests leuchtet nicht, wenn der Gerätedeckel offen ist.
- Page 124 7 Lichtanzeigebalken Beschreibung Lampe Funktion Roter Lichtbalken Rotes Der Test ist abgeschlossen in den 7 Leuchten und der getestete Rubin Lichtanzeigebalken weist eine hohe UV- Lichtdurchlässigkeit auf. Dies weist darauf hin, dass es sich wahrscheinlich um einen synthetischen, flammengeschmolzenen Rubin handelt. Blauer Lichtbalken Blaues Der Test ist abgeschlossen...
-
Page 125: Pflege Des Identifizierungsgeräts Für Synthetische Rubine
Vielen Dank, dass Sie sich die Zeit genommen haben, das Benutzerhandbuch durchzulesen, das Ihnen helfen soll, Ihr neues Gerät besser zu verstehen. Presidium empfiehlt Ihnen außerdem, Ihre Garantie zu registrieren, indem Sie die mitgelieferte Garantieregistrierungskarte an uns senden oder sich online unter http://www.presidium.com.sg/ registrieren. - Page 126 Manuale utente identificatore rubini sintetici Presidium (Versione italiana)
- Page 127 I. Liberatorie, esclusioni e limiti di responsabilità II. Contenuto del manuale III. Informazioni sull’identificatore di rubini sintetici IV. Contesto e sviluppo dell’identificatore di rubini sintetici Presidium V. Avvisi importanti 1. INTRODUZIONE all’identificatore di rubini sintetici 2. ESECUZIONE DI UN TEST con l’identificatore di rubini sintetici 3.
-
Page 128: Liberatorie, Esclusioni E Limiti Di Responsabilità
L’identificatore di rubini sintetici (Synthetic Ruby Identifier (“SRI”)) di Presidium di cui in questo manuale viene fornito e venduto sulla base di “così come è”. Tranne come richiesto dalle leggi in vigore, non viene data alcuna garanzia espressa o implicita, comprese, ma senza limitarsi a, garanzie implicite di commerciabilità... -
Page 129: Contenuto Del Manuale
Studiato e sviluppato da Presidium in collaborazione con il rinomato Gem and Jewelry Institute of Thailand (GIT) vicino al tradizionale sito di origine dei rubini, l’identificatore di rubini sintetici rappresenta una svolta nello... - Page 130 luce UV dei rubini poiché la ricerca ha scoperto che rubini sintetici per fusione alla fiamma sono sempre più trasparenti a luce UV profonda. L’identificatore di rubini sintetici presenta una luce UV a onda profonda che viene attivata per passare attraverso il rubino verso il fotorilevatore sulla piattaforma di base.
- Page 131 Il dispositivo è stato concepito con i seguenti obiettivi: • Contribuire a ulteriormente indentificare con rapidità un tipo sintetico comune, il rubino sintetico per fusione alla fiamma tra gli altri rubini noti. • Aiutare a consentire ulteriormente l’identificazione del rubino naturale escludendo un tipo di rubino sintetico.
- Page 132 • Porta USB esterna sul retro dell’unità per collegamento ad una fonte di alimentazione esterna o a un computer • Compatibilità con tensione internazionale La confezione comprende: • Identificatore di rubini sintetici Presidium • Borsa di protezione con sacca per accessori all’interno • Cavo USB • Adattatore di alimentazione universale Presidium •...
- Page 133 Fig. A Identificatore di rubini sintetici Caratteristiche/funzioni (Fig. A) 1. Pulsante di accensione (on/off, spia batteria in esaurimento e spia connettività Bluetooth) 2. Coperchio 3. Piattaforma di base con segni concentrici 4. Fotorilevatore 5. Fonte luminosa LED interna con guida per anello incisa sulla parte superiore 6.
-
Page 134: Contesto E Sviluppo Dell'identificatore Di Rubini Sintetici Presidium
IV. Contesto e sviluppo dell’identificatore di rubini sintetici Presidium Il mondo delle gemme colorate è scintillante ma anche un po’ mistico. A differenza dei diamanti che hanno un sistema di gradazione riconosciuto che valuta un diamante sulla base di colore, taglio, trasparenza e tonalità, le gemme colorate non hanno un simile... - Page 135 Sapendo ciò, Presidium si mise a lavoro per fare ricerche più approfondite sui rubini sintetici e sviluppare un dispositivo che potesse contribuire alla rapida identificazione di tali rubini.
-
Page 136: Avvisi Importanti
• Non verniciare il dispositivo. La vernice può bloccare le parti mobili e impedire il corretto funzionamento. Se il dispositivo non funziona correttamente, contattare l’assistenza clienti Presidium all’indirizzo service@presidium.com.sg oppure a Presidium Instruments Pte Ltd Unit 7, 207 Henderson Road... -
Page 137: Introduzione All'identificatore Di Rubini Sintetici
L’identificatore di rubini sintetici può essere alimentato utilizzando batterie o attraverso il cavo USB collegato all’adattatore universale Presidium, entrambi in dotazione col prodotto, oppure ad una fonte di alimentazione esterna. Se si utilizzano batterie, identificare il comparto batteria in fondo dell’unità. - Page 138 Se si utilizza una fonte di alimentazione esterna, inserire il micro cavo USB in dotazione nella porta sul retro del dispositivo (Fig. 1.2) e l’altra estremità nell’adattatore universale Presidium per il collegamento ad una presa esterna. Fig. 1.2 Inserimento di micro USB nella porta sul retro del dispositivo È...
- Page 139 1.2 Accensione del dispositivo Per accendere l’identificatore di diamanti sintetici premere il pulsante “Power”, posto sul lato anteriore dell’unità. Una luce blu lampeggerà per circa 20 secondi, per consentire al prodotto di riscaldarsi. (Fig 1.3). Quando la luce blu smette di lampeggiare e resta fissa, il dispositivo è pronto all’uso.
- Page 140 1.3 Spegnimento del dispositivo e spagnimento automatic per risparmio energetico Per spegnere l’identificatore di rubini sintetici, tenere premuto il pulsante Power per circa 2 secondi fino a che la luce si spegne. Per assicurare che l’identificatore di rubini sintetici non sprechi energia, l’unità...
- Page 141 Non è necessario togliere le batterie dall’unità quando si utilizza l’adattatore universale Presidium attraverso il cavo USB. 1.5 Panoramica del pulsante Power Per una panoramica completa del pulsante Power e delle sue funzioni, vedere la sezione 5 di questo manuale - “Panoramica delle...
-
Page 142: Esecuzione Di Un Test Con L'identificatore Di Rubini Sintetici
Ci sono molti modi per verificare ciò sulla base delle proprietà intrinseche dei rubini. Un modo è utilizzare il Gem Tester Presidium/Estimator Colored Stone che testa sulla base delle proprietà di conduttività termica della gemma. Se la pietra rossa ricade nell’intervallo rubino –... - Page 143 High Start Test UV Transmittance Fig 2.1 Premere il pulsante “Inizio test” per eseguire un test Quando il dispositivo è pronto per il test, usare le scanalature sulla parte anteriore del coperchio per sollevarlo e accedere all’area di test interna. (Fig 2.2) Fig 2.2 Sollevare il coperchio del dispositivo utilizzando le scanalature sulla parte anteriore...
- Page 144 Il test viene eseguito sotto il coperchio dell’identificatore di rubini sintetici dove una zona è segnata da una piattaforma di base a cerchi concentrici con un fotorilevatore al centro e una fonte luminosa LED che sporge (Fig 2.3). Fig 2.3 L’area di test all’interno del dispositivo Le istruzioni che seguono fungono da guida per testare gemme singole e montate su gioielli.
- Page 145 2.1 Per testare gemme singole Assicurarsi che la gemma sia abbastanza larga da coprire il fotorilevatore. La larghezza deve essere circa 3 mm. Inoltre la gemma non deve avere un’altezza superiore a 6 mm per assicurare che la lunghezza d’onda UV trasmessa dalla fonte luminosa LED possa essere misurata accuratamente.
- Page 146 Regolare la leva per abbassare la fonte luminosa LED e fissare la gemma nella sua sede sul fotorilevatore per il test (Fig 2.5). Fig 2.5 Regolare verso il basso la fonte luminosa LED per fissare la gemma nella sua sede sul fotorilevatore Chiudere il coperchio e premere il pulsante “Inizio test”.
- Page 147 2.2 Per pietre montate su gioielli o gioielli Assicurarsi che le pietra sia impostata con una montatura a giorno cioè che si possa ancora avere una visuale chiara della pietra e del colore quando se ne guarda il retro e che essa non sia coperta dal metallo del gioiello o da altre pietre.
- Page 148 Con l’anello che pende all’interno dell’area di guida per gli anelli, utilizzare la leva per abbassare la fonte luminosa LED per fissare la pietra al di sopra del fotorilevatore (Fig 2.7). Fig 2.7 Mettere il gioiello montato a giorno sulla guida per gli anelli sulla fonte luminosa e premere quest’ultima verso il basso per fissare la pietra contro il fotorilevatorer Se la pietra è...
- Page 149 Il pulsante inizia a lampeggiare in bianco mentre il test è in esecuzione. Quando il test è completo, il pulsante emette una luce bianca fissa e il risultato del test viene visualizzato dalle 7 spie luminose. I risultati del test compaiono di solito entro 2 secondi. Per comprendere i risultati del test vedere la sezione 3 di questo manuale –...
-
Page 150: Lettura Dei Risultati Di Un Test Con L'identificatore Di Rubini Sintetici
3. Lettura dei risultati di un test con l’identificatore di ru- bini sintetici L’identificatore di rubini sintetici misura la capacità di trasmittanza UV della pietra e questa misurazione viene comunicata come lettura bassa o alta visualizzata attraverso 7 barre luminose sulla parte anteriore del dispositivo. - Page 151 Lettura bassa Le prime 4 barre dalla sinistra ricadono nell’intervallo lettura bassa e se viene registrata qualunque misurazione entro questo intervallo si accende una luce blu entro queste 4 barre (Fig 3.2). High High Start Test UV Transmittance UV Transmittance Fig 3.2 Lettura bassa Una lettura bassa con luce blu significa che la capacità...
- Page 152 Lettura alta Le ultime 3 barre ricadono nell’intervallo lettura alta e se viene registrata qualunque misurazione entro questo intervallo si accende una luce rossa entro queste 3 barre (Fig 3,3). High High Start Test UV Transmittance UV Transmittance Fig 3.3 Lettura alta Una lettura alta con luce rossa indica che la capacità...
-
Page 153: Panoramica Delle Spie Sull'identificatore Di Rubini Sintetici
4. Panoramica delle spie sull’identificatore di rubini sintetici La tabella che segue riepiloga le funzioni e le descrizioni di pulsanti e spie sull’identificatore di rubini sintetici. Pulsante Power Descrizione Spia Funzione Il pulsante Power Lampeggiante Il dispositivo si accende viene tenuto premuto in blu e inizia la fase di quando il dispositivo... - Page 154 Pulsante Start Test Descrizione Spia Funzione Pronto per il test Blu fisso Il coperchio del dispositivo è chiuso e pronto per il test con la fonte luminosa LED interna disattivata. Nota: Il pulsante Inizio test non si accende se il coperchio del dispositivo è...
-
Page 155: Cura Dell'identificatore Di Rubini Sintetici
Grazie per aver dedicato tempo a leggere questo manuale utente che aiuta a comprendere meglio l’acquisto appena fatto. Presidium consiglia anche di registrare la garanzia inviandoci la scheda fornita o registrandosi on-line su sito http://www.presidium.com.sg/. Nota: piastra in metallo per pietre non fornita da Presidium. - Page 156 Руководство по эксплуатации детектора синтетических рубинов Presidium (версия на русском языке)
- Page 157 ответственности II. Информация о данном руководстве III. Информация о детекторе синтетических рубинов Presidium IV. Предпосылки и история разработки детектора синтетических рубинов Presidium V. Важное примечание 1. НАЧАЛО РАБОТЫ с детектором синтетических рубинов 2. ПРОВЕДЕНИЕ ТЕСТА с помощью детектора синтетических рубинов...
-
Page 158: Отказ От Обязательств, Исключения И Ограничения
по эксплуатации. Гарантия распространяется только на производственные дефекты. Ввиду постоянного усовершенствования продукции, компания Presidium оставляет за собой право на исправление документов, включая внесение изменений в руководство по эксплуатации, без предварительного уведомления третьих лиц о внесении таких изменений и исправлений. Рекомендуется периодически... -
Page 159: Информация О Данном Руководстве
касающиеся отказа от ответственности, ИСКЛЮЧЕНИЙ и ограничению ответственности. III. Информация о детекторе синтетических рубинов Presidium Детектор синтетических рубинов Presidium («SRI») - это принципиально новое устройство, назначением которого является диагностика рубинов и определение синтетических камней, созданных методом плавления в пламени. Прибор был... - Page 160 измерение теплопроводности драгоценного камня. Если драгоценный камень является рубином, то детектор синтетических рубинов поможет определить, является ли этот камень синтетическим рубином, полученным методом плавления в пламени. Известно, что воздействие на драгоценные камни дальним ультрафиолетовым излучением позволяет измерить разницу в их способности к светопропусканию, достаточную для определения...
- Page 161 портативностью, прочностью, имеет защиту от скольжения по поверхности, а питание его обеспечивается 4 батареями типа AAA или через порт USB, подключенный к внешнему источнику питания. Детектор синтетических рубинов прошел многократные комплексные лабораторные испытания, проводимые совместно с Геммологическим институтом Таиланда (GIT), которые...
- Page 162 При использовании детектора синтетических рубинов со следующими видами камней следует помнить, что показания могут быть неточными: × Неопределенные камни (следует проводить диагностику только на камнях, которые определенно являются рубинами) × Неотшлифованные камни × Камни высотой более 6 мм, так как диапазон ультрафиолетового...
- Page 163 • Внешний порт USB в задней части прибора для подключения к внешнему источнику питания или компьютеру • Соответствие международным стандартам напряжения В комплект входит: • Детектор синтетических рубинов Presidium • Жесткий футляр для переноски с отделением для принадлежностей • Кабель USB •...
- Page 164 Рис. А Детектор синтетических рубинов Особенности/функции (рис.A) 1. Кнопка питания (вкл/выкл, индикатор низкого заряда батарей и индикатор подключения Bluetooth) 2. Крышка 3. Площадка с концентрическими отметками 4. Фотоприемник 5. Внутренний светодиодный источник излучения с направляющими для кольца сверху 6. Рычаг источника излучения для регулировки его положения 7.
-
Page 165: Предпосылки И История Разработки Детектора Синтетических Рубинов Presidium
подключенный к внешнему источнику питания IV. Предпосылки и история разработки детектора синтетических рубинов Presidium Мир цветных драгоценных камней привлекает сверкающими красотами, но, в то же время, многое в нем остается под завесой тайны. В отличие от индустрии алмазов, в которой... - Page 166 поэтому большинство покупателей не могут гарантировать, что в партию натуральных рубинов не были подмешаны синтетические камни. Понимая эту ситуацию, компания Presidium начала исследования особенностей синтетических рубинов и разработку устройства, позволяющего быстро их обнаружить. Известно, что примеси или ионы переходных металлов, обычно...
-
Page 167: Важное Примечание
Геммологическому институту Таиланда за сотрудничество в проведении научного исследования и поддержку во внедрении улучшений технологии тестирования, впоследствии используемых компанией Presidium в разработке продукта. V. Важное примечание • Храните прибор в сухом месте. Осадки и различные виды жидкостей и влаги могут содержать разрушающие... -
Page 168: Начало Работы С Детектором Синтетических Рубинов
1. Питание прибора Питание детектора синтетических рубинов обеспечивается за счет батарей или посредством подключения кабеля USB к универсальному блоку питания Presidium (оба входят в комплект) или внешнему источнику питания. Для установки батарей следует открыть отсек в нижней части прибора. Для доступа к этому отсеку откройте два фиксатора на... - Page 169 Рис. 1.2 Подключите разъем Micro USB к порту в задней части прибора Другой конец кабеля USB также можно напрямую подключить к внешнему источнику питания (например, к компьютеру, ноутбуку и т.д.). Рекомендуется использовать только кабель USB и универсальный блок питания Presidium из комплекта поставки.
- Page 170 1.2 Включение прибора Чтобы включить Детектор синтетических бриллиантов, нажмите и удерживайте кнопку вкл/выкл, расположенную в передней части устройства. В течение приблизительно 20 секунд будет мигать синий световой индикатор, что обозначает разогрев устройства. (рис. 1.3). Индикатор синего цвета перестанет мигать и начнет гореть непрерывно, указывая...
- Page 171 1.3 Выключение прибора и автоматическое энергосберегающее выключение Для выключения детектора синтетических рубинов нажмите и удерживайте кнопку питания в течение примерно 2 секунд, пока индикатор не погаснет. Функция энергосбережения автоматически выключит прибор через 10 минут бездействия. 1.4 Индикатор низкого заряда батарей Если...
- Page 172 электрические схемы прибора. Рекомендуется извлекать батареи перед длительным хранением прибора. Нет необходимости вынимать батареи из прибора при питании через универсальный блок питания Presidium и кабель USB. 1.5 Обзор функций кнопки питания Подробный обзор функций кнопки питания приводится в Разделе 5 «Обзор индикаторов детектора синтетических...
-
Page 173: Проведение Теста С Помощью Детектора
камень действительно является рубином. Учитывая внутренние свойства рубинов, это можно проверить многими способами. Одним из них является использование тестера драгоценных камней Presidium, который позволяет провести диагностику на основании теплопроводности драгоценного камня. Если проверяемый камень красного цвета попадает в диапазон Рубин – Сапфир, то, вероятнее всего, вы имеете дело именно с... - Page 174 High Start Test UV Transmittance Рис. 2.1 Нажмите кнопку запуска диагностики для проведения теста При готовности прибора к работе возьмитесь пальцами за выемки в передней части крышки и поднимите ее, открывая доступ к зоне для проведения диагностики внутри прибора. (Рис. 2.2) Рис.
- Page 175 Диагностика производится под крышкой детектора синтетических рубинов, на отмеченной концентрическими окружностями площадке, в центре которой находится фотоприемник, а над ней расположен светодиодный источник излучения (рис. 2.3). Рис. 2.3 Зона для проведения диагностики внутри прибора Ознакомьтесь с приведенными далее инструкциями по проведению...
- Page 176 2.1 Диагностика отдельных драгоценных камней Убедитесь, что ширины отдельного драгоценного камня достаточно, чтобы полностью закрыть фотоприемник. Ширина камня должна быть примерно 3 мм. Высота отдельного драгоценного камня не должна превышать 6 мм, что позволит точно измерить длину создаваемого светодиодным источником ультрафиолетового...
- Page 177 Опустите светодиодный источник излучения с помощью рычага и зафиксируйте драгоценный камень на площадке фотоприемника (рис. 2.5). Рис. 2.5 Опустите светодиодный источник излучения с помощью рычага для закрепления драгоценного камня на фотоприемнике Закройте крышку и нажмите кнопку запуска диагностики. Во время процедуры кнопка будет мигать белым цветом. По завершении...
- Page 178 2.2 Диагностика камней, вставленных в украшения Убедитесь, что камень вставлен так, что видна его нижняя часть. Изнутри украшения должен быть четко виден сам камень и различим его цвет. Его не должны закрывать металлические элементы украшения или другие камни. (Рис. 2.6). Рис.
- Page 179 Кольцо должно располагаться в направляющей. Опустите светодиодный источник излучения с помощью рычага, чтобы зафиксировать камень на фотоприемнике (рис. 2.7). Рис. 2.7 Установите кольцо с открытым низом в направляющую на светодиодном источнике излучения и опустите его вниз, чтобы зафиксировать камень на фотоприемнике Если...
- Page 180 Закройте крышку и нажмите кнопку запуска диагностики. Во время процедуры кнопка будет мигать белым цветом. По завершении процедуры кнопка будет гореть белым цветом непрерывно, а результаты измерения отобразятся на шкале из 7 индикаторов. Результаты должны появиться через 2 секунды. Пояснение результатов теста приводится в Разделе 3 «Получение...
-
Page 181: Получение Результатов Теста На Детекторе
3. Получение результатов теста на детекторе синтетических рубинов Детектор синтетических рубинов измеряет уровень пропускания ультрафиолетового излучения камнем, а полученные результаты сообщаются в виде высокого или низкого уровня на шкале из 7 индикаторов в передней части прибора. После нажатия кнопки запуска диагностики, она будет мигать белым... - Page 182 Низкий уровень Первые 4 левых индикатора соответствуют диапазону низкого уровня пропускания, и, при регистрации результатов в этом диапазоне, эти 4 индикатора загораются синим цветом (рис. 3.2). High High Start Test UV Transmittance UV Transmittance Рис. 3.2 Низкий уровень Индикация низкого уровня пропускания синего цвета свидетельствует...
- Page 183 Высокий уровень Последние 3 индикатора соответствуют диапазону высокого уровня пропускания, и, при регистрации результатов в этом диапазоне, эти 3 индикатора загораются красным цветом (рис. 3.3). High High Start Test UV Transmittance UV Transmittance Рис. 3.3 Высокий уровень Индикация красного цвета соответствует высокому уровню пропускания...
-
Page 184: Синтетических Рубинов
4. Обзор индикаторов детектора синтетических рубинов В этой таблице приводится обзор функций и пояснения к работе кнопок и индикаторов детектора синтетических рубинов. Кнопка питания Описание Индикатор Функция Нажатие и Мигает синим Устройство включается и удержание кнопки сейчас начнется разогрев. при выключенном устройстве... - Page 185 Кнопка запуска диагностики Описание Индикатор Функция Готов к работе Горит синим Крышка прибора закрыта, прибор готов к работе, внутренний светодиодный источник излучения выключен. Примечание: Кнопка запуска диагностики не горит при открытой крышке. Выполняется Мигает Прибор выполняет процедура белым тестирование с включенным...
- Page 186 шкала из 7 индикаторов Описание Индикатор Функция Индикатор красного Горит Диагностика завершена. В цвета на шкале из 7 красным ее ходе было определено, индикаторов что тестируемый рубин обладает высокой способностью к пропусканию ультрафиолетового излучения. Есть большая вероятность, что это синтетический рубин, полученный...
-
Page 187: Уход За Детектором Синтетических Рубинов
Благодарим Вас за время, уделенное прочтению этого руководства по эксплуатации. Мы уверены, что полученная информация поможет Вам лучше понять принцип работы нового прибора. Компания Presidium также рекомендует зарегистрировать свою гарантию, отправив нам свой заполненный гарантийный талон, или зарегистрироваться на сайте http://www.presidium.com.sg/. - Page 188 Manual del usuario del Identificador de rubíes sintéticos Presidium (Versión en español)
- Page 189 Página I. Descargos, exclusiones y limitaciones de responsabilidad II. Acerca de este manual III. Acerca del Identificador de rubíes sintéticos Presidium IV. Contexto y desarrollo del Identificador de rubíes sintéticos Presidium V. Aviso importante 1. PRIMEROS PASOS con el Identificador de rubíes sintéticos 2.
-
Page 190: Descargos, Exclusiones Y Limitaciones De Responsabilidad
LEA Y TENGA EN CUENTA LOS TÉRMINOS Y CONDICIONES DE LA GARANTÍA DE PRESIDIUM tal y como se exponen en la tarjeta de garantía. La garantía que Presidium ofrece de sus dispositivos está sujeta a un uso correcto por parte de sus usuarios, de acuerdo con todos los términos y condiciones expuestos en el manual de usuario... -
Page 191: Acerca De Este Manual
Verneuil, también conocido como de fusión por llama. Investigado y desarrollado por Presidium, en colaboración con el reconocido Instituto de piedras preciosas y joyería de Tailandia (Gem and Jewelry Institute of Thailand;GIT) cerca del origen natural de los rubíes, este Identificador de rubíes sintéticos supone un importante avance en el desarrollo de... - Page 192 diferenciar rubíes conocidos, el Identificador de rubíes sintéticos mide la capacidad de transmisión de luz ultravioleta de los rubíes, ya que las investigaciones realizadas han demostrado que los rubíes creados mediante el proceso de Verneuil presentan una transparencia a la luz ultravioleta profunda más homogénea. El Identificador de rubíes sintéticos está...
- Page 193 El dispositivo se diseñó con los siguientes objetivos: • Ayudar a identificar rápidamente un tipo de rubí sintético, el rubí creado mediante el proceso de Verneuil, entre rubíes conocidos • Ayudar a permitir la identificación de un rubí natural mediante el descarte de un tipo de rubí...
- Page 194 anillo, con un diámetro interior superior a los 14,88 mm (tamaño 6 de anillo italiano) El Identificador de rubíes sintéticos incorpora las siguientes características: • La primera y única tecnología del mundo que mide la capacidad de transmisión de luz ultravioleta de una gema con luz ultravioleta de onda profunda para ayudar a identificar los rubíes creados mediante el proceso de Verneuil •...
- Page 195 Qué incluye la caja: • Identificador de rubíes sintéticos Presidium • Funda protectora de transporte con bolsillo interior para accesorios • Cable USB • Adaptador de corriente universal Presidium • Completo manual de usuario en 7 idiomas • Tarjeta de garantía...
- Page 196 Ilustración A Identificador de rubíes sintéticos Presidium Características/funciones (Ilustración A) 1. Botón de encendido (encendido/apagado, indicador de batería baja e indicador de conectividad Bluetooth) 2. Tapa 3. Plataforma base con marcas concéntricas 4. Fotodetector 5. Fuente de luz LED interior con guía de anillo grabada en la parte superior 6.
-
Page 197: Contexto Y Desarrollo Del Identificador De Rubíes Sintéticos Presidium
IV. Contexto y desarrollo del Identificador de rubíes sintéticos Presidium El mundo de las gemas de colores es un mundo brillante pero también ciertamente místico. A diferencia de los diamantes, que cuentan con un sistema de clasificación establecido que valora el diamante según el color, la talla y la claridad, las gemas de colores... - Page 198 Con estos conocimientos en su poder, Presidium se marcó el objetivo de investigar más sobre los rubíes sintéticos y desarrollar un dispositivo que pudiera ayudar a identificar rápidamente este tipo de rubíes.
-
Page 199: Aviso Importante
Si el dispositivo no funciona correctamente, póngase en contacto con el Servicio de atención al cliente escribiendo a service@presidium.com.sg o: Presidium Instruments Pte Ltd Unit 7, 207 Henderson Road Singapore 159550 Attn: Customer Service Executive... -
Page 200: Primeros Pasos Con El Identificador De Rubíes Sintéticos
El Identificador de rubíes sintético puede alimentarse mediante pilas o con el cable USB conectado al adaptador de corriente universal Presidium que se incluyen con el producto, o conectado a una fuente de alimentación externa. Si se usan pilas, puede localizar el compartimiento de las pilas en la parte inferior de la unidad. - Page 201 USB incluido al puerto situado en la parte trasera del dispositivo (Ilustración 1.2) y el otro extremo al adaptador de corriente universal Presidium incluido, para realizar la conexión a una toma de corriente externa. Ilustración 1.2 Conecte el cable micro USB al puerto situado en la parte trasera del dispositivo También puede conectar el otro extremo del cable USB directamente...
- Page 202 1.2 Encendido del dispositivo Para encender el Analizador de diamantes sintéticos, mantenga pulsado el botón de encendido y apagado situado en la parte frontal de la unidad. Una luz azul parpadeará durante aproximadamente 20 segundos para permitir que el producto se caliente. (Ilustración 1.3). Cuando la luz azul deje de parpadear y se mantenga estable, el dispositivo estará...
- Page 203 1.3 Apagado del dispositivo y apagado automático de ahorro de energía Para apagar el Identificador de rubíes sintéticos, mantenga pulsado el botón de encendido y apagado durante unos dos segundos, hasta que la luz se apague. Para garantizar que el Identificador de rubíes sintéticos ahorra energía, la unidad se apagará...
- Page 204 Se recomienda extraer las pilas si el dispositivo va a permanecer guardado durante un periodo de tiempo prolongado. Si se utiliza el adaptador universal de corriente Presidium con el cable USB, no tendrá que extraer las pilas. 1.5 Descripción general del botón de encendido y apagado Si desea obtener una descripción completa del botón de encendido y...
-
Page 205: Realización De Una Prueba Con El Identificador De Rubíes Sintéticos
Una de las formas que pueden usarse para comprobarlo es utilizar el Probador de gemas Presidium/Dispositivo de estimación de piedras de color, que realiza pruebas basándose en la propiedad de conductividad térmica de la gema. - Page 206 High Start Test UV Transmittance Ilustración 2.1 Pulse el botón “Iniciar prueba” para realizar una prueba Una vez que el dispositivo esté listo para realizar la prueba, utilice los agarres para dedos situados en el frontal de la tapa para elevarla y acceder al área de prueba interior (Ilustración 2.2).
- Page 207 La prueba se realiza bajo la tapa del Identificador de rubíes sintéticos, en el que el área de prueba está marcada por una plataforma base con círculos concéntricos, dotada de un fotodetector en el centro y una fuente de luz LED elevada saliente (Ilustración 2.3). Ilustración 2.3 Área de pruebas del interior del dispositivo Las siguientes instrucciones le guiarán durante la prueba de gemas sueltas y engastadas en joyería.
- Page 208 2.1 Para pruebas de gemas sueltas Asegúrese de que el ancho de la gema suelta sea lo suficientemente amplio como para cubrir el fotodetector. Debe tener aproximadamente 3 mm de ancho. La gema suelta no deberá superar los 6 mm de alto, para garantizar que la longitud de onda ultravioleta transmitida por la fuente de luz LED pueda medirse con precisión.
- Page 209 Ajuste la palanca para bajar la fuente de luz LED y fijar la gema en el lugar del fotodetector para realizar la prueba (Ilustración 2.5). Ilustración 2.5 Ajuste la fuente de luz LED hacia abajo para fijar la gema en el lugar del fotodetector Cierre la tapa y pulse el botón “Iniciar prueba”.
- Page 210 2.2 Para joyería o gemas engastadas Asegúrese de que la piedra esté colocada con la parte posterior abierta, lo que significa que puede ver una vista y color claros de la piedra cuando visualiza su parte posterior, y que no está oscurecida por el metal de la joyería ni por otras piedras (Ilustración 2.6).
- Page 211 Con el anillo colgado de la zona de guía de anillo, utilice la palanca para bajar la fuente de luz LED y fijar la piedra sobre el fotodetector (Ilustración 2.7). Ilustración 2.7 Coloque el anillo con parte posterior abierta en la guía de anillo sobre la fuente de luz LED, y empuje la fuente de luz LED hacia abajo para fijar la piedra contra el fotodetector Si la gema está...
- Page 212 El botón empezará a parpadear en color blanco mientras se efectúa la prueba. Cuando la prueba haya finalizado, el botón se iluminará en color blanco fijo y se mostrarán los resultados de la prueba en las siete luces indicadoras. Debería ver los resultados en un plazo de 2 segundos.
-
Page 213: Lectura De Los Resultados De La Prueba En Su Identificador De Rubíes Sintéticos
3. Lectura de los resultados de la prueba en su Identificador de rubíes sintéticos El Identificador de rubíes sintéticos mide la capacidad de transmisión ultravioleta de la piedra, y esta medición se expone a través de una lectura baja o alta mostrada a través de las siete barras luminosas indicadoras situadas en el frontal del dispositivo. - Page 214 Lectura baja Las primeras cuatro barras de la izquierda se encuentran dentro del rango Lectura baja, y si se registra alguna medición dentro de este rango, se iluminará una luz de color azul dentro de estas cuatro barras (Ilustración 3.2). High High Start Test...
- Page 215 Lectura alta Las últimas tres barras se encuentran dentro del rango Lectura alta, y si se registra alguna medición dentro de este rango, se iluminará una luz de color rojo dentro de estas tres barras (Ilustración 3.3). High High Start Test UV Transmittance UV Transmittance Ilustración 3.3 Lectura alta...
-
Page 216: Descripción General De Los Indicadores Del Identificador De Rubíes Sintéticos
4. Descripción general de los indicadores del Identificador de rubíes sintéticos En la siguiente tabla se resumen las funciones y representaciones de los botones y luces del Identificador de rubíes sintéticos. Botón de encendido y apagado Descripción Función El botón de Azul El dispositivo se está... - Page 217 Botón “Iniciar prueba” Descripción Función Listo para realizar Azul fijo La tapa del dispositivo está pruebas cerrada y lista para pruebas, con la fuente de luz LED interior desactivada. Nota: el botón “Iniciar prueba” no se encenderá mientras esté abierta la tapa del dispositivo.
- Page 218 Las siete luces indicadoras Descripción Función Barra de luz roja Rojo fijo La prueba ha finalizado y el en las siete luces rubí que se ha probado ha indicadoras registrado una alta capacidad de transmisión de luz ultravioleta, lo que indica que existen muchas posibilidades de que se trate de un rubí...
-
Page 219: Cuidados Del Identificador De Rubíes Sintéticos
Le agradecemos el tiempo que se ha tomado en leer el manual del usuario. Este documento le ayuda a entender mejor el funcionamiento de su compra reciente. Presidium le recomienda también que registre su garantía enviándonos por correo la tarjeta de garantía proporcionada o registrándose a través de Internet, en la dirección...
Need help?
Do you have a question about the Synthetic Ruby Identifier and is the answer not in the manual?
Questions and answers