
Related Manuals for PRESIDIUM Synthetic Ruby Identifier


Summary of Contents for PRESIDIUM Synthetic Ruby Identifier
-
Page 1: Table Of Contents
Ruby Identifer V. Important Notice 1. GETTING STARTED with your Synthetic Ruby Identifier 2. PERFORMING A TEST with your Synthetic Ruby Identifier 3. READING TEST RESULTS on your Synthetic Ruby Identifier 4. OVERVIEW OF INDICATORS on your Synthetic Ruby Identifier... -
Page 2: Disclaimers, Exclusions And Limitations Of Liability
Users are advised to check Presidium’s website from time to time http://www.presidium.com.sg/ Presidium shall not be responsible for any damage or loss resulting from the use of this product or handbook. -
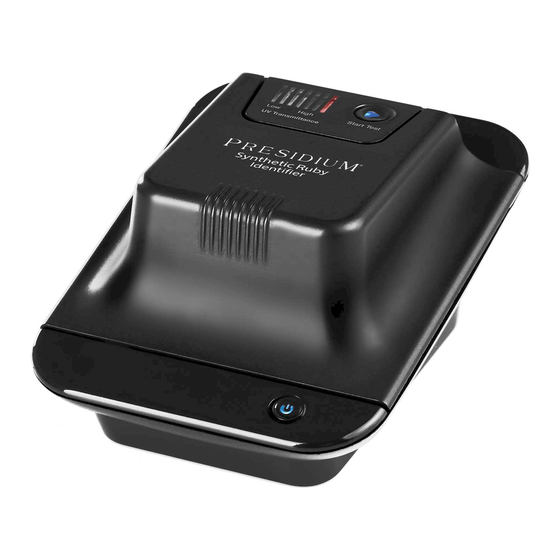
Page 3: About This Book
Presidium in collaboration with the renowned Gem and Jewelry Institute of Thailand (GIT) near the traditional source hub of rubies, the Synthetic Ruby Identifier is a breakthrough in the development of gemological instruments, as it is the world’s first and only tool, aside from expensive laboratory equipment, that identifies certain common synthetic rubies. - Page 4 The Synthetic Ruby Identifier features a deep-wave UV light that is activated to pass through the ruby towards the photo-detector on the base platform. Bars of coloured light on the front of the lid will provide an easy reading that indicates if the UV light transmittance ability of the tested ruby is high or low.
- Page 5 The capabilities of the Synthetic Ruby Identifier are as follows: • Help to identify most synthetic flame fusion rubies • Tests on rubies within a range in dimension from 3 mm in width and up to 6mm in height (approx. 0.1 to 6 carat size) •...
- Page 6 • UV-sensitive Photo-detector in the centre of base platform to detect the amount of light that passes through the stone The connectivity functions of the Synthetic Ruby Identifier include: • Exterior USB port at back of unit for connecting to external power source or computer •...
- Page 7 Fig.A Synthetic Ruby Identifier Unit Features/Functions (Fig.A) 1. Power button (On/Off, Low Battery Indicator and Bluetooth Connectivity Indicator) 2. Lid Base platform with concentric markings 4. Photo-detector 5. Interior LED Light Source with Ring Guide embossed on top 6. Light Source Lever to adjust Light Source 7.
-
Page 8: Background And Development Of Presidium Synthetic Ruby Identifer
With the knowledge of this, Presidium set out to work on researching more about synthetic rubies and developing a device that can aid in... -
Page 9: Important Notice
Working closely with researchers at GIT who readily shared their gemmological knowledge, testing trials for the Synthetic Ruby Identifier were also conducted by GIT for Presidium. V. Important notice • Keep the device dry. Precipitation and all types of liquids or moisture can contain minerals that will corrode electronic circuits. - Page 10 If the device is not working properly, kindly contact Presidium Customer Service at service@presidium.com.sg or: Presidium Instruments Pte Ltd Unit 7, 207 Henderson Road Singapore 159550 Attn: Customer Service Executive...
-
Page 11: Getting Started With Your Synthetic Ruby Identifier
Synthetic Ruby Identifier 1.1 Powering up your device The Synthetic Ruby Identifier can be powered either by the use of batteries or through the USB cable connected to the Presidium Universal Power Adaptor that are both included with your product, or to an external power source. - Page 12 You may also connect the other end of the USB cable directly to an external power source (e.g. computer, laptop, etc). It is recommended you use only the USB cable and the Presidium Universal Power Adaptor provided with your product.
- Page 13 1.2 Switching on your device To switch on your Synthetic Ruby Identifier, press and hold the Power button located at the front of the unit. A blue light will blink for approximately 20 seconds to allow the product to warm up. (Fig 1.3).
- Page 14 1.3 Switching off your device and Power-Saving Auto-Off To switch off your Synthetic Ruby Identifier, press and hold the Power button for approximately 2 seconds until the light goes off. To ensure that your Synthetic Ruby Identifier conserves power, the unit will automatically switch off 10 minutes after the last activity.
- Page 15 It is recommended that batteries should be removed when the device is expected to be stored for an extended period of time. Batteries do not have to be removed from the unit when the Presidium Power Universal Adaptor is used through the USB cable.
-
Page 16: Performing A Test With Your Synthetic Ruby Identifier
Once you know your stone is a ruby, you can proceed to use the Synthetic Ruby Identifier to check if it is a synthetic flame fusion ruby. The “Start Test” button located at the top right corner of the device indicates when the device is ready for testing and activates the interior LED light source to begin the identifying procedure. - Page 17 Once the device is ready for testing, use the finger grips on the front of the lid to lift the lid and access the interior testing area. (Fig 2.2) Fig.2.2 Lift the lid of the device using the finger grips on the front...
- Page 18 The testing is performed under the lid of the Synthetic Ruby Identifier where a testing area is marked by a concentric-circled base platform with a Photo-detector in the centre and a protruding overhead LED light source (Fig 2.3). Fig.2.3 The interior testing area inside the device The following instructions will guide you through testing loose gemstones and mounted jewelry.
- Page 19 2.1 For testing on loose gemstones Ensure your loose gemstone is wide enough to cover the Photo- detector. It should be approximately 3mm in width. Your loose gemstone should also not exceed 6mm in height to ensure that the UV wavelength transmitted by the LED light source can be accurately measured.
- Page 20 Always place the flattest face of the stone on the Photo-detector. To understand your test results, refer to Section 3 in this book – “Reading test results on your Synthetic Ruby Identifier”.
- Page 21 2.2 For mounted jewelry or gemstones Ensure that the stone is set with an open-back setting, meaning you can still see a clear view and colour of the stone when you view the back of it and it is not obscured by the jewelry metal or other stones. (Fig 2.6).
- Page 22 With the ring hung within the Ring Guide area, use the lever to lower the LED light source to secure the stone over the Photo-detector (Fig 2.7). Fig.2.7 Place open-back ring jewelry on the Ring Guide on the LED light source and push the LED light source down to secure the stone against the Photo-detector If your gemstone is mounted with open-back setting in other types of jewelry that cannot be placed over the Ring Guide, place the jewelry...
- Page 23 7 Indicator Lights. You should see your results within 2 seconds. To understand your test results, refer to Section 3 in this book – “Reading test results on your Synthetic Ruby Identifier”. 2.3 Important Notes about Performing a test •...
-
Page 24: Reading Test Results On Your Synthetic Ruby Identifier
3. Reading Test Results with your Synthetic Ruby Identifier The Synthetic Ruby Identifier measures the UV transmittance ability of the stone and this measurement is communicated as a low or high reading displayed through the 7 Indicator Light bars on the front of the device. - Page 25 Low Reading The first 4 bars from the left fall within the Low reading range and if any measurements within this range is recorded, a blue light will light up within these 4 bars (Fig 3.2). High High Start T est UV T ransmittance UV T ransmittance Fig.3.2 Low Reading...
- Page 26 The tested ruby is hence likely to be a synthetic flame fusion ruby. You can use the Synthetic Ruby Identifier to quickly sort through a parcel of ruby stones and identify which ones are synthetic flame...
-
Page 27: Overview Of Indicators On Your Synthetic Ruby Identifier
4. Overview of Indicators on your Synthetic Ruby Identifier The table below summarizes the functions and representations of the buttons and lights on the Synthetic Ruby Identifier device. Power Button Description Light Function Power Button is Blinking blue Device is being switched on pressed and held and will start warming up. - Page 28 Start Test Button Description Light Function Ready for testing Steady blue Device lid is closed and ready for testing with the interior LED light source switched off. Note: The Start Test button will not light up when the device lid is open. Testing is underway Blinking white Device is conducting the test...
-
Page 29: Taking Care Of Your Synthetic Ruby Identifier
5. Taking care of your Synthetic Ruby Identifier The Synthetic Ruby Identifier should be handled with care. Always cover it or place it securely in its custom carrying case when the device is not in use. Caution should be taken so as not to damage the device.
Need help?
Do you have a question about the Synthetic Ruby Identifier and is the answer not in the manual?
Questions and answers